Category Archives: Cooking and Recipes

Best Big Green Egg Accessories – Reviews and Tips for 200+ Accessories for your Big Green Egg

Are you an Egghead? Whether you’re a long-time owner of a Big Green Egg or a newbie, this article can help you. We’ll discuss which accessories are the best to buy for your BGE and why. Here’s a list of over 200 Big Green Egg accessories that will take your cooks to the next level. 


Top 10 Accessories for your Big Green Egg

There are 200+ recommended accessories for your Big Green Egg on this page, but here’s a quick ‘Top 10’ List to get your started.

Get these items first and you’ll be well on your way to success with your Big Green Egg.

1-EGGSPANDER
(Flexible Cooking System)

A Flexible Cooking System like the EGGspander will change the way you use your Big Green Egg because you can 

  • Cook High
  • Cook Low
  • Cook both Direct AND Indirect at the same time
  • And gain a world of flexibility.

Alternative to the Eggspander?

Did you know…
The Kamado Joe Divide and Conquer FCS fits BGE’s and is much less expensive option to utilize a flexible cooking system in your Egg.  

2-Kamado specific Cookbook

You need one that includes sections on ‘how to use a kamado’ so you can overcome the learning curve faster. Here are some great options.

  1. Smoke It Like a Pro by Eric Mitchell
  2. Hot Coals by Jereon Hazebroek
  3. The Kamado Smoker and Grill Cookbook by Chris Grove

BONUS: Eric Mitchell’s first “Smoke it Like a Pro” book has been so popular, he published a follow-up called “More BBQ & Grilling for the Big Green Egg.”

4. The Official “Big Green Egg Cookbook” by Big Green Egg
5. Ray Lampe’s “Big Green Egg Cookbook: Grill, Smoke, Bake & Roast

3-Hand Protection

This could be welding gloves or high heat rubber-style gloves. You’ll also want some good tongs and meat hooks but we’ll talk about those below. 

Your kamado will get HOT. You need hand protection!

This could be welding gloves or high heat rubber-style gloves. Here are a few to consider…

4-Good Remote Thermometer

As fun as it is to cook on the Big Green Egg nobody wants to sit by the fire all day. You want be with friends, drink a few brews, and relax without always wondering about the temps of your meats. Having a good remote thermometer allows you to do that. There are really only 2 brands to consider: ThermoPro or Maverick.

Having a good remote thermometer allows you to do that. The top two brands (in my opinion) ThermoPro or Maverick. 

Ones I personally own are the ThermoPro TP20 and the Maverick ET732.

5-Electric Charcoal Lighter

Stop with the blow torches and the tumbleweed, just get an electric charcoal lighter – it’s easier. End of story. You’ll thank me for this one. 

Kamado Joe makes a good electric lighter and so does Grill Dome:

6-Ash Basket 

Increase your airflow and get more from your lump. 

Only 1 brand to seriously consider here: Kick Ash and the classic option is the Kick Ash Basket

I added a demo video so you can see how it works…

7-Pizza Stone

Because you know you want to make pizzas in your Egg, right? Try one of these. The BGE version is hard to find now and there are so many options is crazy. For the value I’d go with the Kamado Joe versions…

Here’s a few to add to your shopping list:

And I highly recommend the cookbook “The Elements of Pizza” if you really want to learn how to make a great pie. 

8-Cast-iron Cookware.

Cast-iron + Big Green Egg = perfect match. 

A large dutch oven is a great start. As is a plancha pan or even a cast-iron griddle insert. 

Learn more about cast-iron under Cooking Surfaces below.

You’ll want to add these to your list…

  1. Kamado Joe Cast Iron Griddle
  2. Kamado Joe Cast Iron Grates
  3. Lodge Dutch Oven
  4. Lodge Plancha Pan

9-Quality Lump Charcoal

No matter what accessories you buy for your Big Green Egg or how well you manage your fire, if you don’t have quality lump charcoal to cook with, you’re setting yourself up for disappointment. There’s nothing like doing everything right and then having the food taste bad because the lump charcoal you used was made with poor quality wood or too much of a particularly strong wood (like hickory). I’d recommend you buy good quality lump charcoal that has a mix of hardwoods that work with all types of foods for your basic cooks and then buy smoking wood chips for particular flavor profiles you want to add in later (such as hickory for chicken, fruit woods for fish, etc). 

Lump Charcoal brands I like:

Smoking Wood Chunks to consider include:

10-Rotisserie for the BGE

There’s really only one to consider – The KJ-made “Jotisserie” which works great on a BGE Large or XL kamado. 

Here’s a demo vid so you can see the JoeTisserie ‘in action’ the Big Green Egg – MMM.

Obviously you’re gonna need some quality meat and plenty of friends and family to enjoy your BGE cooks with, but for now these 10 “Must Have” accessories are the basics that will get you fast-tracked for success with your Big Green Egg. Once you have these in your arsenal, then move on to the full list below. 


200+ Accessories for The Big Green Egg

Best COOKBOOKS for the Big Green Egg

What, you’re starting your list of Best Accessories for the Big Green Egg with cookbooks? 

What gives? Is a ‘cookbook’ even an accessory? In my book YES. Here’s why…

There IS a learning curve when it comes to kamado grill cooking on your Big Green Egg. And it’s a continuous learning process. 

Do yourself a favor and don’t try to figure it all out on your own – you’ll just end up burning a lot of food and getting frustrated.

But it doesn’t have to be that way. There are a number of good books out there that can help you master kamado cooking on your Big Green Egg and speed up your BGE Mastery learning curve.

Here are two of my favorites books – they provide some awesome kamado grill recipes as well as MANY helpful tips.

After you get Hot Coals and/or Smoke It Like a Pro, other great highly-rated cookbooks for your Big Green Egg. The sauce recipes alone in Big Bob Gibson’s book make it an incredible value!

If you must have only a “BGE” specific book, check these options out…

Best Cooking Surfaces for the Big Green Egg

1-Flexible Cooking System
(#1 MUST HAVE ITEM ON THIS PAGE)

This accessory will change the way you use your BGE and for that reason it is my #1 MUST HAVE Accessory for the Big Green Egg (or any kamado).

Let’s face it the Big Green Egg is the #1 most popular kamado on the market for a reason – the quality is awesome, the reputation is well-earned, and the Egghead community is the strongest of any kamado cooking group. BUT, if we’re honest with ourselves, BGE users shouldn’t be afraid to admit that even though Kamado Joe is a competitor KJ has made some great accessories over the years – perhaps the best of all time is their Flexible Cooking System called “The Divide and Conquer” system. Check out the theory behind the Divide and Conquer Flexible Cooking System…

A picture tells a 1,000 words in this case right?

You can use a Flexible Cooking System in your BGE and you’ll be able to…

  • Cook High
  • Cook Low
  • Cook both Direct AND Indirect at the same time
  • And gain a world of flexibility.

KJ’s Divide and Conquer system has been so successful that BGE made their own “Flexible Cooking System” and called it the EGGspander. 

The Big Green Egg EGGSpander Flexible Cooking System

The KJ Alternative?
If you can afford the Eggspander, go for it. You’ll be happy. However if you are looking for a quality alternative, the Kamado Joe Flexible Cooking System is a worthy option – not only is it less expensive to begin with but the cost of the various cooking surface inserts are less expensive as well. This can help your money go farther. 

Remember when you are converting KJ to BGE…

  • The KJ Classic = BGE Large
  • The KJ Big Joe = BGE XL. 

After you make a decision on which flexible cooking system to buy, next get some Half Moon Heat Deflectors so you can to cook both Direct and Indirect at the same time or just because they are easier to use than the traditional bulky BGE place setter (aka “The convEGGtor”)

Then get these additions to conveniently hold your drip pans and/or allow you to cook higher up in the dome – which is really useful for pizza cooking too so you can avoid burning the crust. 

Finally, for even more cooking space and another higher level add these…

2-Cast Iron Griddle

Now that you have a Flexible Cooking System in your Big Green Egg tou’re going to quickly learn that the standard stainless steel cooking grates just don’t cut it for certain foods.

You want to get a good sear on steaks? Cook scallops? Griddle up some bacon and eggs? Then you’ll want a cast-iron griddle. Sure you could use a cast-iron pan but these griddles fit into your BGE and give you some great flexibility too. 

Now if you can afford to get both the cast iron grates and the cast iron griddle for your BGE, you’ll be really happy, but if you have to prioritize then get the cast iron griddle first because it adds so many more options to your cooks.

I’ve got a few options for you to pick from. Personally I prefer using the half-moon Cast Iron Griddle made by Kamado Joe – it’s 1/3 of the price of the BGE version!

If for some reason you want a stainless steel griddle, you do have an option – Little Griddle makes a nice half-moon griddle specifically for the Kamado. It’s super easy to clean and has a convenient grease trough. 

3-Cast Iron Grates

Although the cast-iron griddle is basically a ‘must-have’ for your Big Green Egg, the grates are more of a nice-to-have item in my opinion. Don’t get me wrong. I have the grates and I use them all the time for burgers, the indirect portion of steak grills, and more. Remember, if you have to prioritize, get the griddle first, then the grates. 

When you’re ready for cast iron grates, consider these: (Again option #3 requires the KJ Flexible Cooking System but the beauty of it is you can use use the griddle for direct searing and then have the grates over a half-moon heat deflector for the indirect cook portion. Bonus!) 

4. Even More Cooking Surfaces

A Quality Grilling Basket

Do you need it?

I think so. Particularly when you get a basket with a removable handle it allows you to turn fish, veggies, and delicate items easily – saving time, hassle, AND protecting your food. 

A Good Dutch Oven

Even if you have the cast-iron griddle and grates you’ll benefit from a quality dutch oven. You can never have too much cast-iron right?

But seriously, the reason you’ll want a dutch oven is because by putting a dutch oven in your Big Green Egg (and learning how to use is safely) you can BAKE and FRY inside your BGE!

There’s really one one brand here to consider – The Lodge. 

PIZZA in the BIG GREEN EGG

One of my family and friends’ favorite things in a kamado is wood-fired pizzas. They’re fun to make, taste great, and easy to do. 

For this reason I consider a Pizza Stone to be a must-have accessory for your BGE. 

Here are a few options. The BGE stone is ridiculously expensive so do a bit of research about your options and you may be able to save some money – just make sure it’s a quality stone that won’t crack on you!

After you get the stone, then get one or more of these helpful pizza accessories. Don’t overlook the Elements of Pizza cookbook here too. 

Soapstone Surface

What the heck is soapstone and why do I need it? 

Soapstone is great for cooking more delicate items like fish and veggies that you don’t want to put in a basket or cedar plank but do want to have directly on a cooking surface. Soapstone is bacteria and stain-resistant and may give you fewer flareups even though the meat cooks in its own juices. People also like using this surface for ‘smash burgers’ too. 

We’ve gotta give credit to KJ again here because they make the best version of this item – another half-moon surface that fits the Flexible Cooking System. 

CEDAR PLANK COOKING

You can’t go wrong with cooking fish on cedar plank – but cedar can be used for veggies and meats too. 

BEST ROTISSERIE for the Big Green Egg

This is a Top 10 MUST HAVE Accessory for your Big Green Egg. 

While a few companies are making a rotisserie for the BGE, there’s really only one to consider here – the “JoeTisserie.” It’s proven to work in the BGE and work well. 

Get the JoeTisserie and turn your kamado into a rotisserie-style cooker and take your cooks to the next level. The JoeTisserie is not just for cooking chicken, you can also use it for some great Brazilian-style steak, pork, and more.

BONUS – add a grilling basket to the JoeTisserie and cook wings, veggies, and expand your game even further. 

Other Useful Cooking Pans and Drip Pans for the Big Green Egg

An assortment of useful cooking pans that sit on the grates and/or don’t necessarily attach to the racks. Item #1 (The Plancha) is super popular and highly useful. BTW all of these are “BGE” official brand. 

All About ASH BASKETS

What is an Ash Basket and why might you want one for your Big Green Egg?

An Ash Basket lets you simply lift out used charcoal and ash before every cook and it is reported to increase air flow around your lump charcoal in your Egg.

When you use an ash basket you can dispose of ashes and be ready for your next cook in seconds—no muss, no fuss. Just lift the ash basket out and give it a few shakes in your grill or over a trash can (make sure the fire is completely out!), then set the ash basket back in place, add some fresh charcoal, and you’re ready to go in seconds.

Spaces between the ash basket’s rings allow the small particles to fall through when you shake the ashes out. You can start each cook with an ideal fuel load, whether you’re searing steaks or going low and slow. You get easier starts and more even burning for ultimate temperature control. 

The most popular choice, by far, in ash baskets for the BGE is the Kick Ash Basket.

Don’t overthink this one and get a lesser brand that’s gonna be lesser quality. You’ll use this in every cook and you’ll want it to hold up over time. Get the Kick Ash and be done with it. 

Don’t Forget the ASH TOOLS too.

Temperature Controls, Thermometers, & Remote Temp Probes for the Big Green Egg

EGG Genius (Remote Temp Controls)

Most Eggheads will agree that kamado cooking is an art, not a science, however if you want to get pinpoint accuracy with your cooks the EGG Genius may be for you. 

BGE says “The EGG Genius effortlessly controls the temperature of your EGG through your smartphone, tablet or computer. Remotely manage and monitor cooking temperatures for worry-free cooking, monitor the temperature of your food, view graphs of your cooks … and even receive alerts when your cook is finished or when the EGG temperature is too high or low.” Can you say, Wow?

Remote Probe Thermometer

As I mentioned in the Top 10 List, a good remote thermometer with remote probes that won’t break the bank is a must have item. If you can afford an Egg Genius then you won’t need these, but if the Genius is out of your budget or you want to have more manual control of the ‘art’ of kamado cooking (but with just a little help) then get one of these options. 

Other Thermometers

You’ll need a quality instant thermometer as well as a “Candy” thermometer if you want to monitor frying oils, etc. And don’t overlook the Temperature “Gun” for checking surface temps accurately on your grill cooking surfaces and so much more (I use it all the time).

Best Lump Charcoal, Fire Starters, and Smoking Wood for your Big Green Egg

Quality Lump Charcoal

You wouldn’t drive a BMW on junk tires would you? Then why are you using crappy lump in your Big Green Egg?

Now I know there are a lot of charcoal options out there when it comes to kamado grilling and there’s even a list of quality options on the Naked Whiz Database, but for my money, I believe in the Kamado Joe Lump Charcoal brand – specifically the Big Block XL version. Why? Because not only is the bag filled with really big lumps of charcoal, but even more importantly, the type of wood used is a combination of various hardwoods so you get a great flavor but not an overpowering flavor. (If you’ve ever used lump charcoal that is primarily made with hickory then you know what I mean). The KJ-Char is great for kamado grill cooking in your Big Green Egg because you can use it for all types of food – from pizza, to chicken, to beefs, to pork, and fish. It works for all of it and it compliments it all well. Using KJ-Char as your base also gives you the flexibility to then add your own wood chips to add additional specific flavors (cherry, pecan, apple, etc) depending on what you’re cooking.

Here are some options to consider…

Helpful Dad’s Tip:

Walmart also has some good buys on charcoal – this includes 20-lb Royal Oak for around $15-20/bag and a new line called Western which is only $10 for a 30-lb bag! Both are pretty good options in my book. 

Smoking Wood Chips

I’m sure you already know that your Big Green Egg is a powerhouse of a smoker – capable of both hot and cold smoking. While a quality lump will give you great flavor to begin with, if you want to impart true ‘smoke’ flavor into your meats you’re gonna need quality smoking wood too. Consider these options…

As an alternative to using chips or chucks, many BGE owners like the simplicity and control of ‘maze’ style smokers that use concentrated wood chips. A-Maze-N is the brand you want for this option. You can get the full maze or just a single tube. Then you’ll need the pellets too (see below).

Here are just a few examples of the smoking pellets you can use in the A-Maze-N for your Big Green Egg. There are tons to choose from.

Fire Starter Alternatives.

If you don’t want to use the Electric Fire Starter I recommended above, then consider these other options to light your Big Green Egg…

Knives, Cutting Boards, Tools, Tongs, Claws, and More

All of these are nice to have accessories for your Big Green Egg. 

Lets Start with KNIVES

If you can’t afford to get a set or don’t want one, then focus on getting a quality chef’s knife, a Filet/Boning Knife, A Brisket Slicing Style knife, along with some nice steak knives for your guests to use. Brands I mentioned before  were Wustof, Henkels, Shun, Global, Cutco, and Rapala. 

Here are the knives I recommended above along with a few more worthy ones. Also, note the knife accessories at the end, including no-cut gloves and some sharpeners. 

Carving, Cutting, and Serving Boards

Tongs, BBQ Sets, Meat Hooks & Claws, Rib Racks, Grate Grippers & Cleaners, and More

TONGS 

I prefer relatively cheap, metal-tips tongs with flanges that grasp food easier. Steer clear of anything is rubber, plastic, or silicone on the tip to avoid sticking to the grill. I also like a variety of shorter (8-9 inch) and longer (up to 16 inch) for different uses. You can never have too many tongs!

BBQ SETS 

These BBQ Sets make great gifts and (with the exception of the BGE official set) all of them are 4+ star rated on Amazon with 100+ reviews. 

Spatulas & Fish Flippers

I like these spatulas because most of them are either long-handled or else have a wide flipper which makes them easier to use on the Big Green Egg. 

Claws and Meat Hooks for Big Green Egg

Again I keep it pretty simple for this category – I want inexpensive but that does the trick. 

RIB Racks and Smoking Meat Hooks

A few quality options to consider for rib racks and smoking meat hanging hooks for your kamado. The first two are the BGE Official ones, followed by numerous quality alternatives. 

Wing Racks, Beer Can Chicken, and Turkey Roasters

Burger Presses and Grill Presses

Grate Grippers & Cleaners

If you need a replacement on your grill grate grippers for your Big Green Egg, here are a few options. The BGE official are listed first, followed by after-market brands.

Grill Mats

Whether you are looking for a grill mat to sit under your Big Green Egg and protect the ground or sit inside on the grates, we have a few to recommend…

Mops, Basting Brushes, and Meat Injectors

Custom Tables for your Big Green Egg

If you’re ready to fly beyond the next, here are a few ideas to get your started on deciding which type of custom table you want for your Big Green Egg. These are all from Amazon, but Etsy is another good spot to check too. Prices vary widely depending on the type of material (wood, plastic, stainless steel), whether you want drawers, how wide/long, granite inserts, etc, etc. 

Heavy Duty Covers for Big Green Egg

Personally I like keeping my Egg under a cover – especially since I moved from the nest to a custom wood table. Here’s a few to consider – just be sure to measure the dimensions of your table and give a little room to play. I’ve purchased both of these Classic Accessories covers and they’ve held up well. If you have a large island like me, the final option is a winner…

Big Green Egg Aprons and other Swag

Did We Miss Anything?

If there is an accessory for the Big Green Egg that we’ve overlooked, be sure to let us know. Or if YOU have a favorite accessory you want to recommend, tell us about it in the comments below. 

Enough reading – let’s start cooking!

What to Read Next?

    Anthony Bourdain Books – The Best of Bourdain Part 2

    Are you a fan of Anthony Bourdain? Like me, I’m sure you’re sad that Tony is no longer with us, but rather than dwell on the negative, let’s not forget that he left a lasting legacy for us – part of that legacy are the many books Tony wrote. And what a life lesson those books taught us! Recall that Anthony was just a little known chef in his early 40’s who was often on the skids until he a tongue-in-cheek article he wrote for The New Yorker found unexpected success and quickly morphed into his first book “Kitchen Confidential” – the title that skyrocketed him to fame. In this article, we’ll talk about that book and others he wrote so you can build your library with some must-have Anthony Bourdain books.

    Pin-Friendly Image | Share This Article

    Bourdain’s Best-Selling Books

    Let’s start with the four books by Anthony Bourdain that are basically must-own titles for any of his fans of the show. If you love Tony for his tell it like it is, no apology style, and you want to enjoy some of his most classic stories, the start with these books…

    Check out Anthony Bourdain in the early days

    Any list of Anthony Bourdain’s best books has to start with this book – it’s the title that effectively propelled Tony to stardom and it’s an all-time classic in the ‘chef reveals his secrets’ category.

    This is the book that warned us ‘don’t eat fish on Monday,’ that taught us the inside scoop on sneaky tricks by penny pinching restaurateurs, and gave us our first glimpse into Tony’s (sometimes scary, often hilarious) life story and outlook on life.

    If you’re building a library of Anthony Bourdain books, then Kitchen Confidential is your #1 first buy – don’t wait, get it now!


    See it on Amazon

    Go behind the scenes of Anthony Bourdain’s first book – listen to what Tony had to say about the New Yorker article that first made him famous….

    A Cook’s Tour is perhaps Tony’s 2nd most popular book.

    It was written around the time he starred in a TV show of the same name in the early 2000’s on The Food Network. It’s basically an account of his world travels to Portugal, France, Vietnam, Russia, Morocco, Japan, Cambodia, Mexico, Spain, and the famous restaurant French Laundry in Napa Valley.

    This is classic Tony – in addition to introducing you to the local food and culture, you get his humorous take on each of the locations as he tries to answer the question “What would make the perfect meal?”


    See it on Amazon

    Tony in his first TV series.
    Tony in his first TV series.

    The most recent of Tony’s books, Medium Raw is actually a long-overdue ‘sequel’ to his original book Kitchen Confidential. It became an instant NY Times Best Seller.

    Fans of Tony who want to see him at his most personal, will love this book because it’s basically a memoir of his recent years, his rise to fame, his thoughts on other TV show ‘chefs’ (and he uses that word loosely when describing some of his rivals), and more.

    It’s a no-holds barred, adults-only, put the kids to bed and enjoy kind of book.


    See it on Amazon

    Personally The Nasty Bits is one of my favorite Anthony Bourdain books. I’m not sure why it’s often overlooked because this title features so much of that hilarious ‘Hardcore Tony’ that so many fans love. If you like that style of Anthony Bourdain, then you’ll enjoy this book.

    What’s here is a collection of 30+ essays in classic Bourdain-style on topics from from behind-the-scenes in restaurants, to “Tony Rants” about places and people he doesn’t like, to some inside scoop on his passions, and more.

    The Nasty Bits is fast-paced, funny, and really hard to put down!


    See it on Amazon

    Who knew essays could be so funny?

    Anthony Bourdain Books – Other Popular Titles

    If you’re looking for cookbooks by Anthony Bourdain or you were a big fan of his popular No Reservations Show, check out these titles.

    Cookbook

    Anthony Bourdain’s Les Halles Cookbook: Strategies, Recipes, and Techniques of Classic Bistro Cooking

    Cookbook

    Appetites: A Cookbook

    Cool Picture Scrapbook!

    No Reservations: Around the World on an Empty Stomach

    Anthony Bourdain Books – Titles You May Not Know?

    There was more to Tony than just his funny quips about traveling around the world. Did you know he also enjoyed making graphic novels? Or that he wrote a couple culinary mysteries? Or that he even penned a what-if historical book?

    See – there’s more to Tony than you knew!

    Intrigued?

    Then check out these Anthony Bourdain books too…

    Graphic Novel
    Available October, 2018

    Best-selling Graphic Novel

    CIA Murder Mystery

    Food, Crime, & Mayhem

    Mob Crime Mystery

    The real cause of Typhoid?

    Anthony Bourdain – Advice for writers

    Are you an aspiring writer? Check out some of Tony’s advice for wanna be authors and producers…

    Ichi-go Ichi-e, Tony

    Pin-Friendly Image | Share This

    What Now?

    If you’re striving to live a legacy life like Tony did, follow our blog and let’s stay in touch. If you’re on Facebook, accept my personal invitation to join The Legacy Life Facebook Group too. Be sure to share some of the funny stories and memorable quotes you picked up by reading all of Anthony Bourdain’s books!


    Yucatan Shrimp Recipe a la Doc Ford’s in Fort Myers, Fl – 2 Versions

    Yucatan Shrimp Recipe – 2 Versions

    If you’ve ever been to Sanibel, Captiva, or Fort Myers, Florida it’s likely you’ve heard of Doc Ford’s Rum Bar (and hopefully you’ve been there). If you have, then for sure you have had their signature dish – Yucatan Shrimp. This peel-n-eat shrimp appetizer is hands down awesome. It’s spicy, it’s addictive, it’s messy, and it’s oh-so-good. In the video I’ll show you how we make Doc Ford’s Yucatan Shrimp recipe at home. It’s really easy and you can do it too. In this article I’ll give you the traditional recipe (shell-on) and which I made for about a decade.

    As a bonus, I’ll also give you my NEW version of Yucatan Shrimp which I’ve been using the last couple years (HEAD-on, but no shells). Why might you want to have shrimp with the heads on but no body shells? So you can suck on the heads and get an amazing mouthful of flavor! In addition, all the ‘Yucatan’ spices will be on the shrimp body and not the shells so the shrimp will be more flavorful. And best of all it’s less messy because you don’t have to peel anything at the table.

    That said, both versions are outstanding so Enjoy!


    Version 1: Doc Ford’s Yucatan Shrimp Recipe – Traditional, Shells-On/No Heads

    To wet your appetite check out this pic I snapped from the first time I had Yucatan Shrimp at Doc Ford’s marina in Fort Myers…

    Doc Ford's Yucatan Shrimp Recipe
    Doc Ford’s Yucatan Shrimp at the Fort Myers marina

    Yucatan Shrimp Recipe Ingredients List:

    • 8 tablespoons unsalted butter
    • 1-2 Large cloves of Garlic (minced)
    • Juice of two large limes
    • 1-2 tablespoon Sambal Oelek Chili Sauce (or substitute Siracha in a pinch)
    • 1-2 pound large, fresh, shell-on shrimp without heads
    • 2-4 tablespoons chopped cilantro.
    • Kosher salt and freshly ground black pepper to taste
    • 1 loaf crusty bread

    Step-by-Step Directions to make Yucatan Shrimp at home

    1. In a small saucepan melt **2** tablespoons of butter over low heat.
    2. Add the garlic and cook, stirring for 2 minutes.
    3. Add remaining **6** tablespoons butter to saucepan. When it melts, stir in the lime juice, chili sauce, salt and pepper, then turn off the heat. Well done – you’ve just made the sauce for Yucatan Shrimp! Now let the sauce rest while you cook the shrimp.
    4. Meanwhile, bring a large pot of well-salted water to a boil.
    5. Add the unpeeled shrimp and cook for 2 minutes (or until they are just firm and pink). Important: Do not overcook the shrimp — as soon as they are pink get the shrimp out because they will keep cooking a bit in the sauce while on your plate.
    6. Drain the shrimp in a colander and shake over the sink to remove excess moisture.
    7. In a large bowl, toss the shrimp and Yucatan sauce mix together.
    8. Plate the shrimp and be sure to put plenty of sauce in the bowls.
    9. Serve with crusty bread (lots of it) for dipping.

    Congratulations, you’ve just made Doc Ford’s Yucatan Shrimp at home!

    Doc Ford's Yucatan Shrimp Recipe

    Serves 4 very happy people – just be sure to give them lots of napkins!

    Source: recipe adapted from Doc Ford’s Rum Bar of Fort Myers, FL


    Yucatan Shrimp Recipe Video


    Version 2 – Yucatan Shrimp HEADs On, but no shells on body

    The ingredients are the same but for the shrimp – in this case you want shrimp with the HEADS on. They will come with the shells on the body too, but we’ll be taking those off. Additionally, this is a one pan dish so that means less clean up later!

    Yucatan Shrimp Recipe Ingredients List:

    • 8 tablespoons unsalted butter
    • 1-2 Large cloves of Garlic (minced)
    • Juice of two large limes
    • 1-2 tablespoon Sambal Oelek Chili Sauce (or substitute Siracha in a pinch)
    • 1-2 pound large, fresh, unpeeled Shrimp with HEADS on
    • 2-4 tablespoons chopped cilantro.
    • Kosher salt and freshly ground black pepper to taste
    • 1 loaf crusty bread

    Step-by-Step Directions to make Yucatan Shrimp at home

    1. Peel the shrimp but leave the heads on.
    2. In a large frying pan melt **2** tablespoons of butter over low heat.
    3. Add the garlic and cook, stirring for 2 minutes.
    4. Add remaining **6** tablespoons butter to fry pan. When it melts, stir in the lime juice, chili sauce, salt and pepper and let the flavors marry together for a minute or two.
    5. Add the shrimp with the heads on to the frying pan that has the sauce still in it and cook for 1-2 minutes until the side that’s down turns pink. Then flip the shrimp and cook for 1-2 minutes until the entire shrimp is pink.
    6. Serve the shrimp WITH ALL THE SAUCE in a large wide bowl that allows for the shrimp to be spread out AND allows the buttery sauce to be accessible for dipping.
    7. Serve with crusty bread (lots of it) for dipping.

    Here’s an example of cooking this version with the heads-on shrimp…

    As you can see the bodies of the shrimp are absorbing all that buttery goodness and the heads are going to produce an amazing flavor bomb when you suck on the heads before you eat the shrimp body. (Note – it should go without saying that you do not EAT the heads, you just suck out the juices and then you throw away the heads just like the tails).

    This version is far less messier at the table and in my opinion tastier too!


    Want to know more about Doc Ford’s?

    Doc Ford's Marina Fort Myers
    View from the Marina at Doc Fords in Fort Myers, Fl

    Here’s a link to Doc Ford’s website: Doc Ford’s Rum Bar

    They have locations in Fort Myers, Sanibel, and Captiva, Florida. My personal favorite location is Fort Myers because it’s right on the water.


    Did you enjoy this article?

    Check out these reads next…

      CinnaBUTTER Coffee Recipe – Tasty AND Good for You? Oh Yeah

      CinnaBUTTER Coffee  – Wake Up to a better cup

      Tired of the same old K-cups? Why not give yourself something to look forward to with your morning cup of Joe? Even better, how about a cup of coffee that not only tastes great but is also healthy for you AND won’t break your fasting routine? If this sounds interesting to you then I’ve got another practical solution for you to try – I call it the CinnaBUTTER Coffee Cup.

      Cinnamon Coffee

      I’ll give you two versions of the CinnaBUTTER Coffee Cup to try – the super simple, super fast, anyone-can-do-it version and the Pimp My Cup AwesomeR version.

      BONUS: Add CinnaBUTTER Coffee to your AM Ritual to take your morning routine to new heights!


      CinnaBUTTER Coffee Cup Recipe

      If you just want the recipe without all the details, here it is, however, if you want to know more about why it’s healthy, how it relates to fasting, and get some tips for taking this coffee and more to the next level, keep reading.

      CinnaBUTTER Coffee Cup Super Simple Recipe

      1. Put a ½ Tablespoon of Grassfed Butter in the bottom of your coffee mug
      2. Brew your favorite cup of coffee into the mug that has the butter so it melts the butter as it pours into it.
      3. Sprinkle some cinnamon on the top.
      4. Stir
      5. Enjoy

      You can use your regular K-Cup for this version of the recipe or any other regular coffee that you normally brew. The goal of the super simple CinnaBUTTER Coffee Cup recipe is just to introduce the idea to you and kick up your regular cup a notch with flavor while also allowing you to experience the potential health benefits of this coffee. This is a speedy way to enjoy the CinnaBUTTER Coffee Cup for those in a rush – you’ll get 75% of the overall benefits from using this method and anyone can do it.

      How long does it take?
      How fast can you cut the butter and sprinkle the cinnamon? It adds about 30 seconds to your normal routine.

      What about my cream and sugar?
      I encourage you to at least try the CinnaBUTTER Coffee Cup without any additional cream and sugar. The flavor is already there so you shouldn’t need to add anything to it. Also if you add cream on top of butter it will end up breaking your fast. And if you add sugar, you’ll really spike your blood sugar. Add them if you must and you’ll enjoy the flavor but try to work yourself towards the non-additive version so you can get the health benefits too.


      CinnaBUTTER Coffee Cup – Pimp My Cup AwesomeR Recipe

      Cinnamon Coffee
      1. Put a ½ Tablespoon of Organic Grass-fed Butter in the bottom of your mug.
      2. Grind fresh coffee beans.
        • Simple: use a motorized coffee/spice grinder.
        • Advanced: practice mindfulness and use a ceramic burr-grinder for the freshest possible taste.
      3. Brew your coffee with a French Press or an Aeropress (my choice) – pressing it into the mug that has the butter.
      4. Sprinkle organic cinnamon onto the top.
      5. Stir with an organic cinnamon stick.
      6. Smell the amazing aroma.
      7. Enjoy.

      For the Pimp My Cup AwesomeR version of the CinnaBUTTER Coffee Cup we’re moving beyond instant coffee, K-Cups, or even pre-ground beans. Here we want only the freshest beans, we want to brew them with a French Press or an Aeropress (see below), we’re using organic grass-fed butter, organic cinnamon, and we’re adding an organic cinnamon stick into the mug at the end too. The goal here is to get the best possible experience. We’re being mindful when we use our ingredients (thus the hand-crank ceramic burr grinder and that use-anywhere Aeropress). And we’re using only the best ingredients. Our goal is taking time to turn the simple into the extraordinary vs. rushing through life.

      OMG, How Long Does All This Take?
      Don’t be afraid of this method from a time standpoint. It’s not like it takes forever. If you use the motorized spice grinder it adds about 30 seconds total to the process. If you go the hand grinder that will add a good minute. The French Press or Aeropress adds another 2-3 minutes. So what’s the total additional time? Let’s call it 5 minutes. Is 5 minutes of additional time worth it to get the full experience of the CinnaBUTTER Coffee Cup Pimp My Cup AwesomeR experience? I think so, but I encourage YOU to give it a try for yourself and let me know.


      CinnaBUTTER Coffee Cup Tools of the Trade

      This section gives you some tips on what I use to make my CinnaBUTTER Coffee cups. Where available I’m including some Amazon affiliate links – remember I only recommend products I actually use myself and to learn more see my Trust Guarantee. Pick these up on Amazon or find them at your local store. Enjoy…

      1. Favorite Butter – I’ve been using Vital Farms grass fed, pasture-raised butter and KerryGold Irish Butter. Use whatever version you prefer but move beyond the run-of-the-mill butter because a lot of your flavor will come from the butter so don’t skimp on this important ingredient.
      2. Favorite Coffee – Lots of options here. Try to expand your horizons a bit. Yes, you can use your K-Cups but trust me when I say that there is a difference between K-Cups and using coffee grounds. Right now my favorite beans are Sprouts Mountain Gold – it’s bold, rich, and even has hints of chocolate in it. I also like using Organic Colombian Coffee beans as well.
        • Did you know most places that sell coffee beans have a grinder that you can use for free? Try it, because even if you don’t grind at home, you’ll get a better flavor and aroma by using coffee grounds vs K-Cups, etc.
      3. Coffee Bean Grinders: The reason to grind at home is to experience the freshest coffee aromas and flavors. Did you know that coffee beans lose their freshness just a few hours after grinding? If that’s true then you’ll want to grind at home. Now if you really want to blow your mind with aroma and incredible fresh flavor try the hand-grinding – it takes a minute or two but its nice. That said, if you are not ready to go there just yet, then at least use a coffee/spice grinder — you’ll get 80% of the benefits of fresh grounds. Here’s what I use:
      4. Aeropress: This is a take-anywhere way to make your own fresh coffee in under 5 minutes with just coffee grounds and hot water. I have another article about the Aeropress, there’s tons more online, and there’s even a Wikipedia page for Aeropress. The bottom line about Aeropress is that it’s inexpensive compared to a french press and yet many believe it provides a better cup. Pick up one on Amazon using this link.
        • BTW, the pic doesn’t do it justice – check out this video too…
      5. Cinnamon: Lots of options here. I’ve always been a fan of McCormick’s spices, but here are a few options. Find them on Amazon or your local grocer…
      6. Hot Water/Tea Kettle: If you are going to to the Aeropress route, you’ll need a way to heat hot water quickly. I love using an electric tea kettle – it’s fast, you can control the temp (Aeropress recommends 175-185 degree hot water), and easy to pour.

      Do you use something else besides these tools?
      If so, please share your tips with me.


      Why is the CinnaBUTTER Coffee Cup Healthy for you?

      Assuming you are not adding cream and sugar to the cup and that you are not using coffee with any artificial sweeteners, etc, then you should be able to benefit from the potential health benefits of this style of coffee. I say potential because I am not a doctor nor do I play one on TV. That being said I’m not the first to tout the benefits of adding healthy fats to your coffee or the pro’s of using cinnamon in your diet.

      I always encourage people to do their own research and if need be talk to your doc or nutritionist but in the meantime consider the following…Benefits of Healthy Fats like grass fed butter:
      1. Ecowatch: Why Grass Fed Butter is One of the Healthiest Fats on the Planet.
      2. Dr Axe: Benefits of Grass Fed Butter
      3. Paleo Hacks: How to use Grass Fed Butter
      4. ManyEats.com: Health Effects of Butter

      Benefits of adding Cinnamon to your diet:
      1. https://www.medicalnewstoday.com/articles/317207.php
      2. http://time.com/4751426/why-cinnamon-is-insanely-good-for-you/
      3. https://www.healthline.com/nutrition/10-proven-benefits-of-cinnamon

      What about my fasting? Will the CinnaBUTTER Coffee Cup break my fast?
      One of the best things about the CinnaBUTTER Coffee Cup (either version) is that it won’t break your fast AND it fits in great with an Intermittent Fasting routine. I’m a big fan of Intermittent Fasting and I have an article with lots of tips for that lifestyle.

      Intermittent Fasting
      Tips for Intermittent Fasting

      Using grass fed butter is great because not only do you get lots of flavor but you also get access to ‘good’ fats to use as an energy source and brain-food during your fasting stage. Can you say Double-Bonus? Remember there are no carbs in the butter or we don’t want to add any to your CinnaBUTTER Coffee Cup so we can stay in the fasting stage. But you do need energy and that butter provides a great way to bridge yourself to the end of your fasting period.

      For me, a single cup of CinnaBUTTER Coffee takes me all the way through to the end of my 16-hour fasting cycle.

      As for the cinnamon – again using it is for more than just flavor (although let’s not overlook the fact that cinnamon is great tasting and there was a famous Seinfeld skit from “The Dinner Party” episode about cinnamon too.

      What’s super important about cinnamon for our purposes is that cinnamon regulates blood sugar and while were in the fasting stage we want to ensure we’re using energy from fat not carbs so we can get all the benefits of the Intermittent Fasting routine. Cinnamon helps us to do that.

      Do you see the magic of the CinnaBUTTER Coffee Cup?
      To use the old ad line… it tastes great AND it’s less filling!


      CinnaBUTTER Coffee Cup – Give it a try

      OK, it’s time to stop reading and start brewing.

      Give the Cinnabun Coffee Cup a try and let me know what you think. I’m guessing you’ll find yourself happy you gave it a try.


      Want more Tips like this?

      Why I chose the Kamado Joe vs Big Green Egg – Reviews, Tips, 10 Best Accessories, and More

      In this article, I’ll detail why I chose the Kamado Joe,  specifically why I chose the Kamado Joe vs Big Green Egg, what my personal experience has been with the Kamado Joe, and provide some helpful Kamado Joe tips for new cooks.

      Updates – since this article was published there are been new developments, including the release of the Kamado Joe III which may well have just ended the debate between the Big Green Egg vs the Kamado Joe — see below for more!

      I. Kamado Joe – What is it?

      The Kamado Joe is the brand name of a line of ‘kamado-style’ ceramic grills. After dabbling in black, Kamado Joe’s are known by their now famous RED color and more importantly by the company’s trend-setting innovations for kamado cooking.

      Here’s what a Kamado Joe Classic II looks like. Note that trademark red color – it’s a thing of beauty, ain’t it?


      Kamado Joe

      II. What is a Kamado?

      For those who are new to kamado cooking, let’s take a step back and talk about what a kamado is. (For those that already know, skip ahead).

      What is a Kamado?
      There an excellent series of “Kamado 101” articles by a fellow named “Kamado Jim” and I’ll link to them in the references at the bottom of this page, but for now let’s refer to the simple definition on the Kamado Joe website

      A kamado is “an ancient, Asian-style grill…thick-walled cooker that imparts rich, smoky flavor to meats, fish, and vegetables.”

      And “relatively unchanged for centuries, air flows through the kamado grill’s ceramic body and out its vented dome, chunk charcoal comes to life as smoke and heat.”

      There are a LOT of kamado-style grill options on the market today. Check out this pic and see for yourself…


      Kamado Grill Choices

      III. Why did I buy a Kamado?

      I’m always on the lookout for ways to improve my cooking. My friends in the neighborhood joke about this because they claim that I rely more on technology than cooking ‘heart’ – ouch! Whether that’s true or not I can’t say, but I will admit that if there is a cooking gadget that I think can up my game, I’ll give it a try.

      For years I’d heard about the Big Green Egg but was averse to try because of the perceived learning curve and the expense of the product. But I did my research and finally took the plunge a couple years ago and I’m kicking myself that it took me so long!

      There is a difference in the flavor of the food when you cook over lump charcoal/wood. Can’t deny it, no disputing it, when you cook on a kamado you’ll taste it and it’s awesome.

      That said, there IS a learning curve to kamado cooking (and I’m still learning!) and it IS expensive to buy a kamado grill ($600-1000 will get you started depending on what brand you buy and how big you go). Also keep in mind you’re gonna want some accessories pretty early on as well – so do yourself a favor and remember this little piece of wisdom…

      Kamado Cooking is a LIFESTYLE – once you commit to it, you’ll never go back.

      IV. Kamado Joe vs Big Green Egg

      I’m not gonna lie – when I was first shopping for a kamado it was a pretty tough decision to choose the Kamado Joe vs the Big Green Egg.

      I did a lot of research (read: spreadsheets, shopping, forums, etc). I talked to a lot of people. I watched a lot of videos.

      Honestly, I don’t think you can go wrong with either the Big Green Egg or the Kamado Joe and since the time this article was first written I have since purchased a Big Green Egg as well (because you can never have too many grills, right?).

      As I mentioned above, in addition to the Kamado Joe and Big Green Egg there are certainly other options in the kamado world too – there are a lot of lower-end options and some higher one too but for me I narrowed it down to the Big Green Egg and the Kamado Joe pretty quickly based on my individual needs.

      To be honest, most of my friends have Big Green Eggs and they love them. As I said I too own a BGE and therefore I am not here to knock the Big Green Egg because it has a long history of success and tons of rabid fans who tout its awesomeness. Let’s face it, The Big Green Egg is the ‘It Girl’ of kamado’s, and it probably outsells all other kamados combined. Buy the Big Green Egg and you will probably be very happy.

      But for me, the Kamado Joe is still the best between the two and here’s why…

      Regarding the research, I’ll link to some threads in the reference area in the interest of time let me just summarize by saying that I chose the Kamado Joe over the Big Green Egg or other options because of the following THREE Reasons:

      1. Kamado Joe reputation – everything I read had it on par with the Big Green Egg in terms of capabilities and quality.
      2. Kamado Joe had more useful accessories that came standard with the purchase. Whereas with the Big Green Egg you had to buy a lot of these accessories at an added cost.
      3. During my shopping experiences the Kamado Joe just ‘felt right‘ when I got my hands on it.

      Additionally my Kamado Joe is more functional than the Big Green Egg “out of the box” and it’s hard to dispute that. This is because the Kamado Joe can do more ‘out of the box’ because of its design – the Kamado Joe comes with an internal cooking rack system called “The Divide and Conquer” system.

      Kamado Joe’s Divide and Conquer system allows you to cook BOTH direct and indirect at the same time, on varying levels. Here’s what that looks like…

      As you can see from the pic, with the Kamado Joe you can have different cooking zones elevations AND you can also use BOTH indirect and direct cooking at the same time.

      With the Big Green Egg (unless you modify the place-setter system by purchasing the Eggspander) your option is either direct OR indirect but not both – that’s HUGE!

      The additional flexibility of the Kamado Joe appealed to me and I can tell you that the Divide and Conquer system is not just a gimmick – it works and I DO use it quite frequently. Furthermore, there are tons of forum articles from Big Green Egg users who end up wanting to modify their eggs to retrofit them with the Kamado Joe Divide and Conquer system (see references below). Why retrofit when you can just by a kamado made for this? That kamado is the Kamado Joe.

      In addition, the Kamado Joe has numerous other useful accessories specifically designed for it. This is because the company specifically focuses on innovation. Accessories include their multiple grilling surface options (stainless steel, cast-iron grates, cast-iron griddle, soapstone, etc), the “Joe-tisserie” (a revolutionary rotisserie for the kamado), and more.

      Additionally, when I purchased my grill (2017) Kamado Joe was coming out with an updated line that featured an ‘easy-close’ lid – one of the things that’s important to know about kamados is they are heavy – I read numerous reports about the lid ‘slamming down’ on some kamado’s and causing cracks. Kamado Joe’s ‘air-lift’ hinge was designed to prevent that and this was another selling point for me.

      STOP THE PRESSES – THE DEBATE IS OVER!

      Kamado Joe has now introduced the Kamado Joe Classic III, the Big Joe III, and the Pro Joe and all of them feature another new innovation called the SlōRoller – an insert that works by distributing smoke and heat in rolling, recirculating waves.

      The SlōRoller helps to surround food in clouds of ‘delicious smoke’ while at the same time evenly distributing heat. Kamado Joe says this results in enhanced flavor and significantly reduced hot spots.

      Fewer Hot Spot? Enhanced Flavor? Sign me up!

      You can read our full review of the new Kamado Joe III here…


      With the release of the Kamado Joe III I personally believe the long-standing debate between the Big Green Egg vs Kamado Joe is finally over. In fact I wrote a new article about it and you can read it here…


      Big Green Egg vs Kamado Joe

      V. Kamado Joe Size Options & Kamado Joe III Walkaround Video

      The Kamado Joe comes in multiple size options:

      Check out this video from Kamado Joe’s John Setlzer with a great intro to the Kamado Joe III…

      Check latest prices for Kamado Joe III

      Kamado Joe Classic III

      Kamado Joe Classic III

      Kamado Joe Big Joe III


      Kamado Joe Joe Junior


      IMPORTANT TIP: Although the Big Joe gives you the most cooking space and it is truly awesome, just understand that not only is it the most upfront cost, but the accessories also cost more too. For most people, the standard size “Classic II” or the new Classic III will be the way to go – you’ll get the most accessory options to choose from as well.

      That being said, if you often cook for groups over 10 people, then you will want the Big Joe or even the new Pro Joe. Enjoy!

      VI. How is the Food on the Kamado Joe?

      Pizza – awesome. Chicken Wings – best ever. Beer Can Chicken – yummy. Fish – moist and tender. Steaks – out of this world flavor!

      Check it out.

      HD Pro Tip: Try a Ribeye Cap Steak on the Kamado Joe and you’ll thank me when you’re family says ‘best steak ever!”). BTW, Costco’s Meat Dept has USDA Prime Cap Steak – it’s expensive but it’s worth it.

      Cooking on kamados (and the Kamado Joe specifically) offers a variety (from cold smokes to 800-degree heat) that just can’t be beaten with any other cooking appliance I know. In addition, you can do really long cooks on them (think low and slow) to include even overnight cooking because the kamado holds a temperature so well and for so long.

      Sadly I also have an expensive, built-in Cal-Flame gas grill (when I put in a patio bar a few years ago) — unfortunately, because of the addition of the Kamado Joe I rarely use my beautiful grill for anything but making bacon (yes I turned a $4k grill into a giant griddle, and no that ROI on that wasn’t so great!) or for ‘must-be-quick’ cooks because kamados take a while to heat up. I also got rid of my Masterbuilt Smoker since the Kamado Joe replaced that too.

      I’ve got some great recipes books that have really helped me and I’ll link to them in the “Tips” section below.​

      VII. Kamado Joe Quick Tips

      A. Buy a Kamado “Manual.”

      You can’t run before you walk. There IS a learning curve to kamado cooking and you would be wise to buy one of the following two books because either of these will speed up your progress and have you mastering the KJ in no time. You just spent a grand on the KJ, chip in another $20-30 and get these books – you’ll learn a bunch AND pick up some great recipes too!

      B. Use Good Lump Charcoal.

      I’ve quickly learned that not every brand of lump charcoal is created equal. Don’t cook on JUNK charcoal when you can cook on quality LUMP charcoal – your food will thank you for it. Some of them are made with woods like hickory or mesquite that are so strong they don’t go with a wide variety of foods. I’ve tried a few brands I’ve found that you get what you pay for – quality brands of lump charcoal offer pieces that are are bigger, burn a long time, and have a flavor on the mild side because of the combo of woods used.

      Lump Charcoal brands I like:

      Smoking Wood Chunks to consider include:

      TIP: Personally I don’t mess around with charcoal chimneys or parafin fire starters. Instead I like electric fire starters. I’d recommend you one too and be done with it. Kamado Joe makes a good electric fire starter for a reasonable price.

      C. Give Yourself Time…literally!

      One downside of the Kamado Joe, like all kamado’s, is that it takes time to get it ready to cook – figure an hour to get heated, etc. and I’ve learned to give myself an extra 15 minutes if I’m trying to ‘time up’ with other foods just to be safe.

      D. Cleaning is Easy.

      Kamado Joe (like most kamado’s) is pretty much self-cleaning (oh yeah!).

      That said, a once-year full clean is helpful as well. Here’s a youtube video from Kamado Joe on the topic.

      E. You will want a Cover.

      If you’re installing the KJ in an island, be sure to check out my full accessory list for tips on custom tables or island covers, but if you’re keeping the Kamado Joe in it’s nest, then here’s an excellent cover (this is for the Classic II size). It’s “Kamado Joe Official” so you can ride in style…

      F. Have Fun with a Few Accessories.

      This is by no means all you’ll want or need in the way of Kamado Joe Accessories, so be sure to read my articles Best Accessories for the Kamado Joe, but to get you started for now, add these to your cart – you’ll thank me.

      The JoeTisserie

      Cast Iron Griddle

      Pizza DoJoe

      Again, if you want to see ALL my recommendations on Kamado Joe Accessories, be sure to visit my “Best Accessories for the Kamado Joe” article – you’ll get over 200 tips and ideas to consider.

      VIII. Do you have The Kamado Joe?

      What’s been your experience so far?

      What tips or accessories recommendations do you have to share?

      I’d love to hear your thoughts – meanwhile it’s time for some more wings and beer with my Kamado Joe!

      ~Michael


      IX. Kamado Joe References:

      1. Kamado 101 by Kamado Jim
      2. Kamado Joe website – Kamado Cooking
      3. Kamado Joe Divide and Conquer system
      4. BBQ Guys – Comparing the Kamado Joe vs the Big Green Egg.
      5. Fire Craft – Kamado Joe vs Big Green Egg
      6. Big Green Egg Forum – How to retrofit a Big Green Egg with the Divide and Conquer system.
      7. Wikipedia – History of Kamado Grills
      8. Shop Kamado Joe on LordoftheGrills.com
      9. Beginner’s Guide to the Kamado Grill – Medium.com
      10. Recipes for your Kamado Joe – Kamado Joe

      There’s More to Life than Cooking?

      Did you know we write about more than just Kamado Cooking on this site? It’s hard to belive, I know, but it’s true! Visit our home page to read more tips…

      How to Make Homemade Dog Food – Recipe and Tips

      homemade dog food

      Homemade Dog Food – It’s Not Hard

      If you’re like me, you love your pets like a member of the family. You want them to have only the best in their lives and that means you want them to have the best diet too, right? So why buy store bought dog food that sits on the shelves for months (and has who-knows-what ingredients inside) when you can make your own homemade dog food recipe with human-grade ingredients?

      Hi, I’m Mike, AKA That Helpful Dad. I’ve been making homemade dog food for my pups for over a decade and I’m here to help you learn how to make it too. Cooking homemade dog food for your pets is easy, it’s fun, and it’s oh so good for them. In this article, I’ll show you one of my favorite recipes for homemade dog food.

      Cooking for your dog is easier than you think!

      One of the most popular vids I’ve put on YouTube over the years is a homemade dog food recipe  – it has over 400,000 views on YouTube and ranks in the top 5 on Google Search for Videos about homemade dog food – yet it’s a really just a simple vid about me doing something I love for my pets. Who knew?
      I think the reason it’s been so popular is that this homemade dog food recipe is easy to make, chock full of healthy goodness for your dog, it’s super fresh, and yields positive results for your pet.

      Homemade Dog Food Recipe VIDEO


      Homemade Dog Food Recipe

      Ingredients:

      1. 2 fresh celery stalks
      2. 1/2 cup fresh carrots
      3. 1/2 cup frozen or fresh green peas
      4. 1/2 cup frozen or fresh chopped spinach
      5. 1 medium fresh sweet potato
      6. 2 Tablespoons Extra Virgin Olive Oil (EVOO)
      7. 1 cup fresh lamb
      8. 1-2 fresh chicken breasts
      9. 1-4 cups non-salted chicken broth

      Tools Needed:

      1. Large Cooking Pot. Lots of options for this but I use one by Rachel Ray. Here’s a link to the newest version of it on Amazon:
        Rachael Ray Porcelain Enamel II Nonstick 8-Quart Covered Oval Pasta Pot with Pour Spout, Green Gradient
      2. Food Processor. Lots of options for this too. I use the tried and true Cuisinart. Here’s a link for that too.
        Cuisinart DLC-10SY Pro Classic 7-Cup Food Processor, White

      Steps

      1. Gather ingredients. Note that you may need to adjust the quantities for your ingredients based on the size of your pets. The recipe here is enough to feed 2 small Yorkies (6-8 lbs each), 1/2cup of food twice per day, for about 4 days.
      2. Heat 2T of EVOO in your pot
      3. Use your Food Processor to roughly chop all your vegetables (NOT the meat). You don’t need to liquify them, just chop them into ‘bite-size’ pieces appropriate for your pet.
      4. Put all vegetables and the raw meats into the pot.
      5. Add your chicken broth to the pot.
      6. Add enough water to cover the meats
      7. Put the pot on the stove and bring to a boil.
      8. Once it boils, turn down heat to medium and cook for 20-30 minutes or until the meats reach an internal temp of 165 degrees. If you want a good thermometer to check this, here’s the one I use:
        ThermoPro TP03A Digital Food Cooking Thermometer Instant Read Meat Thermometer for Kitchen BBQ Grill Smoker
      9. After 20-30 minutes, remove your meats and use the food processor to chop the meat. Then return the meat to the pot – at this point, it should start to look like a stew.
      10. If you are going to serve immediately, be sure to let it cool first – maybe add an ice cube or two to your pet’s bowls.
      11. Refrigerate any unused portion. It should keep for 3-4 days in the fridge (OR) you can also freeze it for long-term use.
      12. Watch your pets go crazy for this food!

      Homemade Dog Food Recipe Source

      This homemade dog food recipe is adapted from the book “The Whole Pet Diet” by Andi Brown. This book is very helpful on many topics related to helping your pet – beyond just a good diet. It not only provides you with a lot of recipes like the one I’m recommending but also a wide variety of holistic tips about caring for your dogs the natural way (without simply relying on medications). You can pick it up on Amazon here…

      Editor’s Note: Where available I’ve included Amazon affiliate links on this page to help you find these products faster – while I may earn a small fee if you buy the products I recommend, know that using my links does NOT cause you to pay higher prices AND most importantly understand that I ONLY recommend products I actually use myself. To learn more, see my Trust Guarantee. Regardless of where you may buy these items, I honestly do believe they will help you.


      The Stars of the Homemade Dog Food Video

      Bonus – in this video you’ll see our beloved Yorkies Bella and Sassy. This vid was filmed a while back and while Bella is still with us (and still eats this stew every day), Sassy passed away a few years ago. This video is part of their legacy. For more on Sassy’s story, check out this free book I’m writing…

      Dog Book


      Do You Have a Homemade Dog Food Recipe?

      If you’ve tried this recipe or have to share, please do so. I’m eager to learn your tips so we can help each other improve.

      If this post helped you feel free to share it with a friend.

      When you do these things we all win.


      Want more tips like this?

      2018 Resources – The Essential Guide to Awesomeness

      https://pixabay.com/en/superman-lego-superhero-hero-super-1529274/2018 Resources – A Summary:

      Hi, I’m Mike, better known as That Helpful Dad. One of my Legacy Life goals is to help people live a better life — I do this by sharing practical tips, life lessons, honest product reviews, and action-oriented wisdom that you can use today to live your best life NOW. No BS, just real-world solutions that I can personally verify work. Each year I publish a list of ‘tools’ that I believe can help my readers live a better life.

      These are 2018 Resources that make my life easier – or as I like to call them, “The Essential Guide to Awesomeness!

      Inside this document, you’ll see the products, apps, websites, etc that I personally use to make my life awesome. These are not necessarily new products, they are simply the tools that I used consistently the most in the past year AND which have improved my life. I want to share them with you because the mission of this site is to “Be…Helpful” and what better way to fulfill that mission than to help YOU, my reader, be even more awesome than you already are?

      2018 Resources – WHO is This Guide Best-Suited for?

      While I hope that The 2018 Essential Guide to Awesomeness is helpful to all my readers, realistically the type of reader who will get the most out of this guide is someone who is fairly similar to myself — The 35-55ish Family Man who has a “worker bee” job and is always on the lookout for tips on how to live a healthier life, be more productive at work/home, likes ‘trusted’ reviews, wants to be a better cook than his neighbors, and would benefit from de-stressing a bit. If that sounds like YOU, then you’ll love this guide.

      2018 Resource Guide – Categories

      • I- Career and Kaizen
      • II- Health and Fitness
      • III – Stress Relievers
      • IV – Cooking
      • V – Apps and Tech
      • VI – Entertainment
      • VII – Home and Shopping
      • XIII – Travel
      • IX – Clubs

      2018 Resources – (I) Career and Kaizen

      Kaizen is a Japanese term for ‘continuous improvement’ or constant improvement towards perfection. I first heard of it 20+ years ago and have long made it a mantra for all aspects of my life. For today let’s just focus on the self-improvement as relates to the career and ‘mental game.’

      1.SMART Morning Routine(lifestyle recommendation)

      My productivity and focus have gone thru the roof after learning about The Am Ritual from Tim Ferris’s book “The Tools of Titans.” I created a separate article about this topic because it’s that important – I call my version “The Working Man’s SMART Morning Routine.”

      You can read that post if you want to know more but here’s a quick summary: starting the day with 15-30 minutes of alone time that focuses on ‘priming’ your body, mind, and soul with a series of breathing exercises, wisdom contemplation (from external sources) and wisdom release (from inside you).

      HD’s Pro Tip: Do the Morning Routine consistently and watch your productivity skyrocket.

      2. Tools of Titans book
      I happened to see a post from Tim Ferris on LinkedIn one day and he was offering this book on Kindle for $4. Having read the 4-Hour Workweek I was already a fan so I bit on the $4 book and I’m glad I did.

      Click to pic to see this book on Amazon….

      Tools of Titans bookI kid you not when I say that I’ve gleaned no less than 100+ actionable tips from this book! It’s amazing. Talk about the ROI on my $4!

      I also got introduced to his podcast and then gained even more useful wisdom from other people that he interviewed. If there was one current book I would recommend for productivity (on work, life, and beyond) it would be this one – read it today!

      HD’s Pro Tip: get the kindle version – here’s why, if you highlight things to remember or add notes, you can then export the notes from the Kindle app and have them already available for followup in one place. BTW that’s a tip from this book – haha.

      HD’s Pro Tip2: I use the Castbox app on android to listen to Tim’s podcast – it’s a great podcast app, it’s free, and it has lots of variety. Disclaimer: I’m actually a bit new to podcasting so there could be a better app. If there is let me know. But for now Castbox works for me.

      3. Steal This Look: Blue Blazer, White Button-Down Shirt, Jeans, and Brown ShoesBlue Blazer Brown Shoes
      I first saw it at a business conference when one of the execs wore it on stage and he stole the show. Later I found that multiple other friends of mine were also impressed with this look. When I got back home I quickly rushed out and updated my wardrobe.

      It’s my new favorite business casual attire – it makes me feel great and I enjoy it – and you know as well as I when you feel good about yourself you perform at a higher level. Give it a try and see if it works for you too.

      Substitute khakis or slacks if you wanna dress it up, but the bottom line is this look rocks and I get lots of compliments when I where it.

      Disclaimer – sadly, the model in the pic ain’t me – but I feel like him when I wear this look! Haha.

      4. LinkedIn (website)
      I’m a long-time user of LinkedIn and it makes the list again this year.

      As someone who prides himself on being a good ‘relationship builder’ I actively work to be a ‘people connector.’ I’d love to connect with you too – perhaps we can help each other or at the very least offer an additional path for us to mutually expand our networks.

      Be sure connect with me on LinkedIn here: https://www.linkedin.com/in/michael-stoppa-mba-27561428/ 

      4. BibleStudyTools.com (website)
      I read The Bible every day. For me, it’s a great source of wisdom and wisdom = kaizen in my book. Although I’ve read the entire book many times over, for the purposes of this discussion (seeking wisdom) I specifically read 1 column from Proverbs (Solomon’s Wisdom) and 1 chapter from one of The Gospels (Wisdom from Jesus).

      It takes just a few minutes in the morning to complete this (as part of my “AM Routine“) and the results are immediate – I get my mind working in the right direction right from the start.

      Although the print version is great, I like this website because it’s well organized, easy to navigate, has numerous versions (I like NIV the best) and I can access it anywhere.

      5. Typing.com (website)
      If you need help improving your typing this website is free and really effective. We started my 8-year old son Jax on this at the beginning of 2017 (while he was in 2nd grade) and he’s taken to typing like a fish to water.

      Typing.com offers free typing lessons from beginner to advanced and it keeps track of his progress. Jax’s typing has really improved and it’s paying dividends for him at school now too. We really feel that by using this website, we’re setting Jax up for success and making things easier for him for years to come.

      6. Lichess (chess app)
      I consider chess a form of Kaizen self-improvement and Lichess is a FREE, open source chess app. It’s a nice little option for passing the time playing chess against a pretty good PC or an online friend. There are no ads and it’s very reliable.

      HD’s Pro Tip: combo this with the free chess learning apps from Chess King (including Opening Lab, Middlegame, Mating, Opening Blunders, and more) and you’ll really up your game.


      2018 Resources – (II) Health and Fitness

      OK, we’ve got the career and self-improvement covered, now let’s turn to the body. I don’t think I’ve gotta tell you how much it sucks to get older, right? Once you pass 40 it’s no picnic, BUT that doesn’t mean we just have to give up! As always, I’ve got a few helpful tips to share here too – starting with what may well be my most awesome tip of all…

      1. Intermittent Fasting.
      My life has changed for the better as a result of Intermittent Fasting. If you don’t know what it is, Intermittent Fasting (as I’m talking about it) is basically not eating for 14 hours (for women) or 16 hours (for men) and then consuming all your calories in the remaining 8-10 hour window. I realize that may sound harsh – and in the beginning, I thought ‘no way’ – but I’m here to tell you that I over a 3-month experiment I learned that Intermittent Fasting has been surprisingly easy and it gives me lots of energy. That said, it’s not a magic cure-all and there are a few important tips to keep in mind if you want to try it. 

      I wrote an article for The Ascent Magazine about Intermittent Fasting — it details my experience with Intermittent Fasting and shares what I learned to help you get the most out of it if you decide to try this lifestyle change.

      BTW, I still practice Intermittent Fasting almost every day.

      2. Apple Cider Vinegar WITH “The Mother” + EVOO Shot/Day
      For most of my life I’ve had tummy troubles. Partly due to a hiatal hernia, partly genetics, and probably also because I eat a lot of spicy foods. When I was a kid, my dad, grandpop, and grandmom all used to drink a shot of vinegar each day. They also all consumed a lot of olive oil. If you haven’t guessed yet I grew up in an Italian-heritage family.  I toyed with both of these things off/on over the years but this past year I made a concerted effort to drink a combo shot (1oz) of ACV + EVOO.

      I chose to do the ‘raw’ ACV with the mother for the (perceived or real) extra health benefits. I’m not here to tell you that a sample size of 1 (aka me) and a short-term (1 year) experiment should make you run out and do the same thing as me, but what I can tell you is that ACV + EVOO really did help me reduce much of my tummy troubles this year. It worked for me, it’s easy to do, and I plan to continue.

      3. New Balance’s Vazee Rush Sneaker (product)

      These sneakers are more like slippers – they are super light, really comfortable, and when you were them you feel like you are walking on the clouds. When I put them on I can walk for days. Add in a cool color like royal blue (but without a lot of the extraneous threads, plastic, and other junk that most shoes seem to carry now – I’m looking at you, Nike!) and you have a winner.

      HD’s Pro Tip: I got mine from a New Balance Factory Outlet for about $50, but if you want to get them from Amazon here’s a direct link…
      New Balance Men’s Vazee Rush V2 Running Shoe, Thunder/Alpha Orange, 11.5 D US

      4. The Mabis Personal Steam Inhaler (product)

      This is about $25. We considered multiple steam inhalers including MyPurMist, Mabis, Vicks, and more. Our goal was to get a personal steam inhaler that was easy to use, easy to clean, and put out a good amount of steam to help with allergies for our family. We purchased multiple steamers to compare them.

      In the end the MABIS was the SUPERIOR product. It really does put out some good steam and I have noticed a difference with my allergies when I do a standard 6-10 minute treatment. You can also easily use aromatherapy options in the convenient reservoir for this purpose and it really does work (I like to add eucalyptus oil). It’s also really easy to clean. The other steamers did not put out near the steam the Mabis does. I found the best price on Amazon…
      MABIS Personal Steam Inhaler Steam Vaporizer – Aromatherapy Diffuser


      2018 Resources – (III) Stress Relievers

      Life is not all go-go-go. It’s important to slow it down too. On that note, here are some awesome tools I use to take a break from the world. Granted, you might laugh at a couple of these (Bed of Nails? Face Masks?) but don’t knock it till you try it. The truly wise are willing to experiment even if it makes them ‘look’ silly to outsiders. Slap on a face mask, lay on your bed of nails, and let the world laugh – while you recharge your batteries for even greater awesomeness!

      1. A Bed of Nails Bed of Nails Mat(product)
      This product goes by many names but it’s basically an acupressure mat. Lay on this thing (skin to mat) and you’ll experience a gamut of sensations.

      Is there pain? Yes. It hurts — especially if you lay on the mat without a shirt and with a hard floor underneath – but seriously if you are gonna do it you gotta go ‘all in’ if you wanna get the highest ROI.

      The good news? Get through the first 5 minutes and you’ll be over the hump – on the way to a state of bliss. After 20-30 minutes, you’ll reach a state of ‘gelatinous euphoria’ where the cares of the world melt away. I love my mat so much I have a small travel size I take with me.

      HD’s Pro Tip: Combo this with your favorite meditation and it’s an out of body experience.

      I use one called Spoonk but there are tons of others. Check out this Amazon Page for ideas: Bed of Nails

      2. Specialty Teas (product)
      I discovered the world of ‘teas with a purpose’ this year at Sprouts and I can’t believe it took me so long to find them! Teas like Belly Comfort, Serene Slumber, Liver Detox, and more are my favorites. There’s even one for Gas Relief and would you believe it really works?!? I now drink 2-4 cups of tea a day with a specific purpose in mind (starting the day/energy, post-meal, stress relief, bedtime, etc). Even when I travel I take a few with me.

      My current favorite brands are Traditional Medicinals and Lifestyle Awareness — they are affordable, have a lot of blends that work for me, and are easy to find where I shop.

      3. Balance in Me website
      This meditation website is a godsend. First off it’s free and it gives you access to countless meditations, affirmations, and more. They range from a few minutes to 1+ hours. Put on a pair of headphones, lay on your Bed of Nails, and open your mind – the stress just melts away. I’m a big fan of the affirmations and there are more meditation ‘journeys’ on this website than I can count – not everyone is great – it depends on the facilitator but I’ve found a couple I really like and they sincerely do help me.

      Honorable mention to meditation apps by Stop, Breathe, and Think (my son Jax loves this app for the ‘sticker rewards’ he earns by meditating), and Excel at Life (in addition to some great ‘journey’ meditations, they have a suite of ‘assistance’ meditation apps for those struggling with panic, depression, and more).

      4. Track Yoga appTrack Yoga (app)
      This FREE yoga app is incredible too. I’ve taken 80 classes on this app this year and I’ve learned so much about yoga – not to mention the health benefits of using it.

      What I like about it is that you can see a real person doing the exercises and the facilitator’s voice gives you lots of really helpful tips to make sure you are doing the positions correctly.

      5. Tony Moly Face Masks (product)
      Put in a request to take away my Man Card if you want and feel free to make fun of me, but I’m not afraid to admit that I love using these hydrating face masks.

      While these are not new to women in the US, I first discovered them on a trip to South Korea a few years ago. My wife and I were shocked as to how all the people in SK were so amazingly beautiful (particularly their skin was so smooth).

      While staying in the Myeondong area of Seoul we discovered a bunch beauty shops and these masks were probably the most prevalent thing we saw. Every shop seemed to have its own version. We tried a bunch of them – but I kept coming back to the Tony Moly “Pureness” (full face) masks. They seemed the best made (in terms of the mask itself), easiest to use (getting the folded mask open and on my face), and most importantly made my face feel the best. On our most recent trip to SK we brought back half a suitcase full of these masks (at 50cents each you would too!).

      My favorite TM Masks are the Hydrating and Collagen masks.

      HD’s Pro Tip: put on a mask, lay on your bed of nails, do a guided meditation, and reach a higher plane of existence – Ahhhhhhh).

      Here’s a link to an example on Amazon:
      Pureness 100 Mask Sheet 21ml No.1 Hyaluronic acid

      You can also find lots of other choices if you search “TonyMoly” on Amazon or Google.

      Seriously, did I just give you a tip about men using Korean Ladies Beauty Masks – yup – and if you give it a try you’ll thank me (even if you keep it a secret from your friends).

      6. Prisma (app)

      Another free app and this one is very cool if you like enhancing your pictures. It can do a nice job of ‘saving’ your mobile phone pics and making them a bit more viewable. I’m putting this under “Stress Relievers” because I love photography and when I work with pictures it’s a great ‘mindfulness’ tool to help me forget about the cares of life.

      There is a bit of a learning curve with Prisma (mainly because there are just so many filters you can use and it takes a while to find the ones you like), but once you figure it out, it’s addictive and productive. You can make some really cool artwork with this! Check out my son JeeHo (AKA “Batman”) on the beach at Captiva, FL…


       2018 Resources – (IV) Cooking and Food

      1. Kamado Joe (Outdoor Grill)

      I’m always on the lookout for ways to improve my cooking. My friends in the neighborhood joke about this because they claim that I rely more on technology than cooking ‘heart’ – ouch! Whether that’s true or not I can’t say, but I will admit that if there is a cooking gadget that I think can up my game, I’ll give it a try.

      For years I’d heard about the Big Green Egg but was averse to try because of the perceived learning curve and the expense of the product. But I did my research and finally took the plunge this year and I’m kicking myself that it took me so long!

      There is a difference in the flavor of the food when you cook over lump charcoal/wood. Can’t deny it, no disputing it. That said, there IS a learning curve (I’m still learning!) and it IS expensive ($600-1000 will get you started depending on what brand you buy and how big you go).

      I chose the Kamada Joe Classic II (KJ) over the BGE or other options because of the KJ’s reputation, highly useful accessories it comes with, and because it just ‘felt right’ when I got my hands on it. Most of my friends have BGE’s but I can tell you that my KJ is more functional than theirs – aka I can do more with it because of its design – this is mainly because the KJ comes with an internal cooking rack system called “The Divide and Conquer” which allows you to cook BOTH direct and indirect at the same time, on varying levels. BGE’s system is either direct OR indirect but not both – unless you do modifications (aka buying the D&C system). KJ also has numerous other useful accessories specifically designed for it.

      How’s the food on the KJ? Pizza – awesome. Chicken Wings – best ever. Fish – moist and tender. Steaks – out of this world flavor.

      HD Pro Tip: Try a Ribeye Cap Steak on the KJ and you’ll thank me when you’re family says ‘best steak ever!”). The variety of what you can do (from cold smokes to 800-degree heat) just can’t be beaten with any other cooking appliance I know.

      Sadly I also have an expensive, built-in Cal-Flame gas grill (when I put in a patio bar a few years ago) — unfortuantely, because of the addition of the KJ I rarely use my beautiful grill for anything but making bacon (yes I turned a $4k grill into a giant griddle, and no that ROI on that wasn’t so great!) or for ‘must-be-quick’ cooks (because the one downside of the KJ, like all kamado’s is that it takes time to get it ready to cook – figure an hour to get heated, etc). The good news is that I rarely have to clean my gas grill (always a pain) and even better the KJ (like most kamado’s) is pretty much self-cleaning (oh yeah!).

      HD’s Pro Tip2: The kamado table you see in the pic was an aftermarket unit from Etsy. I searched far and wide for something that would work. I considered chopping up my built-in patio bar and replacing either my Cal-Flame grill or removing the sink (I rarely use it) and putting in the KJ, but ultimately I wanted the KJ to be farther away from the action – there IS smoke when you cook with a kamado and it needs space. So I got this beautiful cedar cart which has wheels (and a cover for everything) and it sits in a nice location overlooking our conservation area. I couldn’t be happier! For more on the table check out RusticWoodWorx on Etsy -they were a pleasure to deal with.

      HD’s Pro Tip3: not every brand of lump charcoal is created equal. Some of them are made with woods like hickory or mesquite that are so strong they don’t go with a wide variety of foods. I’ve tried a few brands so far and right now I still prefer the KJ “Big Block” XL Lump Charcoal bag – the pieces are huge so they can burn a long time and the flavor is on the mild side because of the combo of woods used.

      If you want to know more about Kamado Joe, here’s a link for Amazon…

      2. Little Griddle (Outdoor Kitchen Product)
      This is the product that turned my expensive gas grill into a giant griddle. It’s amazing. It works. It’s easy to clean. And I use it all the time.

      Why did I buy it? My family lives in Florida and we use our outdoor kitchen quite a bit. Even though my Cal-Flame came with a griddle attachment to replace 2 of the 4 grates, I’ve never been satisfied with it – mainly because all the griddle drippings fall down onto my burners and create flare-ups and a big mess. In addition, the grill griddle is small and I wanted something larger.

      When I first saw the Little Griddle series I was originally looking at the Sizzle Q (SQ180), but thankfully I saw the LG website and discovered the GQ230 and I’m glad I did – the GQ230 is the size that I really wanted because it covers about 24 inches (which is 3 of my 4 grates), whereas the SQ180 only covers 18 inches and the GQ120 only 13. I got the largest size because I wanted to be able to cook for friends and family – that being said, it’s not like the GQ230 is giant and I’d venture to say it would fit most full size grills. Measure your grill and I’ll bet you’ll see this will be the right size for you. Here’s the link for Amazon…

      Little Griddle offers Versatility – this will allow you to do so much more with your grill than before. So far I’ve made cheesesteaks, bacon/eggs/potatoes, fried pineapple, Korean chicken, and Cajun chicken. These are items that most people can’t do on a regular grill.

      Little Griddle offers Easy Cleanup! Compared to the Cal Flame griddle attachment the Little Griddle is so much easier to clean – just sear/wipe/clean the griddle itself while the grill below stays clean!

      Bonus: Little Griddle also makes a griddle for your Kamado too.

      3. Some great food items you might be overlooking…
      I discovered the Mezzetta Brand this year and I’m glad I did (try to the Cherry Tomato Pizza Sauce for your KJ Pizza’s, the Spicy Marinara is my favorite jar pasta sauce [I know that’s heresy for an Italian to say but it’s great in a pinch], and both their Jalapeno-stuffed olives and Pepperocini are best in class in my book). I found them all at Sprouts.

      Maldon Sea Salt is phenomenal: big flakes = big flavor.

      Dave’s Killer Bread is pure quality and great taste. I like the Good Seed – Thin Sliced Version. It’s available a lots of grocery stores now.

      Pacific Foods Bone Broth is an affordable way to get in on the bone broth phenomena (I like the Turkey & Sage flavor best). I’ve been buying it on Amazon for about $2 a container – they often have a coupon too. Check out this link for more info…

      Sprout’s Smoked Bacon from the deli section is my family’s new #1 choice for bacon – thick slices that cook evenly (especially on your Little Griddle) and have fantastic flavor. Costco’s Meat Dept is surprisingly good – they have a great selection of seafood (including Ahi Tuna) and they also have USDA Prime and Choice options (get that USDA Prime Ribeye Cap Steak I told you about in the KJ section and you’ll forever thank me).

      Juicy Gems Pomegranate Seeds are a super tasty snack – for $2-3 you can get a little jar that lasts a week.

      And 4Earth Farms make a really good package of precooked edamame (HD’s Pro Tip: throw these in a pot with some fresh minced garlic, fresh minced ginger, sesame oil, a dash of soy sauce, and a dot of Sirachi and you’ve got a killer appetizer).

      BTW If you haven’t discovered Sprouts you are missing out. I’ve long-time been a Whole Foods advocate and that further increased when Amazon bought the brand. I still believe WF has the best seafood, cheese, and a superior selection of packaged goods, and we also still love WF’s hot bar, but I have to admit that Sprouts has better produce (especially organics) at a better price. I’ve particularly enjoyed Sprouts Organic bananas, avocados, blueberries, raspberries, and fresh spinach – there really is a difference in the taste!

      4. Three Great Thermometers you need to know about (products)
      Let’s end this section a ‘hot’ note – or at least be able to check the temp with a few great thermometers.

      First the ThermoPro TP20 Wireless Remote Digital Cooking Food Meat Thermometer with Dual Probe for Smoker Grill BBQ Thermometer.

      • I use this specifically when I am cooking on my Kamado and doing a longer cook where I want to monitor what’s going on but not always have to be sitting right there AND when I don’t want to keep opening/closing the kamado (which you want to avoid if you want to keep the temp controlled inside – and, ah, as I’ve learned that’s kind of important!).
      • The TP20 lets me sit inside the house or at the patio bar and monitor what’s happening in the meat inside the kamado. Drinking a beer and cooking ribs? I’ll take that option any day.
      • HD’s Pro Tip: this model gives you two temp probes, multiple presets, and has a pretty good range – it costs about $60.

      Next is the ThermoPro TP03A “Pen” Thermometer. It’s always a challenge to find a good ‘instant’ read thermometer but this one is both accurate, affordable, and easy to use. It’s about $10 on Amazon and blows away the options from the big box kitchen and hardware stores.

      Finally, an odd little unit that is actually really useful. It’s the Etekcity Lasergrip  Infrared Thermometer Temperature “Gun”.  For around $13 this is another really good product.

      • It’s extremely easy to use (just point and shoot) and it does a fine job of providing helpful info about SURFACE temps.
      • HD’s Pro Tip:  I used the Etekcity one  a lot for checking the temp on my Little Griddle (you’d be surprised how hot the griddle surface itself can get vs the temp measured by the grill hood – for example, I’ve seen the grill hood register 250ish while the griddle was over 400 – this info is much needed when cooking so you don’t burn).
      • HD’s Pro Tip2: Another great usage is to check air temp coming out of the AC vents.

      2018 Resources – (V) Apps and Tech


      1-Daylio (Life Journal App/Free)
      This is a mobile app that I use for tracking my daily activities. It’s easy to use, it’s free, and you can modify the activities to fit your needs. It allows me to rate how I felt each day (awesome, good, average, not good, awful) AND it lets me get granular with specific activities. Daylio ScreenshotsDaylio is easy/quick to use and it provides an efficient way for me to keep an on-the-go de-facto daily journal about life. Add to that the fact that you can also include free text notes for each day (if you want to) and now you’re talking. To read more about Daylio, see the feature article I wrote about it in The Startup Magazine.

      2-Google Apps (Supercharge your Productivity)
      Everyone who knows me knows that I am an “Android > Apple” type of guy. First off, I invested in Google at $85/share and have never sold it (I just wish I bought more back then!) – but the point is that I invested in Google because I use their products and they improve my life (especially my productivity).

      Why do I love Google products? Because they just make sense to me and because most of them allow me the ability to do some level of customization to make them further fit my needs (unlike Apple which frustratingly is more of an ‘as is and that’s all there is’ system). I want to share with you HOW I use them so that you can benefit from them too.

      Besides GMAIL (which goes without saying) and Maps (which I still prefer over Waze), there are a few more Google apps that I use every day and they are all FREE — these include Keep, Drive, Online Office Suite, Calendar, Launcher, and of course Google Photos. This combo of apps supercharges my productivity. Additionally, because I use Google for pretty much everything, all my stuff is connected to my various mobiles and laptops so I can access it anywhere.

      2a. Google Keep
      I use Google Keep to create a series of ‘to do’ lists and use the Keep widget on my Android Phone (Pixel XL) to show them on various home pages of my phone so that I have them ‘always up’ and thus always on my mind.

      HD’s Pro tip: I use the ‘checkbox’ feature of Google Keep to make them “action items” and they are easy to remove from view once complete).

      I find that Keep is a simpler version of Google Tasks or other apps like Wanderlist. I don’t need a lot of complication. I just need to SEE the tasks so I can be reminded to DO them.

      To read more about Google Keep here’s a more detailed article – which includes a tip about how to use Google Keep as an awesome Speech-To-Text tool.

      2b – Google  Office Suite
      These apps act as a free replacement for Microsoft Office. No offense to Microsoft (I like that brand too) and I’ve used M-Office for years but I got tired of paying for upgrades and/or new versions whenever I got a new computer. For years I didn’t have a choice because, let’s face it, M-Office was the King of the Hill and no other office related products compared. BUT, Google changed the game – Google’s Office Suite (especially Docs, Sheets, and Slides) is a very real replacement for M-Office’s Word, Excel, and Powerpoint.

      • First off, G-Suite’s versions are all compatible with M-Office’s so you can read/create/modify back and forth.
      • Secondly, G-Suite’s versions are FREE.
      • Third, G-Suite’s versions are auto-updated by Google so you always have the latest and best version.
      • Fourth, you can easily share G-Suites files with co-workers so they can work on the same doc as you to power up efficiency.
      • And fifth, combo G-Suites with your use of Google Drive and you have a system that allows you to have ‘always-access’ to all your files. (HD’s Pro Tip: you can even make them available ‘offline’ if you’ll be in an area without connectivity).

      2c. Google Drive
      I use Google Drive store all my stuff – not just my G-Suite files but EVERYTHING on all my computers, phones, etc. Google Drive (via Google Backup) now even connects to my laptop hard drive to allow me to work on my laptop files from anywhere too. It’s easy to share files with family/friends as needed (and know when they access it). It’s easy to organize things.

      And storage is free up to 15 GB. With additional storage at very reasonable rates (100 GB for $2/mo or 1TB for $10/mo).

      Am I worried about Big Brother watching me, hacks, etc? Shockingly (for someone who counts Orwell’s 1984 book on my Top 10 All-Time Best Books list) I am not. Perhaps I should be but I’ve accepted the loss of privacy from at least the big players like Google, Facebook, and Amazon as a necessary cost of doing life in today’s world and, for me, the benefits I derive from using their products to the fullest outweigh the perceived risks (at least for now).

      2d. Google Calendar
      I use the Google Calendar mainly because the android widget is great — I can see my calendar (I like the month view) on my phone WITHOUT having to open the app (I’m calling you out, Apple!) and that little step makes the calendar so much more valuable to me.

      Additionally, the benefit of the Google Calendar is that it is already connected to my Gmail and my Launcher so I’m also reminded on both of these other apps of important calendar events.

      HD’s Pro Tip: the reminders on the Launcher are especially great for airline flights and hotel reservations – I can see the specifics of my reservation, flight number, gate, location, directions, etc — all on my Google Launcher automatically – without needing to search for them).

      2e. Google Phone Launcher
      I use the Google Launcher as my primary phone interface – its connectivity with the rest of my G-suite items makes it uber-useful and the assistant is really functional. I was first introduced to it when I was a member of Google Fi (phone service) and I loved it. Later when I got the newest galaxy phone I tried the latest Samsung interface (Bixby) but was sorely disappointed. Google Launcher is simply superior in terms of functionality, ease of use, and usefulness.

      2f. Google Photos
      I use Google Photos as the one-stop shop for automatically storing all my photos (both from my phone and computer). It also allows me to easily share pics with my wife and friends via customizable shared albums. The search function is just ok but it does help to find older pics and it does a good job of recognizing faces (even pets!). Plus Google Photos has some nice filters (their B&W options are particularly good).

      HD’s Pro Tip: the Google Photo Assistant is pretty awesome too – not only does it automatically make some cool animated pics, collages, and movies, but it also lets you quickly produce some great little movies (combo’s of pics and vid clips) that you can share on Facebook and family/friends with ease.

      3. WordPress.com
      I’ve made tons of websites over the last decade – self-hosted ones like this site (ThatHelpfulDad.com), an investment site called ThomsettsGuide, and many others on a variety of topics.  But the use of wordpress.COM to create FREE websites allows me to make more sites quickly and efficiently.

      I am now specifically using WordPress.com as hosts for my books – making them into more interactive platforms that allow me to reach my readers easier AND add more layers to my books that expand the experience for my readers. I invite you to read my books and I welcome your feedback – please visit my book page to learn more: https://thathelpfuldad.com/books/

      4. Acer Chromebook R11 Convertible (product)
      I’ve used Chromebooks for years — I love the Chrome OS, how fast these computers turn on, and their overall ease of use. This Acer CB is no different – it’s quick and responsive for all the basic stuff my son needs. After looking at tons of CB options, we ultimately chose this one because it offered a TOUCHSCREEN (which works really well) and because of the 360 folding options so you can use it like a normal computer, or flat, or even in tent mode. All these work great and are convenient. The screen is bright and looks good too.

      For just around $200 how can you go wrong? The low cost makes this a great value. As a note we purchased an older version — newer ones are available with more features for a higher price but the one we have works just fine for our needs. Here’s a link for Amazon: Acer Convertible Chromebook.


      2018 Resources – (VI) Home and Shopping

      What’s life without a little shopping? I’ve got you covered here. Want to make the home a little more ‘user-friendly’ and save yourself some headaches dealing with wifi dead spots and making holes in walls? Check. How about a good credit card that actually provides a decent rate AND a live human to talk to when you call? Got that too. Read on, my friend…

      1. Amazon Prime – for Free Shipping, TV, Music, Photo’s & more
      Another year of Favorite Lists and another year on the list for Amazon Prime. I’ve been a prime member since the very beginning (2005) and an Amazon customer since 2002. Amazon is another stock that has made me a good bit of money too so that’s a bonus.

      I’ve talked about Prime many times so I won’t rehash it all but besides the 2-day ordering for most items, you get the free music, free tv/movies, 5% cash-back on the A-Prime credit card for Amazon specific purchases  and when you shop at Whole Foods (with no annual fee), and more. I have a separate post about 5 Ways to get the most from your Prime membership but here are a few tips…

      Shopping with Amazon Prime is simple and efficient and (for me) faster than going to the store.

      HD’s Pro Tip: Use the ‘subscription’ services for frequently purchased items (toilet paper, protein powder, laundry detergent, vitamins, etc) and you can save an additional 5-15%.

      HD’s Pro Tip: Always check the Amazon Warehouse when you are shopping on Amazon. You can find a lot of ‘like new’ items (that still carry an Amazon warranty) for 25% off or more.

      Prime Music is my 1-stop shop for tunes – why pay for a subscription on Pandora or use other music apps when they are here for free? Again it’s just simpler.

      Prime Video: with lots of binge-worthy tv and a variety of free movies (with options to rent/buy new ones and have them stored on your Amazon account) and you’ve got entertainment largely covered.

      Prime Photos: it’s still a bit raw but I’ve found prime photos to be an inexpensive way to order some prints and get them pretty quickly. Plus you can use it as another auto-backup for your pics and have another location to store them in.

      Treasure Truck: I’m surprised how many people don’t know about this yet. The Amazon Treasure Truck is a great way to get Trending Items and tasty fresh food selections for a nice discount.

      Nintendo Classic NES – you know the one that’s sold out everywhere? I got it Day 1 with Treasure Truck. Aged Bone-In Porterhouse? Dude Perfect Bow and Arrow? Nespresso Machine? All on the Treasure Truck. The gist is that, unlike normal Amazon Shopping where they send the items to your home, in this case, you go to the Treasure Truck and pick up the item – also there is only every 1 item at a time.

      About one every two weeks youu get notified on your phone via text when something is available – if you want it, you buy it, pick a stop, and then show up at the assigned time to retrieve it. Bonus: if you miss the pickup, you get a refund. Also, all these items are covered by Amazon’s A-Z guarantee so if you don’t like if you can send it back for a refund as well (although I’m not sure about the food, you’ll have to confirm that one – mine is always tasty so it’s gobbled up quickly!). Visit this page to learn more about Amazon’s Treasure Truck. 

      2. Google Mesh Wifi System (product)
      Google WifiIn a word: fantastic! Yes, it costs close to $300 for a 3-pack but it’s worth it. We have Frontier/Verizon Fios and our house is 3200sf, but even with wifi extender, there’s always been a bit of a problem in the far reaches of the house. As you know Frontier (just like Verizon) is of little help for this or ANY issue so if you want better wifi coverage in the house you’re on your own to figure it out.

      After researching about multiple wifi mesh products and comparing lots of options, we narrowed it down to Google Wifi and Orbi. Since I have a long history of using Google products and we’ve always been satisfied with them, and since the price for Google was lower as well, we went the Google route.

      How did it work? The setup could not have been easier — it was essentially plug-and-play. The results were instant – great coverage everywhere. We’re paying for 100/100 speeds from Frontier but prior to using the mesh it was hard to get them at any distance away from the router. Now with the G-Mesh we’re consistently around 95/95 up/down speeds anywhere in the house. Streaming is now fast and instant – no more buffering!

      It’s such a great product I wrote a separate article about it, but the bottom line is it’s a reasonable price for getting true wireless coverage for your entire house. Learn more with this link:
      Google Wifi system (set of 3) – Router replacement for whole home coverage

      3. Feit Electric Outdoor String Light Set (product)
      For years I’ve wanted to get the ‘Italian Patio String Light” look on my patio but I just never got around to it. Thanks to a visit from my dad this fall and these affordable, easy to install string lights from Feit and viola – it’s done! There’s a bunch of string light sets like this available.

      I like the Feit version best because you get 1 light every 2 feet (where other sets give you 1/3 feet), the lights are a good size (11 or 15w), Feit gives you extra bulbs with the pack (others don’t), the connection between sets is easier, the price is affordable (about a $1 per foot), and they look great. I couldn’t be happier. Here’s the Amazon Link for the 48-foot size, but other sizes are available too…

      As an added bonus the light they put out is better than expected – my Kamado is away from the action in a ‘dark’ area of the patio and it was always a bit difficult to cook at night – not anymore – these string lights provide plenty of light to see by – they don’t light it up like a supernova, just a reasonable amount to see by. Perfect.

      4. MCS 8×10 Inch Format Frame 6-Pack, Black (65608)   (product)
      I’m giving you the Amazon link for this item (click on title) because it’s the best price I’ve found for these frames so far. Yes these are cheap frames, but they are easy to use, they are affordable (less than $5 for an 8×10 frame!), and they do the trick. Using these frames I’ve been able to showcase more of my photography in my bonus room.

      HD’s Pro Tip: because of their thin profile and nondescript appearance, these frames work especially well for showing off Black & White Prints.

      5. HyLoft 00625 45-Inch by 45-Inch Overhead Storage System (product)
      My garage is always full – even with a 3-car garage size we can only fit 1 car inside – this is because of all the junk we have. It’s a constant battle that feels like a blog is continually trying to eat us. Thankfully I discovered these HyLoft units this year. They’re easy to install, hold quite a bit of stuff overhead and out of the way, and you can put up a bunch of them for an affordable price. I like the 45x45in version. Here’s the Amazon link:
      HyLoft 00540 45-Inch-by-45-Inch Overhead Storage System, White
      HD’s Pro Tip: I’ve numerous ones from The Amazon Warehouse for around $35/each – you just can’t beat it.

      6. TOGGLER SnapSkru Self-Drilling Drywall Anchor, Pack of 20 (product)
      In the never-ending battle I have with my walls about hanging pictures, shelves, etc I’ve historically made more holes that I don’t end up using than ones I do.

      The Toggler SnapSkrus and the Drywall Anchor both do an excellent job of holding up whatever we’ve used them for. Yes they do make a pretty BIG hole in the wall so be sure you’re putting it in the right spot, but they are an effective way to hang your items on drywall and I have purchased both versions multiple times. A pack of 20 costs about $10.

      7. Chase Sapphire Preferred Card (credit card)
      While we have others, this is pretty much the only credit card my wife and I use now. First off, I love that when you call you get directly to a live person immediately (without any phone tree ‘push 1 for X, 2 for Y’ crap). Secondly, the sign-up reward (80k pts) is pretty generous. The cash-back reward rate (1.5%) is good. And the reward options (particularly the travel reward flexibility) is nice. Also, the no foreign transaction fee is a bonus.

      On top of that, the website for card management is easy to use/navigate. Look, I’m not here to tell you that I’m a c/card expert and I encourage you to do your research but I can tell you that we are very satisfied with this card. We pay it off in full each month and the benefits work for us. It’s worth looking in to.

      8. Google Pay (app)
      Similar to Apple Pay, this is Android’s version. This app is incredibly easy and I like not having to get my credit card out when I pay at merchants that accept this form of payment.

      9. Google Rewards (app)
      This app will earn you FREE MONEY!

      It’s basically a SURVEY system but the twist is that you actually get paid for doing surveys. It’s only 10 – 67 cents at a time but the surveys are super quick (usually 1-3 questions, sometimes 5) and you get the money into your Google account immediately. I’ve earned $25+ this year for doing surveys when they pop up – that’s free music, movies, books, etc from Google Play Store.

      I love it so much I wrote another article about it – Read more about Google Opinion Rewards

      10. Lego Advent Calendar (product)
      Here’s another entry from Legos — you can’t go wrong with the Lego Advent Calendar. Why give your kids a piece of unhealthy sugar candy for Advent when you can give them a cool little lego build each day of the calendar countdown to Christmas? We’ve done these for a few years now and my kids have enjoyed them every time. You get a great combo of little ships, characters, and more. And on the 24th you get the ‘special’ character – C3PO in a Santa Hat, BB8 in a Santa Hat, etc. It’s really fun.

      So far this was our favorite one…


      2018 Resources – (VII) Entertainment

      Let’s take a break for a moment and just chill. In this category, I’ll give you some tools that will help you do just that – entertainment-wise.

      1. Bose Quiet Comfort 25 Over the Ear Headphones (product)
      If you travel at all, you need these headphones. They tune out the noise and tune in the calmness. Yes they are expensive (about $200 for the version I have or $350 for the latest “35” version) but they are worth it.

      What about Beats? I’ve got another post that compares Bose vs Beats, but there really is no comparison. I own both Bose and Beats. I can’t even tell you where the Beats are because I never use them anymore, but Bose I use all the time. Here’s why:

      • First, the Bose are far superior for active noise canceling.
      • Second, what the Bose lack in bass to Beats they make up for in the other ranges — you’ll hear more overall with the Bose, especially if you listen to more ‘non-Pop’ music.
      • And  third, the BIGGEST difference for me – with Beats once the battery charge of the (only option) rechargeable battery is gone so is your music; with the Bose, if the AAA-battery runs out, not only can you switch to a new AAA-battery, but as a last resort (even without the battery) the Bose WILL still work as non-noise cancelling headphones without ANY battery.
      • Bottom Line: get the Beats if you wanna look cool because of the name, get the Bose if you want the better pair of active noise canceling headphones that you can really rely on.

      You can find the pair I have here…

      2. Amazon Fire Stick (product)
      In the battle for Amazon and Google for most items on my list, Amazon has another with the Fire Stick. We have both the Fire TV and the Fire Stick. Both are great. When we got the Fire TV box it was because it was on sale and it offered 4k options (although we rarely watch things in 4k b/c there’s just not much available yet). Until 4k becomes more readily available the Fire Sticks are a great way to get a QUALITY streaming service at an affordable price.

      Yes, we’ve tried Roku, the Chromecast, and Smart TV built-in apps, and other options. And Apple TV is always something to consider (but remember, I’m not an Apple fan). Roku is fine but it just doesn’t compare to the Fire Stick. The Home Screen interface, features, and usability of the Amazon Fire Stick/Tv are superior to any other streaming tool. Even the Ultra Roku takes too long to get anywhere, the Chromecast requires another source (phone, computer) to do anything, and the stock services on Smart-TV’s are anything but user-friendly.

      Amazon’s service is just fun to use – especially if you have Amazon Prime TV as part of your Prime Membership.

      HD’s Pro Tip: the cool little “X-Ray” feature of Fire TV gives you easy access to answer the question “where have I seen that actor before?”, as well as show-related trivia, and other behind the scenes info.

      HD’s Pro Tip2: power-up your fire stick with Google’s Wifi Mesh (above) and forever rid yourself of the dreaded ‘buffering, buffering’ problem.

      Pick up a Fire Stick with this link:
      Fire TV Stick with Alexa Voice Remote | Streaming Media Player

      3. Binge-Worth TV Shows:
      OK, it’s hard to say that watching a lot of TV would lead to an awesome life but there’s a time and place for everything and there are some pretty good tv shows to be discovered that can add some mindless enjoyment to your life (and sometimes that exactly what you need to recharge).

      Here’s what we became addicted to last year (I know some of them are older but they were new to us and if you haven’t discovered them yet, check them out).a. Stranger Things – only 2 seasons so far but both are addictive – pay attention and you’ll see ST merch everywhere – it’s a true phenomenon now. Please, Netflix, don’t make us wait till 2019 for more episodes!

      b. Oz – a great older series that makes you never want to go to prison. (Series complete)
      c. The Wire – this older series about Cops vs Drugs in Baltimore is proclaimed by some as the best TV series ever. If you haven’t seen it yet, you’re in for a fantastic ride. Omar rules! (Series complete)
      d. Sons of Anarchy – About a motorcycle gang in LA and so much more. Too many surprises to name. Satisfying ending. (Series Complete..or is it?)
      e. Bosch – a new Amazon original about an LA Detective. Good acting. 3 seasons and counting.
      f. The Man in the High Castle – a drama that considers life in the US if The Nazi’s had won WWII. 2 seasons so far.
      g. Ballerz (HBO) Life in, out, and after the NFL. The Rock plays a good role. 2 seasons and counting. It’s pretty addictive.
      h. Game of Thrones (HBO) 7 seasons and counting. It takes a lot of tangents, like the book, but it has its moments and I’m satisfied overall.
      i. Narcos – 3 seasons on Netflix and counting. The tale of Pablo Escobar and the DEA agents who chased him.
      j. Oliver Stone’s Untold History of America – 12 part documentary from WWII forward – with lots of info I’ve never heard before. It’s totally uber-liberal so take it with a grain of salt perhaps but it’s also totally fascinating. (series complete)
      Side notes: We got tired of watching House of Cards after 2 seasons. We were highly enjoying an older HBO show called Deadwood (Ian McShane is a great actor) but were shocked to discover that the show was canceled after 3 seasons right in the middle of the story! And Mad Men didn’t do it for us (not enough action).


      2018 Resources – (VIII) Travel

      Just a couple notes for this category but don’t let the small number fool you – these tips could literally make your life Awesom-er!

      1. LegoLand and the LegoLand Hotel (travel destination)
      If you have kids between 4-12 and you plan to visit the Orlando, FL area do yourself a favor and plan a stop at Legoland in nearby Winter Haven. If you can swing a stay at Legoland main hotel for a night, even better.

      As a resident of Florida, we’ve been to all the Disney and Universal parks many times over and sure they are great, but for kids between 4-12 Legoland is perfect.  This is probably because the park is specifically ‘built’ for kids this age. The rides are all made for them, the activities are geared for them, and everything, everything is Legos! Who wouldn’t like that?

      As a bonus the pricing is pretty reasonable (a single day visit is less than $90, multi-day is just a few bucks more and Fl Residents can get an annual pass with no blackout dates for about $100 – Compare that to Disney which has gotten so out of hand on annual pass pricing that it’s nearly unaffordable to visit anymore!

      HD’s Pro Tip: buy an annual pass on Black Friday and get the “Awesomer Pass” with more benefits for the same price as the regular pass).


      And then there’s the Legoland HOTEL – yes it’s expensive ($250+ per night and often higher than that based on availability) but it’s actually worth it. Consider these benefits:

      1. All standard rooms include a separate area for adults vs kids.
      2. Each room includes a treasure chest/safe of small gifts.
      3. There are TONS of activities to do at the hotel for the kids.
      4. There is a giant Lego castle filled with a giant pit of legos – kids pretty much play in this area all day together and make new friends. (HD’s Pro Tip: There is a lobby bar overlooking the castle – yes that means the parents can have a drink/eat while watching their kids play – genius!) At the castle they have afternoon/evening play times (to include a lego build competitions and giant pajama dance party).
      5. There are regular character visits.
      6. Breakfast is included.
      7. There’s a heated pool and a boardwalk to walk along the lake and relax.
      8. Dance music plays in the elevators.
      9. There is a secret s’mores areas.
      10. HD’s Pro Tip: your kids can sign up for free “Master Builder” Workshops where they get to build a special lego toy with guidance from an expert – it’s really fun and Jax has made some cool little builds at these 30-minute events
      11. Best of all the hotel is less than 100 steps (you read that correctly) from LegoLand park and you have your own entrance/security checkpoint.
      12. You get free parking as well.
      13. We love it so much we’ve stayed there 3 times this past year.
      14. HD’s Pro Tip: be cautious about which hotel you book at. I’m describing the Legoland Main Hotel. There is also a “Beach Retreat” – these BR has cute little bungalows and they have their own games, etc but BR it is actually NOT on site at Legoland. You have to take a shuttle to the park. Personally, I find that too inconvenient to make the BR worthwhile.

      2. Uber (app)
      It took me a while to trust using Uber – I was a little skeptical at first about just hopping in the car of a stranger, but I eventually took the plunge while traveling and I’m glad I did. It’s so convenient. I love being able KNOW what I’m going to pay BEFORE I take the ride – that’s the #1 thing I hate about taxi’s (I always feel like I’m going to get screwed and the ride is never fun because I am always staring at the dang meter and wishing it would slow down!).

      With Uber there is none of that. You know what you’ll pay before you go. I also like being able to visually see where my car is before it gets to me, follow the route I’m going while in the car, and I also love, love, love just being able to hop out and go after the ride is done (because the payment is already taken care of). So far I’ve only had 1 bad ride – it was a rideshare car in San Fran and it took forever because the driver didn’t follow the Uber-suggested route! Otherwise, it’s been great.

      3. Google Contribute (app)
      This FREE app is kind of like TripAdvisor or Yelp (both of which I used to use, but as Google takes over the world (in this case with Google Reviews) I’ve switched to Google Contribute. I’m now a Level 7 Local Guide – which doesn’t really mean anything per se, but it does perhaps help people to know they can trust my reviews are real . Google Contribute is easy to use to do the reviews and to post pics, vids, etc.


      2018 Resources – (IX) Clubs

      Our final category is last but definitely not least. These two ‘clubs’ have seriously been a big part of bringing me closer together with my sons and adding lots of quality time into the equation. Check them out…

      1. Cub Scouts (organization)

      When I was a kid I did Cub Scouts for one year – I came in last in the pinewood derby, I wasn’t much for the outdoors if sports wasn’t involved, and I never really put much effort into it. But when my son Jax got ‘recruited’ at school for cub scouts we thought we would give it a try.

      Now I don’t know if things have drastically changed with Cub Scouts since I was a kid or if it’s just me, but I was blown away by everything that Jax and his troop did this past year in scouting.

      I can honestly say that many of Jax and I’s best bonding moments this past year came from our time doing scouting events.

      Our pack has done so many fun things – an overnight camp under the Atlantis Space Shuttle in Port Canaveral, a day trip to a Coast Guard Air Station, a weekend camp that was highlighted by searching for shark teeth fossils in an old river bed, an overnight behind-the-scenes tour of Sea World in Orlando, not to mention all the hiking, pack shows, cookouts, and of course the Pine Wood Derbies (Jax even got an award for his special design).

      He’s had so much fun and I have too. He’s found a real home with scouting and made so many new friends. The leaders are great and we couldn’t be happier.

      Special thanks to Pack 323 of Land O Lakes, Fl for being so awesome.

      2. Amazon’s STEM Club (Subscription Service)Amazon STEM ClubAmazon scores again. I don’t recall how I first heard of this but I’m glad I did. This past year we moved our son Jax to a STEM Magnet School this year (shout out to The Sunlake Academy of Math & Science in Lutz, Fl!) — only to discover it was a much more challenging curriculum than he (or we!) expected – but in a good way.

      Jax’s mind is expanding in a variety of ways with his exposure to STEM subjects and he’s taking a real liking to it. So far he’s received ‘toys’ that focus on engineering construction, circuits, coding, and more. It’s been a lot of fun. You can choose a subscription for 3 Age Levels (3-4, 5-7, and 8-13).

      Here’s a link to learn more…


      2018 Resources – Conclusion

      There you have it, my friends. The 2018 Resources that comprise the most consistently used tools that I’m using to live an Awesome Life. Every one of these resources has made a genuinely positive impact on my life and which can help you too.

      BTW if you are wondering who won the battle of Google vs Amazon for most items on the list it was Google with 10 vs Amazon’s 7.

      Meanwhile, if you’re somehow still reading this list then I have to wonder what went wrong? Why the heck are you not following my advice and getting some of these items? Go ahead, get started today.


      2018 Resources – Trust Guarantee

      If you know me, you know I am honest. In the spirit of transparency please allow me to disclose that some of the links on this document may lead to websites (for example Amazon) where I am an affiliate.

      What does that mean? It simple — if you use my links to find/purchase a product (which is easier for you), it will NOT cost you any more money (which is my requirement), but it may result in a small commission for me (which is much appreciated). I look at that as a win-win and I hope you feel the same.

      Please remember I only recommend products when ALL THREE of the following conditions are met…

      1. I pay for and/or use the product myself — so I KNOW it works.
      2. I honestly believe the resource will be helpful to my readers.
      3. And providing the recommendation fits with the mission of this site to “Be… Helpful.”

      To learn more please visit my Transparency Page.


      2018 Resources – Did I miss something?

      If so be sure to let me know. What’s in your Life Toolbox that’s making a difference?

      BTW, did you know I put out new tips, practical solutions, and honest product reviews every week? If you want to make sure you never miss a tip, be sure to Follow Me – I’ll send you my tips via email each week so you can review them at your leisure.

      Let’s talk again soon.

      ~Michael, That Helpful Dad

      Which Masterbuilt Electric Smoker is Right for You? Helpful Tips from Actual User!

      Today’s wisdom is again on the practical level – it may not change your life on a grand scale, but it may well make you a better cook and could win you some kudos from your neighbors when you get together. Today we’ll be looking into the Masterbuilt Electric Smokers — since there are A LOT of different models, it can get confusing, but fear not because I’ll give you some tips that may help you determine which model could be right for YOU!

      First some housekeeping notes:

      1. This article assumes you have already made the decision to choose an ELECTRIC smoker over the alternatives (for example the more ‘traditional’ charcoal smokers like the Weber Smokey Mountain, an old school barrel smoker, or even a macked out Komodo or BGE). The skinny on that is simple: if you are just starting out and want to begin to learn the craft of smoking and/or you don’t want to be tied to managing the pit all day (aka you want to essentially ‘set it and forget it’), then you choose an Electric smoker. After doing my research and considering all my options I found myself in this category and thus I chose Electric.
      2. This article also assumes that you have decided to buy a MASTERBUILT electric smoker. I researched a LOT of brands prior to deciding on Masterbuilt. Eventually I boiled it down to Masterbuilt, Bradley, Smoking Tex, and Big Chief. Ultimately I decided to go with the Masterbuilt brand (hereafter referred to as “MES”). To be brief my reasons for choosing MES were: overall consistent quality of positive reviews on consumer sites and smoking meat forums, reputation of the brand, variety of options, positive price to value ratio, and availability of the product. Assuming you have decided on an MES as well, then keep reading.
      3. Please understand that I don’t profess to be some sort of pitmaster, nor am I claiming to be an expert on the subject of smoking. I am just an average dad who likes to cookout with friends and family. I was in the market for a smoker, did a lot of research, and feel like I learned quite a bit, but during my search I found all the different MES models to be a bit confusing. If you are also confused by the many different models then this article will help you. Perhaps some of the other ‘quick tips’ I share will help you as well.
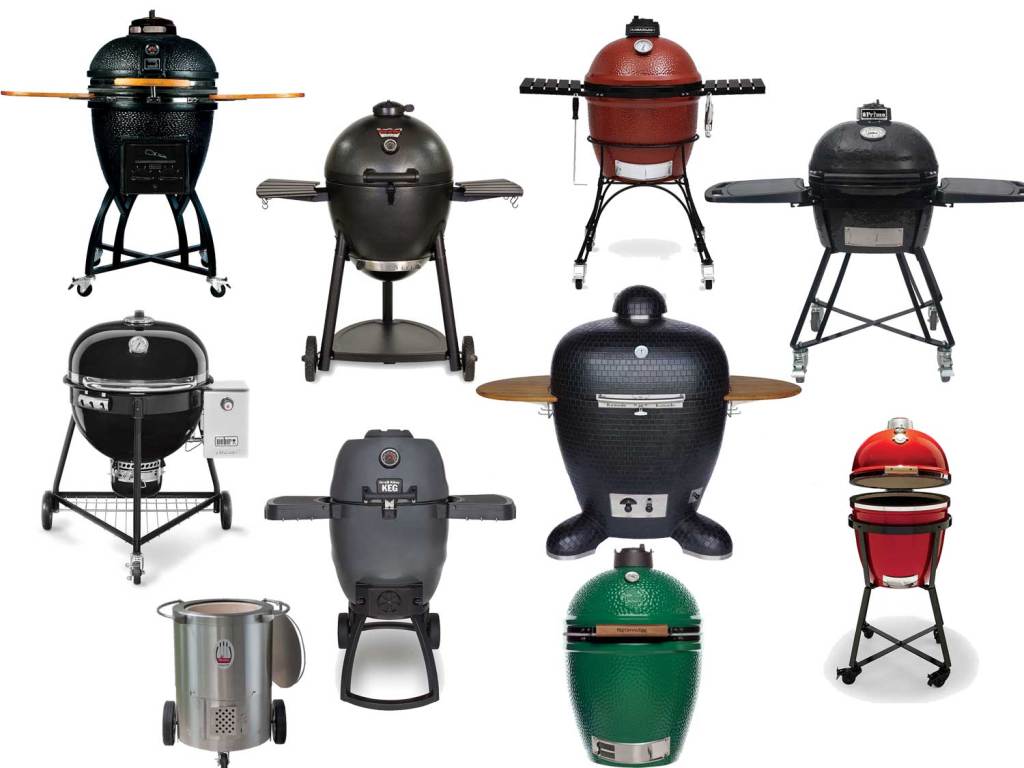
      4. I’ve learned quite a bit after my purchase, so sure to read to the end of the article and see a bunch of accessories I’ve found to be useful – these tools can help you  get the most out of your smoker.
      5. And finally, if you’re curious, you’ll see the model I purchased at the end of the article.


      The Basic Differences to Be Aware of:

      Before look at the different model types, let me give you a few basic features to keep in mind so you can better compare the models and determine what will meet YOUR needs best.

      1. SIZE: for the most part you are looking at either a 30-inch model or a 40-inch one (there is a 24-inch too but it’s non-digital and doesn’t include near the same features as the bigger ones). In terms of the cooking area, you’re looking at about 720 inches for a 30-inch model vs 975 for a 40-inch. BOTH models come with 4 racks to cook on, but obviously the 40-inch model has wider racks.
        1. Quick Tip: if you tend to cook for a group of 4-8, then the 30-inch should do just fine. If you cook for larger groups, want to cook giant cuts (for example a full rack of ribs without cutting them in two), or you just want to show off, then go for the 40-incher.
      2. COST: realistically you’re looking at $150-400 for the 30-inchers and $300-500 for the 40-inchers. As you can probably imagine, a lot depends on which model, what features you want, and where you buy from. Obviously only you can decide what you want to spend, however I would just point out that you may be very satisfied with one of the lower cost models (especially if you are just starting out) because even the $150 models offer MOST of the key features of their higher priced brethren.
        1. Quick Tip – be sure to consider big box stores like Sam’s and Costco which sometimes feature the 40-inch model with lots of extras (including a stand) for a discount price!
      3. HEATING ELEMENTS (HE): most of the models will offer from 650-1200 watts, but you may occasionally see up to 1800watts on special models. The HE is not only want causes your wood chips to smoke but also controls the temperature range of the food (as well as how fast it can reach that temp). For the most part, higher would be better.
        1. Quick Tip: in my opinion most people would likely benefit from choosing a model with 800-1200watts. In addition, some models provide easy access to the HE in the event you need to clean it (or change it if something goes wrong), while others (especially older models) make it a bit difficult to access the HE – you may want to verify this on the models you are looking at.
      4. DOOR TYPE: do you want stainless steel or black for your door color, do you want a window, etc? Regarding the window – some people believe it causes a loss of heat – that may well be true but I haven’t found it to be an issue on my unit (which does have a window).
        1. Quick Tip: personally I like the window it offers you the chance to look in on the food without having to open the  door — of course this assumes that you that you remember to CLEAN the window! And dt worry, it’s not hard to clean.
      5. ELECTRONIC CONTROL PANEL: other than a remote (if your unit comes with one), the control panel is where you set the temp, time, etc. Generally you can find it on the top of the door (aka ‘integrated’ into the door) or sticking up on the top rear of the smoker (opposite from the door).
        1. Quick Tip: Does this matter much? Overall probably not, the newer models seem to feature the ‘integrated’ panels now and they do appear to be less exposed than the older ones that stick up higher, but I wouldn’t let this make or break your deal.
      6. REMOTE: some models have a remote and some don’t. For me this wasn’t a make or break deal, and instead I consider it more of a ‘nice to have.’ The one I purchased did come with a remote but I don’t find myself using it all that much.
        1. Quick Tip: The newest ones also feature ‘bluetooth’ remote options as well so you can control it from your phone or tablet.
      7. MEAT THERMOMETER: Personally I think this is a nice feature since it allows you to see what’s going on with your meat without having to open the door to check the temp. Granted you could purchase a third-party probe on your own but why go to the extra expense if it’s already built in?
        1. Quick Tip: remember that every time you open the door you will lose smoke and temp – having a built in temp probe lets you avoid this problem.
      8. DRIP TRAY LOCATION: newer models tend to have easier access to this by putting it in the bottom center of the unit, while older models make it a bit tricker by having it in the back.
        1. Quick Tip: Look closely at the pics of the models you are researching and you’ll see the differences right away.
      9. AIR DAMPER LOCATION: (aka where the smoke comes out) – some feature the damper on the top, others on the side.
        1. Quick Tip: does this really matter? Some may argue a certain position of the damper could help with airflow (and this could be something to consider if you are using an A-Mazen pellet smoker inside your MES as a smoke source because those can be finicky if your airflow isn’t just right – but that is another topic beyond this discussion). Overall, I wouldn’t let the location of the air damper determine your purchase.
      10. WHEELS/HANDLES: The handle could be on the door (for the obvious purpose of open/closing the door) and/or it could be attached to the top/back of the smoker (for the purpose of moving it around). Most of the MES models do not offer a handle on the door and it’s really not an essential (more for aesthetics really because you have to open the side latch either way). Most of the MES models also do not offer wheels and a transportation handle but this could be a big deal if you need/want to be able to move your smoker around – otherwise you’ll be stuck keeping it in one place or going through a lot of hassle to move it. In my opinion wheels and a transportation handle was an important consideration for me so be sure to look for it if you need it too.
        1. Quick Tip: if you don’t need to be able to move it around, consider buying a stand – it looks nice and will save you the hassle of bending down so much (your back will thank you!). Here’s one example: Masterbuilt Smoker Stand
        2. Quick Tip #2: You’ll probably also need a cover as well. Here’s the nice-looking and low-cost Cover for your MES Smoker I purchased on Amazon (this cover is made for a 40-incher but it fits my 30-inch model with the handle and wheels attached perfectly!): 
      11. MISCELLANEOUS: BOTH the 30-inch and 40-inch models feature the following: insulated walls, easy to read exterior digital thermostats, temperatures that go up to 275-degrees (however if you can find a 1800-watt unit you may reach even higher temps and at a faster rate).


      The Top Selling MES Model Types You’re Likely to See:

      1. 30 inch model WITHOUT window. You will mostly see these offered in all black or with  a stainless steel door. Be sure to examine the pics of the models you are considering because there are LOTS of models/options here. Older models will usually have the control panel on the top rear and the drip pan will be harder to find (it’s not on the bottom front like the newer models as you can see in the pics below). The older models will likely be priced in the $150-185 range while the newer ones will be in the $180-250 range — shop around and you can find good deals because there are TONS of these out there. Keep in mind all of these models should still offer 4 racks and 720 inches to smoke on, 650-800 watt HE’s (which reach temps of 250-275 degrees), and more. However you may or may not get a remote, meat probe, wheels/handle, or certain other higher-end (possibly non-essential) features.

      Here are some pics of the older models.

      MES-30-older-Blk-nowindow


      MES-30-older-SS-nowindow

      Here are some pic of newer models in black without a window: (I couldn’t find a pic of a newer model SS since most of those now have a window as you’ll see below).

      MES-30-new-Blk-nowindow

      MES-30-new-Blk-Bluetooth

      2) 30 inch model WITH window. You can find both older and newer models in this category (aka older ones with the rear top control panel and hidden drip pan or newer ones with the control panel integrated into the door and the drip pan on the bottom front). Once again, these models will all still offer 4 racks and 720 inches to smoke on, 650-800 watt HE’s, and more. In addition, most of these smokers (both old and new) DO come with remotes, meat probes, and wheels/transportation handle so that is a nice bonus, but be sure to read the specs on the actual models you are considering to make sure. Prices here can range quite a bit – from around $180 to well over $300 so definitely shop around!

      Here are some pics of older models with windows (with black or SS doors):

      MES-30-older-blk-window

      MES-30-older-SS-window

      Here are some pics of the newer models with windows (almost all seem to feature SS doors like these – as an FYI the one on the bottom has the bluetooth remote option).

      MES-30-new-SS-window

      MES-30-new-SS-window-bluetooth


      3) 40 inch models WITH or WITHOUT Windows: let’s be honest, most people have probably not read this far in this article – if you actually have then you must be really committed to buying an MES smoker (or just really bored) – either way I appreciate your interest (and I’m sure Masterbuilt appreciates it even more!). That being said, the fact of the matter is that while you’ll find both older and newer models in this smoker class, and most of the 40-inch models you’re going to see out there are going to come with a window and a stainless steel door. The 40-inchers (both old and new) will likely have almost every feature available (with the exception of the bluetooth remote option on only the newest models) – so that means you should expect to get at least a basic remote, a meat probe, and wheels/transportation handle. Here you’ll find HE’s in the 1200 watt range (with all newer models at 1200). Expect to pay from about $350-500 (but be sure to look for the package deals that offer you a stand or other options too).

      From a visual perspective here the pics don’t really look much different than the 30-inch models (but obviously in real life they do because they’ll be taller!). Nonetheless, in the interest of being thorough, let me show you a few pics of the 40-inch models available today (old vs new):

      MES-40-older-SS-window

      MES-40-new-SS-window-bluetooth


      4) OTHER Models? There are a few other models in the MES electric lineup and they’re called “analog” smokers. They are in the 24 and 30 inch category. The basic appeal of analog smokers seems to be that they have thicker “dual-wall” insulation that may offer an advantage in harsh weather conditions and they are often lower in price (sometimes below $150 depending on the model). The 24 inch models only has a 650 watt HE and less than 540 inches of smoking space on 3 racks. The 30 inch models range in features with 1500-1800 watt HE’s and you may also see these models under the ‘Cookmaster’ brand as well so just FYI. The 1500 watt model can actually reach temps of up to 400 degrees and would be better than the 1800 watt model because even though the latter has a higher HE it doesn’t actually don’t have insulated doors. That being said, unless you live in the tundra and/or must have the higher temps, I’d skip the analog option. If you wanna see what they look like, here you go…

      MES-30-Analog


      5) More about Model Numbers:

      Hopefully my review of the model types has helped you to narrow down what you’re looking for. Once you know the model TYPE, you may also want to check the specs on the actual model NUMBER. You’ll quickly find that there are so many MES model numbers it’s hard to keep track of them all. For a nice overview check out these links: http://www.smokingmeatforums.com/a/masterbuilt-electric-smokehouse-models and http://www.smokingmeatforums.com/t/99348/all-mes-model-numbers


      But wait, there’s more…TOTALLY OPTIONAL (but possibly really helpful) ACCESSORIES

      a) STAND: we already talked about the stand. Here’s a reminder of one option to consider: http://amzn.to/20S67nB .

      b) COVER: again we mentioned this too. Here’s the one I have: http://amzn.to/1XdKfFp You can get this in either a 30 or 40inch model – remember I bought the 40inch one even though I have a 30inch model because the bigger one allows me to keep my handle on, if you don’t have a handle and want a really snug fit then get the 30inch cover for your 30inch smoker.

      c) COLD Smoker attachment: http://amzn.to/1VugoXC (one option for cheese, fish, etc – you could also use the A-Mazen pellet smokers for cold smoking as well – in which case you won’t need this attachment).

      d) Smoking MATS: http://amzn.to/281MHC5 (so your smaller food doesn’t fall thru the grates!)

      e) PELLET Smoker accessory: A-Mazen Maze: http://amzn.to/1XNUb74 The A-Mazen 6-inch tube: http://amzn.to/1TWtLif The A-Mazen 12-inch tube: http://amzn.to/1Vuhjr0. You could use any of these instead of the normal wood chips and they may offer you more options (for example cold smoking without using the HE of the smoker even turned on) and/or longer smoker times (versus having to keep refilling the wood chips each 1-3 hours as required with normal MES smoking). As an FYI, I have both the maze and the 12-inch tube. I find myself using the 12-inch tube the most. In addition, there are tons and tons of wood pellet options and a wide variety of flavors. Here are a couple flavor ideas: http://amzn.to/1O3H9k6 and http://amzn.to/1O3HvHi and http://amzn.to/20S9Q4x and http://amzn.to/1r2ds7J

      f) Smoking Meat TIME Guide: this is a handy little tool: http://amzn.to/1O3HDXr

      g) Shredder Claws: these are useful for shredding meat and also picking it up as well: http://amzn.to/1TWuZdk (there are lots of options for these so shop around).

      h) Heat Resistant Gloves: so many options and price variations but here are two options to consider: http://amzn.to/22wF3f2 and http://amzn.to/22wF3fc (mine are like this one).

      i) Meat Thermometor: if your unit doesn’t have one or it breaks or you want a longer range consider this popular one: http://amzn.to/1TWvjZy

      j) Racks and more: self-explanatory. Here’s a rib rack: http://amzn.to/1XNWTcJ Here’s a sausage hanger: http://amzn.to/1TPm5QA Here’s a chicken stand: http://amzn.to/281P08f And here’s a really cool chicken wing rack: http://amzn.to/1t08uKx

      k) Guide Book: here’s a nice book for beginners: http://amzn.to/1Vukkrb The author also has a helpful blog: http://www.smokingmeatforums.com/


      BTW, do you want to know which model I chose?

      MES-30-MY-smokerI bought a newer 30-inch model with SS door and window. Model #20077915. It was around $225 at Lowe’s and it has pretty much everything I wanted including an 800watt HE, remote, meat probe, wheels/handle, front drip tray, integrated control panel, etc, etc.  

      I couldn’t be happier. 

      Well, that about does it. So did you make a decision yet?

      Let us know what you decided and how it all worked out for you. And BTW, if you have any comments, spotted an error on this page, and/or just want to say hello, we’d love to hear from you. Cheers!