Life Lesson #8: Don’t just WISH to be helpful, DO something good today.
Do Something Good Today – Our Teachers
If you’ve read my blog for awhile you’ll know I don’t take credit for much of the wisdom I write about — instead, I view myself as more of a curator of helpful tips about life. From that perspective, my job is clear — to gather the wisdom from wherever it may be found and bring it to your attention.
Such is the case today’s lesson — inspired by Dr. Seuss, Robert Frost, and William Penn.
Want to Watch This as a Video?
Doing Good – Starts with a Choice
I know this may sound cliche but from a poetic standpoint, one of my favorite works is “The Road Not Taken” by Robert Frost.
One piece of advice about poetry that I got looooong ago (from my 9th grade English Teacher) was that “to truly understand and appreciate a poem you need to read it at least seven times to even begin to unlock its mysteries.” Whether that’s true or not is perhaps a subject for another time (to be honest I’ve always thought that advice sounded a bit too much like it came from “J. Evans Prichard, Ph.D.” of Dead Poets Society infamy, but I digress).
The good news here is that you don’t need to read Frost’s poem 7 times to appreciate it’s wisdom — I promise you’ll love it from the first time because it’s that good.
And because this poem applies directly to our discussion today I’d like to share it with you in full…
Two roads diverged in a yellow wood, and sorry I could not travel both and be one traveler, long I stood, and looked down one as far as I could to where it bent in the undergrowth; Then took the other, as just as fair, and having perhaps the better claim, because it was grassy and wanted wear; though as for that the passing there had worn them really about the same, and both that morning equally lay in leaves no step had trodden black. Oh, I kept the first for another day! Yet knowing how way leads on to way, I doubted if I should ever come back. I shall be telling this with a sigh, somewhere ages and ages hence: Two roads diverged in a wood, and I—I took the one less traveled by, and that has made all the difference.
Two Roads… Your Choice…
Life is full of different paths to choose from – some of those paths lead to you do something good to help others, other may seeing you deferring that helping hand till another day.
More often than not you will have every intention to return to those ‘other’ roads and do something good, but if you’re honest with yourself, you’ll soon discover that most of the time (in spite of your best intentions) you never actually do return to that ‘other’ path and thus you miss out on a lot of opportunities to be helpful. Why? Because as Frost writes ‘way leads on to way’ and life takes you elsewhere.
When we miss the opportunity to do something good, we diminish our part in the great play of Life.
Make the World Better – TODAY
To help ensure you don’t miss your opportunity to make the world a better place, I’d recommend you keep this other bit of verse in mind…
I may not pass this way again…
I first heard Penn’s(2) words 30 years ago… and the quote has stuck in my head ever since. I often repeat it to myself when I’m out and about running errands or at work – it reminds me to always be on the lookout to be helpful and more often than not it gives me that ‘extra kick’ I need to not just think about doing good but instead to actually take action and help out.
3 Simple Ways to Do Something Good Today
Being helpful is not hard. Here are some easy ones to get you started…
You’re on the elevator and you see a stranger who seems a bit sad or quiet.
Perhaps a kind word from you will turn their day from gloomy to bright, perhaps even save their life?
What did it cost you? Nothing.
And while you may never know the outcome of your kindness, to that other person it could mean the world.
You’re in a store parking lot and you see an older person struggling to put their groceries in their car.
Perhaps you take a moment out of your day and help them load their bags.
Perhaps a passerby sees you and gets inspired to help someone they see later that day as well.
Who knows – maybe someone else could see them and does the same.
And so on and so forth.
Suddenly, due to something YOU started with a small act of kindness, helps the world becomes a better place.
You’re a student and you notice a classmate is really struggling but nobody seems to know why or care.
What nobody knows is that your classmate’s family doesn’t have enough money to put enough food on the table at home and thus your classmate is hungry – truly starving.
Seeing your classmate has at the lunch table and seeing how they look at your food, you decide to quietly break your sandwich in half and slide some over to them.
Nobody else has to know.
Your classmate smiles and eats.
Their day is a bit brighter…and so is yours.
You get the idea. It’s not rocket science.
I’m sure YOU have lots of examples you can share too — BTW I’d love to hear them and I DO read them so please add them to the comments below and we can all learn together.
Meanwhile, the point is this…
Do not wait to do your good deeds, do them NOW.
Remember, there is no guarantee that you or the person you are doing them for will meet again. The world is constantly moving and you with it.
Take every opportunity to do something good today and you’ll be making the world a better place for all of us.
There is some speculation ‘on the internet’ that this quote may not come directly from William Penn and his Quakers of Pennsylvania. To me it doesn’t really matter – regardless of who said it, the fact is that it is a wonderful piece of wisdom to remember and apply in your daily life, right?
In this article, I’ll review what a balance bike is, compare balance bikes with training wheels and tricycles, and tell you my recommendation for which balance bikes to check out.
Bonus: I’ll also share some vids of my son JeeHo using his balance bike over time so you can see the progress he’s made. Be sure to check him out doing his ‘look, ma, no feet’ trick.
What is a Balance Bike
A Balance Bike is basically a two-wheeled toddler bike that does not have any training wheels to help the child balance.
Here’s a pic.
The purpose of a balance bike is to teach the child to learn how to balance on two wheels without ever using training wheels.
Your goal in using a balance bike is to bypass the training wheel stage and the tricycle stage and speed up the process of moving on to a standard bicycle with pedals. A Balance bike forces a child to balance in order to ride – kind of like survival of the fittest, eh?
I can tell you a balance bike works – even better than I expected!
Check out these videos…
Balance Bike in Action
My son JeeHo on his balance bike last year.
JeeHo on his balance bike this year.
What is the best age for a balance bike
We started our son JeeHo at 2 years old but you could start them as early as they can walk if you wanted to. The earlier you start them the better.
How do you teach a child to ride a balance bike?
Step 1 Put them on the bike.
Step 2 Adjust the seat so their feet can touch.
Step 3 Tell them to Go, Go, Go.
Step 4 Watch them have a blast.
Balance Bikes Vs Training Wheels
Again one of the main purposes of the balance bike is to skip the training wheels stage. Why is this so important?
Because using a balance bike teaches them to balance (thanks, Captain Obvious) while using training wheels actually down-regulates the child’s ability to learn how to balance on a bike (not what you want).
Training wheels provide a false sense of security on a bike. Balance bikes teach them how to be confident on a bike.
(Important) Here’s a little-known benefit – balance bikes teach your kids how to manage TURNS more efficiently while using training wheels decreases this ability because the training wheels just don’t allow your kids to turn that easily. With a balance bike your kids will learn how to do sharp, real-life turns, but with training wheels, they are forced to make wide, unrealistic turns. This was a real problem for our first son Jax (who used training wheels and not a balance bike), but it wasn’t a problem for our second son JeeHo (as you saw in the vid above).
Balance BIke vs Tricycle
As we talked about above, you can start a child on a balance bike very young – pretty much at the time you’d normally consider buying a tricycle, you can put them on a balance bike. Quite frankly there is no reason to buy a tricycle (other than perhaps nostalgia) when you can buy a balance bike instead.
A tricycle is slow and steady. A balance bike is fast and cool.
As with training wheels, tricycles delay your child learning balance. A balance bike forces them to learn balance.
Even worse than training wheels, a tricycle forces those wide turns. A balance bike helps your child learn how to balance ‘through’ the turn.
Balance Bike vs Scooters
This is really like comparing apples and oranges. In the case of a scooter AND a balance bike, both teach balance, but in different ways. There are such a wide variety of scooters it’s hard to make a worthwhile comparison of these two so we’ll forego that for now. We own a wide variety of scooters, bikes, etc. Although it’s totally off subject and definitely does not teach balance, one of our favorite ‘razor’ scooters of all time is (3 wheel scooter).
Our Experience with a Balance Bike
To say we’ve been happy with our decision to try a balance bike is an understatement. Seeing JeeHo race around the neighborhood is so cool. It’s really surprising to see how fast he can go on his balance bike – he regularly keeps up with the bigger kids on their bikes and that makes him feel so cool.
Also, JeeHo has developed so much confidence on his balance bike and that was an unexpected benefit.
Should you buy a Balance Bike?
Do you really have to ask? This is a no-brainer. YES, you should buy a balance bike. They are so cool.
Recommendations for Balance Bikes
Here is my top pick for balance bikes – as with ALL products I recommend, we actually own/use this item.
The Kazam balance bike was super easy to put together, has held up well over the years, and has proven to be a great value. You can’t go wrong with this bike.
If you want to compare it vs other bikes, here’s a link to few more to consider on Amazon – of particular note are the ones by Strider and Cruzee.
It’s Foto Friday and I’m sick. Unfortunately for me, I’ve been sick quite a bit since December with a laundry list of ailments. It sucks to get old.
That said, I’m not about to give up, and I’m confident that I’ll overcome what’s keeping me down. Meanwhile, this brings to light an important life lesson – one we’ve discussed often in the past…
There is no guarantee of tomorrow, friends. Today is all we have.
You know all those hopes, dreams, and great ideas on your to-do list? Well if you’re putting them off for ‘the future’ you may never get to them. The flower that blooms today may be gone tomorrow. Don’t let that happen to you.
Gather your rosebuds TODAY.
Live NOW.
Make TODAY great – it’s the only thing you can control.
Tired of the same old K-cups? Why not give yourself something to look forward to with your morning cup of Joe? Even better, how about a cup of coffee that not only tastes great but is also healthy for you AND won’t break your fasting routine? If this sounds interesting to you then I’ve got another practical solution for you to try – I call it the CinnaBUTTER Coffee Cup.
I’ll give you two versions of the CinnaBUTTER Coffee Cup to try – the super simple, super fast, anyone-can-do-it version and the Pimp My Cup AwesomeR version.
If you just want the recipe without all the details, here it is, however, if you want to know more about why it’s healthy, how it relates to fasting, and get some tips for taking this coffee and more to the next level, keep reading.
CinnaBUTTER Coffee Cup Super Simple Recipe
Put a ½ Tablespoon of Grassfed Butter in the bottom of your coffee mug
Brew your favorite cup of coffee into the mug that has the butter so it melts the butter as it pours into it.
Sprinkle some cinnamon on the top.
Stir
Enjoy
You can use your regular K-Cup for this version of the recipe or any other regular coffee that you normally brew. The goal of the super simple CinnaBUTTER Coffee Cup recipe is just to introduce the idea to you and kick up your regular cup a notch with flavor while also allowing you to experience the potential health benefits of this coffee. This is a speedy way to enjoy the CinnaBUTTER Coffee Cup for those in a rush – you’ll get 75% of the overall benefits from using this method and anyone can do it.
How long does it take? How fast can you cut the butter and sprinkle the cinnamon? It adds about 30 seconds to your normal routine.
What about my cream and sugar? I encourage you to at least try the CinnaBUTTER Coffee Cup without any additional cream and sugar. The flavor is already there so you shouldn’t need to add anything to it. Also if you add cream on top of butter it will end up breaking your fast. And if you add sugar, you’ll really spike your blood sugar. Add them if you must and you’ll enjoy the flavor but try to work yourself towards the non-additive version so you can get the health benefits too.
CinnaBUTTER Coffee Cup – Pimp My Cup AwesomeR Recipe
Put a ½ Tablespoon of Organic Grass-fed Butter in the bottom of your mug.
Grind fresh coffee beans.
Simple: use a motorized coffee/spice grinder.
Advanced: practice mindfulness and use a ceramic burr-grinder for the freshest possible taste.
Brew your coffee with a French Press or an Aeropress (my choice) – pressing it into the mug that has the butter.
Sprinkle organic cinnamon onto the top.
Stir with an organic cinnamon stick.
Smell the amazing aroma.
Enjoy.
For the Pimp My Cup AwesomeR version of the CinnaBUTTER Coffee Cup we’re moving beyond instant coffee, K-Cups, or even pre-ground beans. Here we want only the freshest beans, we want to brew them with a French Press or an Aeropress (see below), we’re using organic grass-fed butter, organic cinnamon, and we’re adding an organic cinnamon stick into the mug at the end too. The goal here is to get the best possible experience. We’re being mindful when we use our ingredients (thus the hand-crank ceramic burr grinder and that use-anywhere Aeropress). And we’re using only the best ingredients. Our goal is taking time to turn the simple into the extraordinary vs. rushing through life.
OMG, How Long Does All This Take? Don’t be afraid of this method from a time standpoint. It’s not like it takes forever. If you use the motorized spice grinder it adds about 30 seconds total to the process. If you go the hand grinder that will add a good minute. The French Press or Aeropress adds another 2-3 minutes. So what’s the total additional time? Let’s call it 5 minutes. Is 5 minutes of additional time worth it to get the full experience of the CinnaBUTTER Coffee Cup Pimp My Cup AwesomeR experience? I think so, but I encourage YOU to give it a try for yourself and let me know.
CinnaBUTTER Coffee Cup Tools of the Trade
This section gives you some tips on what I use to make my CinnaBUTTER Coffee cups. Where available I’m including some Amazon affiliate links – remember I only recommend products I actually use myself and to learn more see my Trust Guarantee. Pick these up on Amazon or find them at your local store. Enjoy…
Favorite Butter – I’ve been using Vital Farms grass fed, pasture-raised butter and KerryGold Irish Butter. Use whatever version you prefer but move beyond the run-of-the-mill butter because a lot of your flavor will come from the butter so don’t skimp on this important ingredient.
Favorite Coffee – Lots of options here. Try to expand your horizons a bit. Yes, you can use your K-Cups but trust me when I say that there is a difference between K-Cups and using coffee grounds. Right now my favorite beans are Sprouts Mountain Gold – it’s bold, rich, and even has hints of chocolate in it. I also like using Organic Colombian Coffee beans as well.
Did you know most places that sell coffee beans have a grinder that you can use for free? Try it, because even if you don’t grind at home, you’ll get a better flavor and aroma by using coffee grounds vs K-Cups, etc.
Coffee Bean Grinders: The reason to grind at home is to experience the freshest coffee aromas and flavors. Did you know that coffee beans lose their freshness just a few hours after grinding? If that’s true then you’ll want to grind at home. Now if you really want to blow your mind with aroma and incredible fresh flavor try the hand-grinding – it takes a minute or two but its nice. That said, if you are not ready to go there just yet, then at least use a coffee/spice grinder — you’ll get 80% of the benefits of fresh grounds. Here’s what I use:
Aeropress: This is a take-anywhere way to make your own fresh coffee in under 5 minutes with just coffee grounds and hot water. I have another article about the Aeropress, there’s tons more online, and there’s even a Wikipedia page for Aeropress. The bottom line about Aeropress is that it’s inexpensive compared to a french press and yet many believe it provides a better cup. Pick up one on Amazon using this link.
BTW, the pic doesn’t do it justice – check out this video too…
Cinnamon: Lots of options here. I’ve always been a fan of McCormick’s spices, but here are a few options. Find them on Amazon or your local grocer…
Hot Water/Tea Kettle: If you are going to to the Aeropress route, you’ll need a way to heat hot water quickly. I love using an electric tea kettle – it’s fast, you can control the temp (Aeropress recommends 175-185 degree hot water), and easy to pour.
Do you use something else besides these tools? If so, please share your tips with me.
Why is the CinnaBUTTER Coffee Cup Healthy for you?
Assuming you are not adding cream and sugar to the cup and that you are not using coffee with any artificial sweeteners, etc, then you should be able to benefit from the potential health benefits of this style of coffee. I say potential because I am not a doctor nor do I play one on TV. That being said I’m not the first to tout the benefits of adding healthy fats to your coffee or the pro’s of using cinnamon in your diet.
What about my fasting? Will the CinnaBUTTER Coffee Cup break my fast? One of the best things about the CinnaBUTTER Coffee Cup (either version) is that it won’t break your fast AND it fits in great with an Intermittent Fasting routine. I’m a big fan of Intermittent Fasting and I have an article with lots of tips for that lifestyle.
Tips for Intermittent Fasting
Using grass fed butter is great because not only do you get lots of flavor but you also get access to ‘good’ fats to use as an energy source and brain-food during your fasting stage. Can you say Double-Bonus? Remember there are no carbs in the butter or we don’t want to add any to your CinnaBUTTER Coffee Cup so we can stay in the fasting stage. But you do need energy and that butter provides a great way to bridge yourself to the end of your fasting period.
For me, a single cup of CinnaBUTTER Coffee takes me all the way through to the end of my 16-hour fasting cycle.
As for the cinnamon – again using it is for more than just flavor (although let’s not overlook the fact that cinnamon is great tasting and there was a famous Seinfeld skit from “The Dinner Party” episode about cinnamon too.
What’s super important about cinnamon for our purposes is that cinnamon regulates blood sugar and while were in the fasting stage we want to ensure we’re using energy from fat not carbs so we can get all the benefits of the Intermittent Fasting routine. Cinnamon helps us to do that.
Do you see the magic of the CinnaBUTTER Coffee Cup? To use the old ad line… it tastes great AND it’s less filling!
CinnaBUTTER Coffee Cup – Give it a try
OK, it’s time to stop reading and start brewing.
Give the Cinnabun Coffee Cup a try and let me know what you think. I’m guessing you’ll find yourself happy you gave it a try.
In this article, I’ll detail why I chose the Kamado Joe, specifically why I chose the Kamado Joe vs Big Green Egg, what my personal experience has been with the Kamado Joe, and provide some helpful Kamado Joe tips for new cooks.
The Kamado Joe is the brand name of a line of ‘kamado-style’ ceramic grills. After dabbling in black, Kamado Joe’s are known by their now famous RED color and more importantly by the company’s trend-setting innovations for kamado cooking.
Here’s what a Kamado Joe Classic II looks like. Note that trademark red color – it’s a thing of beauty, ain’t it?
II. What is a Kamado?
For those who are new to kamado cooking, let’s take a step back and talk about what a kamado is. (For those that already know, skip ahead).
What is a Kamado?
There an excellent series of “Kamado 101” articles by a fellow named “Kamado Jim” and I’ll link to them in the references at the bottom of this page, but for now let’s refer to the simple definition on the Kamado Joe website…
And “relatively unchanged for centuries, air flows through the kamado grill’s ceramic body and out its vented dome, chunk charcoal comes to life as smoke and heat.”
I’m always on the lookout for ways to improve my cooking. My friends in the neighborhood joke about this because they claim that I rely more on technology than cooking ‘heart’ – ouch! Whether that’s true or not I can’t say, but I will admit that if there is a cooking gadget that I think can up my game, I’ll give it a try.
For years I’d heard about the Big Green Egg but was averse to try because of the perceived learning curve and the expense of the product. But I did my research and finally took the plunge a couple years ago and I’m kicking myself that it took me so long!
There is a difference in the flavor of the food when you cook over lump charcoal/wood. Can’t deny it, no disputing it, when you cook on a kamado you’ll taste it and it’s awesome.
That said, there IS a learning curve to kamado cooking (and I’m still learning!) and it IS expensive to buy a kamado grill ($600-1000 will get you started depending on what brand you buy and how big you go). Also keep in mind you’re gonna want some accessories pretty early on as well – so do yourself a favor and remember this little piece of wisdom…
I’m not gonna lie – when I was first shopping for a kamado it was a pretty tough decision to choose the Kamado Joe vs the Big Green Egg.
I did a lot of research (read: spreadsheets, shopping, forums, etc). I talked to a lot of people. I watched a lot of videos.
Honestly, I don’t think you can go wrong with either the Big Green Egg or the Kamado Joe and since the time this article was first written I have since purchased a Big Green Egg as well (because you can never have too many grills, right?).
As I mentioned above, in addition to the Kamado Joe and Big Green Egg there are certainly other options in the kamado world too – there are a lot of lower-end options and some higher one too but for me I narrowed it down to the Big Green Egg and the Kamado Joe pretty quickly based on my individual needs.
To be honest, most of my friends have Big Green Eggs and they love them. As I said I too own a BGE and therefore I am not here to knock the Big Green Egg because it has a long history of success and tons of rabid fans who tout its awesomeness. Let’s face it, The Big Green Egg is the ‘It Girl’ of kamado’s, and it probably outsells all other kamados combined. Buy the Big Green Egg and you will probably be very happy.
But for me, the Kamado Joe is still the best between the two and here’s why…
Regarding the research, I’ll link to some threads in the reference area in the interest of time let me just summarize by saying that I chose the Kamado Joe over the Big Green Egg or other options because of the following THREE Reasons:
Kamado Joe reputation – everything I read had it on par with the Big Green Egg in terms of capabilities and quality.
During my shopping experiences the Kamado Joe just ‘felt right‘ when I got my hands on it.
Additionally my Kamado Joe is more functional than the Big Green Egg“out of the box” and it’s hard to dispute that. This is because the Kamado Joe can do more ‘out of the box’ because of its design – the Kamado Joe comes with an internal cooking rack system called “The Divide and Conquer” system.
Kamado Joe’s Divide and Conquer system allows you to cook BOTH direct and indirect at the same time, on varying levels. Here’s what that looks like…
As you can see from the pic, with the Kamado Joe you can have different cooking zones elevations AND you can also use BOTH indirect and direct cooking at the same time.
With the Big Green Egg (unless you modify the place-setter system by purchasing the Eggspander) your option is either direct OR indirect but not both – that’s HUGE!
The additional flexibility of the Kamado Joe appealed to me and I can tell you that the Divide and Conquer system is not just a gimmick – it works and I DO use it quite frequently. Furthermore, there are tons of forum articles from Big Green Egg users who end up wanting to modify their eggs to retrofit them with the Kamado Joe Divide and Conquer system (see references below). Why retrofit when you can just by a kamado made for this? That kamado is the Kamado Joe.
Additionally, when I purchased my grill (2017) Kamado Joe was coming out with an updated line that featured an ‘easy-close’ lid – one of the things that’s important to know about kamados is they are heavy – I read numerous reports about the lid ‘slamming down’ on some kamado’s and causing cracks. Kamado Joe’s ‘air-lift’ hinge was designed to prevent that and this was another selling point for me.
STOP THE PRESSES – THE DEBATE IS OVER!
Kamado Joe has now introduced the Kamado Joe Classic III, the Big Joe III, and the Pro Joe and all of them feature another new innovation called the SlōRoller – an insert that works by distributing smoke and heat in rolling, recirculating waves.
The SlōRoller helps to surround food in clouds of ‘delicious smoke’ while at the same time evenly distributing heat. Kamado Joe says this results in enhanced flavor and significantly reduced hot spots.
Fewer Hot Spot? Enhanced Flavor? Sign me up!
You can read our full review of the new Kamado Joe III here…
With the release of the Kamado Joe III I personally believe the long-standing debate between the Big Green Egg vs Kamado Joe is finally over. In fact I wrote a new article about it and you can read it here…
V. Kamado Joe Size Options & Kamado Joe III Walkaround Video
Check out this video from Kamado Joe’s John Setlzer with a great intro to the Kamado Joe III…
Check latest prices for Kamado Joe III
Kamado Joe Classic III
Kamado Joe Big Joe III
Kamado Joe Joe Junior
IMPORTANT TIP: Although the Big Joe gives you the most cooking space and it is truly awesome, just understand that not only is it the most upfront cost, but the accessories also cost more too. For most people, the standard size “Classic II” or the new Classic III will be the way to go – you’ll get the most accessory options to choose from as well.
That being said, if you often cook for groups over 10 people, then you will want the Big Joe or even the new Pro Joe. Enjoy!
VI. How is the Food on the Kamado Joe?
Pizza – awesome. Chicken Wings – best ever. Beer Can Chicken – yummy. Fish – moist and tender. Steaks – out of this world flavor!
Cooking on kamados (and the Kamado Joe specifically) offers a variety (from cold smokes to 800-degree heat) that just can’t be beaten with any other cooking appliance I know. In addition, you can do really long cooks on them (think low and slow) to include even overnight cooking because the kamado holds a temperature so well and for so long.
Sadly I also have an expensive, built-in Cal-Flame gas grill (when I put in a patio bar a few years ago) — unfortunately, because of the addition of the Kamado Joe I rarely use my beautiful grill for anything but making bacon (yes I turned a $4k grill into a giant griddle, and no that ROI on that wasn’t so great!) or for ‘must-be-quick’ cooks because kamados take a while to heat up. I also got rid of my Masterbuilt Smoker since the Kamado Joe replaced that too.
I’ve got some great recipes books that have really helped me and I’ll link to them in the “Tips” section below.
VII. Kamado Joe Quick Tips
A. Buy a Kamado “Manual.”
You can’t run before you walk. There IS a learning curve to kamado cooking and you would be wise to buy one of the following two books because either of these will speed up your progress and have you mastering the KJ in no time. You just spent a grand on the KJ, chip in another $20-30 and get these books – you’ll learn a bunch AND pick up some great recipes too!
I’ve quickly learned that not every brand of lump charcoal is created equal. Don’t cook on JUNK charcoal when you can cook on quality LUMP charcoal – your food will thank you for it. Some of them are made with woods like hickory or mesquite that are so strong they don’t go with a wide variety of foods. I’ve tried a few brands I’ve found that you get what you pay for – quality brands of lump charcoal offer pieces that are are bigger, burn a long time, and have a flavor on the mild side because of the combo of woods used.
TIP: Personally I don’t mess around with charcoal chimneys or parafin fire starters. Instead I like electric fire starters. I’d recommend you one too and be done with it. Kamado Joe makes a good electric fire starter for a reasonable price.
C. Give Yourself Time…literally!
One downside of the Kamado Joe, like all kamado’s, is that it takes time to get it ready to cook – figure an hour to get heated, etc. and I’ve learned to give myself an extra 15 minutes if I’m trying to ‘time up’ with other foods just to be safe.
D. Cleaning is Easy.
Kamado Joe (like most kamado’s) is pretty much self-cleaning (oh yeah!).
If you’re installing the KJ in an island, be sure to check out my full accessory list for tips on custom tables or island covers, but if you’re keeping the Kamado Joe in it’s nest, then here’s an excellent cover (this is for the Classic II size). It’s “Kamado Joe Official” so you can ride in style…
This is by no means all you’ll want or need in the way of Kamado Joe Accessories, so be sure to read my articles Best Accessories for the Kamado Joe, but to get you started for now, add these to your cart – you’ll thank me.
Again, if you want to see ALL my recommendations on Kamado Joe Accessories, be sure to visit my “Best Accessories for the Kamado Joe” article – you’ll get over 200 tips and ideas to consider.
VIII. Do you have The Kamado Joe?
What’s been your experience so far?
What tips or accessories recommendations do you have to share?
I’d love to hear your thoughts – meanwhile it’s time for some more wings and beer with my Kamado Joe!
Did you know we write about more than just Kamado Cooking on this site? It’s hard to belive, I know, but it’s true! Visit our home page to read more tips…
OK, OK, I know what you’re thinking – “Bed of Nails?” Is that some sort of yogi fetish? Do visions of somebody laying on a board of spikes go through your head?
I’m not quite talking about that. Instead, The Bed of Nails I’m referring to is a product that’s basically an acupressure mat. Here’s what mine looks like…
As you can see, there’s a bunch of little ‘golf spike’ looking things that provide the ‘nails’ for you to lay on.
Now before you dismiss this as a cockamamie idea, let me just tell you that this acupressure mat is freakin’ awesome – I use my ‘Bed of Nails’ almost every day and it really works!
Bed of Nails – Why should YOU want one?
Lay on this thing (skin to mat) and you’ll experience a gamut of sensations.
Is there pain? Yes. It hurts — especially if you lay on the mat without a shirt and with a hard floor underneath – but seriously if you are gonna do it you gotta go ‘all in’ if you wanna get the highest ROI, right?
However, if you can get through the first 5 minutes then you’ll be over the hump – on your way to a state of pure bliss.
After 20-30 minutes, you’ll reach a state of ‘gelatinous euphoria’ where the cares of the world melt away.
I love my mat so much I have a small travel size I take with me.
Bed of Nails – HD’s Pro Tip
Combo your Bed of Nails with your favorite meditation and it’s an out of body experience.
Trust me, if you give this product a chance you will be thanking me – it’s that incredible.
Google Rewards is a free app you can download from the Google Play store. You may also hear Google Rewards called Google Opinion Rewards or Google Surveys.
Regardless of what you call, it the fact is that the Google Rewards app is an easy way to earn some free money!
After you download the app and answer some basic demographic questions about yourself, Google will begin sending you notifications on your phone when a new survey is available. Open the survey and answer the questions.
Each survey has 1-7 questions and takes about 10-seconds to a minute to answer. Questions range from, “Which logo is best?” and “Which promotion is most compelling?” to “When do you plan on traveling next?”
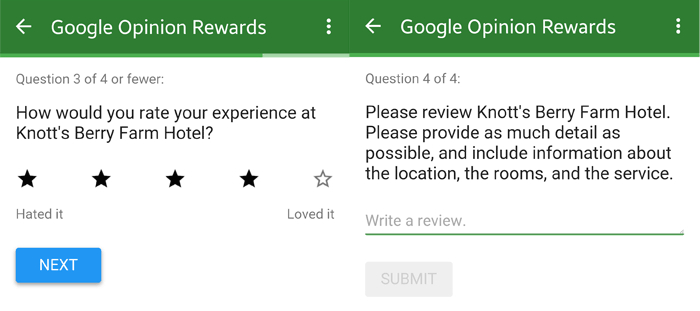
Once you complete the survey you get your rewards instantly. You can then spend them immediately. Here are some screenshots…
HD’s Pro Tip: Regarding frequency of surveys and earning more money – Google says they send surveys about once a week, but I’ve found that if you visit a lot of places that are tied to Google Maps (hotels, restaurants, etc) the frequency tends to increase. More Surveys = More Money. Also these surveys are usually tied to Google Reviews – if you tend to leave a review anyway, why not get paid for it? Here’s an example…
How Much Money Can You Earn from Google Opinion Rewards?
For each survey, you will receive between 10cents and $1.00 in Play credit.
Most surveys I’ve done pay out about $16-25-cents.
That may not sound like much, but it does add up over time. In the past 6 months I’ve made over $35 – just from taking a few seconds 1-2 times a week to answer a few questions. It’s easy money. I’ve used that money to buy premium apps, e-books, and music.
You can then spend the money you earn from Google Opinion Rewards on whatever you like in the Google Play universe – that means music, books, tv shows, apps, and more.
Google Rewards – What’s YOUR Take?
Have you tried Google Rewards? What’s been your experience?
Do you know any other tips to make the most of Google Rewards? If so, please share them.
Did this article help you? Drop me a comment and let me know. Feel free to share this with a friend.
The first step towards gaining wisdom is to recognize the value of advice.
Our life lesson today comes to us from King Solomon who said “Listen to advice and accept instruction and in the end you will be wise” (Proverbs 19:20).
What This Means to YOU…
If you’re like me, you have people trying to give you advice every day.
Unfortunately, if you’re like me, that means you probably also find it difficult to listen to that advice!
If that’s true, it could mean you’re letting a great deal of knowledge just slip through your fingers and that’s a problem because it means you’re making your life harder than it needs to be.
Don’t let that happen to you – learn to accept advice and allow this wisdom to improve your life.
3 Ways to Use This Wisdom Today
Recognize what could be stopping from you accepting advice.
Understand how to recognize good advice from bad.
Use this wisdom to help others.
I-Overcome Your Pride Perhaps the biggest obstacle that keeps us from accepting advice is our own pride. There are many reasons for this — it could be that we feel like we should be able to figure things out for ourselves, or we foolishly believe our ideas are always better than anyone else’s, or we are embarrassed to ask for help because we don’t want to appear stupid, etc.
Regardless of the reason, the important thing to understand is that when you allow pride to stop you from listening to advice, you end up making your life more difficult than it needs to be because you limit yourself to only one solution source — you! The fact is that nobody knows everything and the sooner you and I realize that, the sooner we’ll know it’s foolish to let our pride stand in the way of gaining knowledge from others.
I know it’s hard, but the next time you find yourself in a situation that you know you could use help with, do yourself a favor, swallow your pride, and be open to letting someone help you. You’ll be glad you did.
II-Recognize Good Advice
Now that I have you at least willing to listen to advice, let me throw you a curveball – not all advice is good advice and it’s important to have some guidelines for sifting out the good from the bad.
Perhaps the most important thing for you to do is to recognize the SOURCE of the advice – is the advice coming from someone who truly cares about you? If so, then it’s worth your while to at least listen. If not, move on. However, even if the advice is coming from a person you trust, that still doesn’t mean it’s going to help you. You can recognize good advice by asking yourself a few questions.
Here are some examples…
Is the person giving you advice qualified to provide it based on their own life experiences?
Did the person listen to you and attempt to understand your situation before giving you advice?
Does the advice give you realistic options that you feel motivated to pursue?
Are you certain the person giving the advice is not just trying to take advantage of you?
Does the advice still leave the final decision in your hands?
Does the advice make sense and do you feel good about it in your gut?
These questions are just examples; I encourage you to develop ones that make sense to you — come up with a list of simple and easy to remember questions that you can ask yourself when you are presented with advice. If the advice provided overcomes these Challenge Questions then it’s probably worth listening to.
Remember this — just because you listen to someone’s advice doesn’t mean you necessarily have to follow it — the final decision on what to do remains with you.
One bonus of seeking that advice is that you’ll have more confidence when you do take action to tackle your problem because you’ll know you invested extra time to seek wisdom and that extra confidence could be the final key you need to overcome your obstacle.
III-Provide Good Advice to Others Let’s face it, the world needs more people who are willing to help others. I encourage you to be one of them.
If you find yourself in a situation where you have the opportunity to give advice to someone else and you have the knowledge you believe could help them, then why not do it? You never know when your words could change or even save somebody’s life so don’t ignore helping someone if you can. That being said, it’s important that you give good advice not just any advice. But how?
For starters, you can apply the Challenge Questions from #2 above to yourself. In addition, you can use this simple formula: Listen First, Advise Second. After all, how can you give advice to someone if you don’t listen and understand their situation? Once you do that you’ll be in a position to know if you can truly help them. If you can, then give them your advice, but be sure to respect their right to accept it or not – understand your job is only to share wisdom, the final decision rests with them.
But what if you listen and realize that you can’t give them any helpful advice? That’s ok. You can still encourage them, pray with them, and perhaps point them towards someone else who can help them. It would be better to do this than to give them questionable advice because you are too proud or scared to admit you don’t know the answers either. Part of giving good advice is knowing your own limitations – recognize that and you’ll come full circle in understanding this lesson.
Don’t Wait, Use This Wisdom TODAY…
Pick a problem, any problem, then challenge yourself to ask someone you trust for advice.
Was this helpful?
If so, take a quick sec and…
Share this page with a friend so they can benefit too
Share your wisdom – did you have a similar experience or great photo to share? Drop me a line below and tell us about it.
Follow my blogand let’s stay connected – we can help each other reach new heights.
If you’re like me, you love your pets like a member of the family. You want them to have only the best in their lives and that means you want them to have the best diet too, right? So why buy store bought dog food that sits on the shelves for months (and has who-knows-what ingredients inside) when you can make your own homemade dog food recipe with human-grade ingredients?
Hi, I’m Mike, AKA That Helpful Dad. I’ve been making homemade dog food for my pups for over a decade and I’m here to help you learn how to make it too. Cooking homemade dog food for your pets is easy, it’s fun, and it’s oh so good for them. In this article, I’ll show you one of my favorite recipes for homemade dog food.
Cooking for your dog is easier than you think!
One of the most popular vids I’ve put on YouTube over the years is a homemade dog food recipe – it has over 400,000 views on YouTube and ranks in the top 5 on Google Search for Videos about homemade dog food – yet it’s a really just a simple vid about me doing something I love for my pets. Who knew?
I think the reason it’s been so popular is that this homemade dog food recipe is easy to make, chock full of healthy goodness for your dog, it’s super fresh, and yields positive results for your pet.
Gather ingredients. Note that you may need to adjust the quantities for your ingredients based on the size of your pets. The recipe here is enough to feed 2 small Yorkies (6-8 lbs each), 1/2cup of food twice per day, for about 4 days.
Heat 2T of EVOO in your pot
Use your Food Processor to roughly chop all your vegetables (NOT the meat). You don’t need to liquify them, just chop them into ‘bite-size’ pieces appropriate for your pet.
Put all vegetables and the raw meats into the pot.
After 20-30 minutes, remove your meats and use the food processor to chop the meat. Then return the meat to the pot – at this point, it should start to look like a stew.
If you are going to serve immediately, be sure to let it cool first – maybe add an ice cube or two to your pet’s bowls.
Refrigerate any unused portion. It should keep for 3-4 days in the fridge (OR) you can also freeze it for long-term use.
Watch your pets go crazy for this food!
Homemade Dog Food Recipe Source
This homemade dog food recipe is adapted from the book “The Whole Pet Diet” by Andi Brown. This book is very helpful on many topics related to helping your pet – beyond just a good diet. It not only provides you with a lot of recipes like the one I’m recommending but also a wide variety of holistic tips about caring for your dogs the natural way (without simply relying on medications). You can pick it up on Amazon here…
Editor’s Note: Where available I’ve included Amazon affiliate links on this page to help you find these products faster – while I may earn a small fee if you buy the products I recommend, know that using my links does NOT cause you to pay higher prices AND most importantly understand that I ONLY recommend products I actually use myself. To learn more, see my Trust Guarantee. Regardless of where you may buy these items, I honestly do believe they will help you.
The Stars of the Homemade Dog Food Video
Bonus – in this video you’ll see our beloved Yorkies Bella and Sassy. This vid was filmed a while back and while Bella is still with us (and still eats this stew every day), Sassy passed away a few years ago. This video is part of their legacy. For more on Sassy’s story, check out this free book I’m writing…
Do You Have a Homemade Dog Food Recipe?
If you’ve tried this recipe or have to share, please do so. I’m eager to learn your tips so we can help each other improve.
If this post helped you feel free to share it with a friend.
When you do these things we all win.
Want more tips like this?
Practical Wisdom YOU can use today to make a difference in YOUR Life






















 HD Pro Tip: Try a