Wanna cook some wood-fired wings? Trying to find the recipe for making Anthony’s Coal Fired Wings? I’ve got you covered. Today we’ll be cooking wood fired chicken wings using a combo of lump charcoal and wood chunks – I’ll show it to you all in video form on this site and give you a link to get the full recipe with detailed cooking instructions from our grilling site if you want to do this cook yourself.
As you’ll see in the vid, I’ll be making my wood fired wings in an Ooni Pro Pizza Oven, but you can use this recipe for any brick oven, kamado, or even your regular oven. Grab a beer and let’s cook wood fired chicken wings!
Wood Fired Chicken Wings
Wood Fired Wings Cooking Notes
For the full recipe that I used in the video along with detailed cooking instructions please visit my grilling site: LordoftheGrills.com
About this recipe: This recipe is a 3-step process
The marinade (6-24 hours)
Cooking the Wings (20-30 minutes)
Making the caramelized onions. (20-30 minutes cooked at same time as wings)
Actually there is a 4th step – EATING the wings!!
Again for the full recipe with detailed cooking instructions visit my grilling site: LordoftheGrills.com
The result: I felt pretty good about this cook – the process was easy, my family loved the flavor, and I believe I can repeat this cook again and again with ease.
If you try this cook, let me know how it turns out. As always, please remember, I’m just an Average Joe so if you have any tips to share, I’d love to hear them so I can learn too.
Cheers!
Did You Know?
If you enjoy reading That Helpful Dad’s articles, you may also like…
Today we’ll be cooking some wood fired chicken wings using a combo of lump charcoal and wood chunks. I’ll show you how to cook wood fired wings in an Ooni Pro Pizza Oven, but you can use this recipe for any brick oven, kamado, or even your regular oven. Grab a beer and let’s cook wood fired wings!
Wood Fired Wings in an Ooni Pro
[lwptoc]
Wood Fired Chicken Wings – The Video
Wood Fired Chicken Wings – The Recipe
You can use whatever chicken wings you like (I’m using Costco’s Party Wings in the vid) and you can cook your wood fired wings with any recipe flavor you like, but our recipe today features a flavor style of wings made popular by the restaurant Anthony’s Coal Fired Pizza which is…
Rosemary Garlic Wings with Caramelized Onions
This recipe ideally uses a 3-Step Process
Marinate Wings 6-24 hours
Cook the Chicken Wings
Prepare the Caramelized Onions
I suppose the only ‘required’ step is #2 (cook the wings) and obviously if you are using a different flavor style than the Rosemary Garlic + Onions that would change Steps 1 & 2.
There are many versions of Anthony’s Coal Fired Wings online, here’s one I like best from Copykat.com and my recipe is a version of it. Thanks, @CopyKatRecipes!
Remember – these ingredients are PER POUND of wings so if you have more than 1 pound, increase the ingredients accordingly.
To make the marinade simply put all these ingredients in a small bowl and mix them up, or just toss it all in a gallon-size Ziploc bag and mix them in there.
Once the marinade is done, put your wings in the ziploc bag too, seal the bag, and then mix the wings around to get them coated with the marinade.
Once the wings are good and coated then put them in the fridge in that ziploc bag and let the marinade do it’s magic.
If you can leave the wings in for 24 hours that’s great, but if you’re in a pinch, any amount of time is better than nothing. In the recipe video I have here, I marinated my wings for 6 hours and they still came out with great flavor. Here’s what my wings looked like after I took them out of the fridge…(and BEFORE the cook)
Rosemary & Garlic Marinated Wings
Step 2: The Cook
DISCLAIMER – it should go without saying that you need to be careful when cooking on any grill and that’s true here too. PLEASE USE HAND PROTECTION. If you buy an Ooni, they’ll often throw in a pair of their Ooni Pizza Oven Gloves but there are many other good options too and even a pair of welding gloves would work great.
As I mentioned at the start, and as shown in the vid, I’m cooking my wood fired chicken wings on an Ooni Pro. I love my Ooni and I give it my full, honest endorsement that it’s an awesome addition to my outdoor kitchen.
Ooni Pro
That said, you can make this recipe in another outdoor oven like a brick oven or a kamado, or you can just do in in your regular oven too, but if you want that ‘coal-fired’ flavor try to use a wood-fired oven if you can.
After you have completed Step 1 – The Marinade, now it’s time to take the wings out of the fridge – I’d recommend you do this about 1 hour in advance of the cook. When you take them out of the fridge go ahead and throw a light coating of salt on them. If you don’t know about the amazing benefits of salt, you really need to read the book Salt, Fat, Acid, Heat (the Salt section alone will change your cooking life). For this part of the salt process, my friends and I like using Maldon Sea Salt flakes (the larger size will add a bit of crunch to the crisp on your finished wings).
For the Ooni Pro, I used a combo of lump charcoal for the base and then added wood chunks to increase the fire.
For the lump charcoal, like the Western Brand from Walmart of Kamado Joe Big Block
For the wood, I like the Weber Wood Chunks (in this case Apple & Hickory; Weber’s bag is a great price) or the Smoak Kiln Dried Cooking Wood (which is especially good for wood-fired pizza, but a bit more expensive). When you add wood, be sure to let any ‘white billowing smoke’ dissipate before you add your wings so you don’t over smoke them. Remember, this recipe is ‘wood-fired’ NOT smoked wings – if you want to cook smoked wings, a kamado or regular smoker would be better than a pizza oven, but that’s a whole different story. .
My next purchase though will be the Ooni Sizzler and Ooni Grizzler pan because the are cast iron pans that have removable handles (read: so you don’t burn your hands)!
Take the pan out after about 10 minutes and let it cool for a minute or so. Then put your wings on the pans (but not into the oven yet).
Get the oven temp up to 500-600 degrees
(On the Ooni Pro this should take about 15 minutes or so, with the main oven door ON).
If you are doing the Anthony’s Coal Fired Wings recipe, then WHILE YOU ARE GETTING OVEN UP TO TEMP, START STEP 3 – Caramelizing Onions (see Step 3 Below)
Now go ahead and put your wings into the oven
(On the Ooni Pro, keep the main oven door ON)
(On the Ooni Pro, I keep my wings near the front door and away from the main heat in the back so they will bake and not burn).
Let the wings cook on 1 side for about 10 minutes
If you have not already cracked open a beer, now is the time.
After 10 minutes take the wings out of the oven, flip them over, then put them back in for another 10 minutes or until you reach your desired temperature (165F or 75C is my goal).
(On the Ooni Pro, keep the main oven door ON)
(On the Ooni Pro, I still keep the wings near the front door)
(On the Oon Pro, you may need to add more wood to keep the temp at 500+, do so now).
After 20 minutes your wings should be at 165F/75C and crispy enough for most people. You can take them out of the oven and eat them now or if you are doing the Anthony’s Coal Fired Wings recipe add the onions you’ve had cooking (from Step 3 below).
Personally, I like my wings ‘well done’ so I put them back into the oven for another 5-10 minutes
(On the Ooni Pro, the coals & flames should be starting to die down so now I’ll move the wings to the rear of the oven so they can really crisp up without burning. I’ll also leave the main door OFF on the Ooni Pro for this step so I can monitor and make sure they are not burning.
Once you have the wings where you like from an internal temp (165F/75C) and skin crispiness standpoint, you can take them out of the oven and eat them now or if you are doing the Anthony’s Coal Fired Wings recipe add the onions you cooked from Step 3 (below)
Here’s what your wings should look like…
Wood Fired Wings 🙂
STEP 3: The Onions
This step is only for those who are doing the Anthony’s Coal Fired Wings recipe and want to add Caramelized Onions on top.
**YOU SHOULD BE DOING THIS WHILE YOUR WINGS ARE COOKING. I like to do this step while my oven is preheating.
Notes: fresh grind the pepper – I like Simply Organics or McCormick’s here)
How I made caramelized onions in the video…
While slicing the onions, heat your EVOO In a small sauté pan over medium heat.
Add onions, salt and pepper.
Cook the onions over low heat for 20-30 minutes
You’ll know their done when the onions are golden brown.
Your onions should be done (aka. “caramelized”) by the time your wings are done, and if so, you can simply add your onions over the top of your wings after you plate the wings on your serving dish.
Garnish with a little fresh parsley and you’ve got a winner!
You can see my finished wings below in “The Results” section…
Wood Fired Wings – Results
Well, let’s see how our cook came out vs the goal (Anthony’s Coal Fired Wings)…
Here’s a pic of the real deal from Anthony’s.
Anthony’s Coal Fired Chicken Wings
Here’s how my version came out…
Mike’s Wood Fired Wings
While there may be no substitute for the original from Anthony’s, I felt pretty good about this cook – the process was easy, my family loved the flavor, and I believe I can repeat this cook again and again with ease.
YOUR Ideas – Recipe Tips, What to Cook Next, etc
If you’ve tried this recipe, let me know how it turned out in the comments.
If you have an Ooni Pro or another wood fired oven and you like it, please share your tips and feedback.
If you’re a believer in the health benefits of turmeric and looking for the best turmeric supplement, this article can help you. We’ll talk about what turmeric is, why turmeric is healthy, how to use turmeric for weight loss, I’ll give you 3 recipes for Turmeric Smoothies, and recommend what I think is the best turmeric supplement.
If you’re in a hurry and just want to know which product I’m recommending that’s cool too. It’s FGO’s Raw Organic Turmeric Root Powder. Here’s a link to it on Amazon…
[amazon box = “B01CRXAYKS”]
Mike, That Helpful Dad
Editor’s Note: I’m Mike, AKA “That Helpful Dad” and this website is all about providing practical solutions to real life problems. I hope you enjoy today’s wisdom – if you do be sure to visit my home page and sign up for my free weekly emails. You can also follow me on YouTube, Twitter, Facebook, and Pinterest. I’d love to hear from you so drop me a comment and let’s chat.
What is Turmeric?
WebMD provides us with a succinct and informative defintion for what is turmeric…
In the U.S., turmeric is best known as a spice. It’s one of the main components of curry powder. In India and other parts of Asia, turmeric is used to treat many health conditions. It is believed to have anti-inflammatory, antioxidant, and perhaps even anticancer properties.
WebMD
Why Add a Turmeric Supplement to Your Diet?
The health benefits of turmeric have been written about in detail by numerous trusted websites, including:
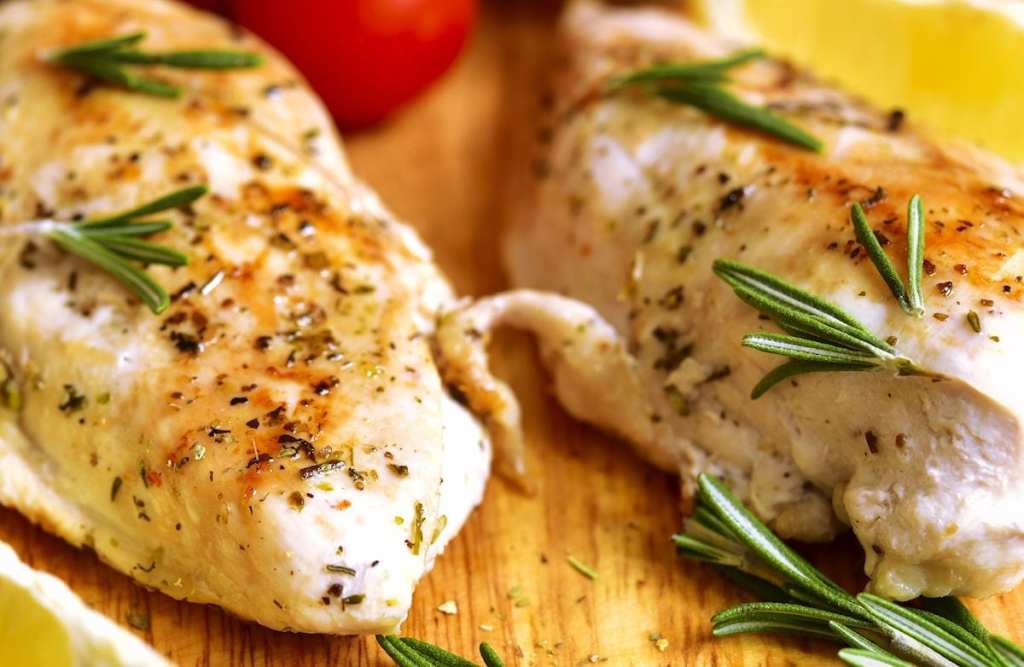
If you’re a fan of home cooked meals that are easy to make and taste delicious, you’ll enjoy today’s tip – a recipe for healthy Chicken Breast in the Slow Cooker by our friend Clara Holtz of the TheFryerHouse.com.
Slow Cooker Chicken Breast
Editor’s Note: This article is written by Clara Holtz – a part-time guest blogger and administrator of TheFryerHouse.com. Clara and the team at TheFryerHouse.com work to provide honest and accurate articles and reviews on all things relating to Airfryers. ThatHelpfulDad.com is happy to be able to share Clara’s recipe with you today. I enjoyed reading her recipe and felt like I was transported into her kitchen as she was making this dish. Keep up the good work, Clara.
Clara Holtz
Introduction
Knock! Knock!!
Wait, don’t open that door! You could get a pie your face! 🙂 Instead let’s get straight to the kitchen so that we can get something amazing done today.
Let’s use our slow cooker and make an easy and delicious chicken breast recipe.
I love to cook my chicken breast in broth in a slow cooker. Why? Because no significant culinary skill is required and and using a slow cooker makes sure the meat is evenly cooked. As a matter of fact, I like cooking my chicken breasts in broth in my crockpot before any other thing. I often use my slow cooker to cook my butchered chicken breast meat for 4hrs-6hrs, depending on the time frame I prefer for that day.
The result of making chicken in the slow cooker? It’s awesome and my children love to eat it — that makes me happy too because I know this recipe is healthy for them.
The Setting
Gone are the days that my family and I slave over our stove to make dinner. Now, I prefer my slow cooker because it’s safer and I can multitask (that means more time with family and friends). Just set the preset on the crockpot and let it work it’s magic. What could be easier?
Letting our crockpots work their magic
You do have a crockpot, right? I’m sure you do but just in case you need a new one or you’re looking for some top-notch features, check out these picks from Amazon…
What’s great about slow cookers like this is that they’re well built, have loads of presets to make cooking easier, and can be operated intuitively. Just be sure to read the manual so you understand how to use your crockpot safely. Once you know how to operate your slow cooker, you can preset the functions, and take a break with your family and friends.
But enough about crockpots – let’s get to the recipe!
If you make this dish, I know you’ll enjoy it. You won’t believe how easy this recipe.
Are you ready? Oh yeah, let’s do this!
Preparation
First of all, we need to make sure the kitchen is sanitized including the cooking utensils (let’s keep our family safe, right?).
Next, let’s take a look at the ingredients….
Slow Cooker Chicken Breast Recipe Ingredients
3 lbs of chicken breast meat.
2-4 tablespoon of butter.
¼ quart chicken broth
2-3 pinches of salt.
½ teaspoon onion powder
½ teaspoon of garlic
¼ grounded pepper.
Pinch of paprika
sprig of rosemary to garnish
Slow cooker.
Tip: The amounts per seasoning are a guide – if you like more bold flavors then double the amounts of onion and garlic.
Once you have these ingredients, it’s time to take our focus to this super easy preparation process.
How to Prepare Slow Cooker Chicken Breast Recipe
1-Rinse the chicken
Would you like to sear the meat before or after you cook it in the crockpot? You can do that if you prefer, but it’s not really necessary, however I do recommend that you rinse the meat first. Here’s what I do to ensure my chicken is cleaned…
Pour the meat in an empty bowl, take the bowl to the faucet, and while the water is running, pick up each of the chicken breasts and use your fingers to remove any stuck on blood or other bits you want to remove. Then pat dry.
2-Preparation & Seasoning
I properly arranged the meats in the crockpot then fill the crockpot with the seasoning ingredients. I make sure that the seasonings are mixed around and then I add the chicken broth. (As an alternative, I also sometimes steam the chicken breast with the seasoning in the slow cooker for about 30 minutes before I add the broth. Both ways are fine and I encourage you to experiment to see which you like better). Most of the time I add the seasoning, chicken, and broth all at the same time and that’s what we’re doing today.
At this point I’ll add in the butter. I think you need at least 2 Tablespoons of butter, although I prefer to use 4 tablespoons (and sometimes even more – ssshhhh!).
There is just something about butter and what it does to your cooking. Do you know what I mean?
BTW, if you use margarine, write me a comment below. I would love to see what you have to say and don’t forget to tell me how you make your dish magical.
With your ingredients added, it should look something like this.
Chicken Breasts in the Crockpot
3-Cooking in the crockpot
The aim is that never overcook the chicken breast. So put this into consideration whenever you’re setting the time for your slow cooker.
Avoid timing it for a long period of time unless you want the meat to be overly juicy because you’re looking to shred it for a particular dish. Personally I like to serve these chicken breasts whole so my family and I don’t cook it too long.
Usually I set the time to 4 hours.
Important tip: one thing I don’t do is continually opening the cover of the slow cooker. This will let all the steam escape and ruin your cooks. It’s ok to check once or twice but I’d rather wait until the time elapsed and let the slow cooker work its magic.
Once the time is reached, I then check the meat by stirring the chicken breasts so as to ensure that the flavors are evenly distributed.
4- The Final Evaluation – Does the Family like it?
As the cook, before you serve this dish, you’ll want to check that the chicken breasts are up to your preferred temperature (165F) and then taste the meat (and that lovely broth) to decide if you’ve hit the mark. You may need to add some salt to taste, drizzle on some EVOO, or perhaps add a sprig of rosemary to garnish like in my pic above.
Once you open the lid of the crockpot I’m sure your family will notice the aroma – it’s sure to steal the show!
After you’ve cooked your chicken breast to your satisfaction, scoop the meat out (with that broth!) and serve it with your favorite sides. (Might I suggest some green beans along with some air fried potato wedges?)
Conclusion
Wasn’t this recipe easy? Definitely!
Best of all, if you don’t finish all the chicken for dinner, you can store in the refrigerator – that means another meal is already done. Bonus!
Another tip: if you are storing the chicken for later, I’d recommend you separate out the broth – you can use it later for all kinds of soups and to flavor other side dishes.
Well, what are you waiting for? Go make the recipe for easy slow cooker chicken breast, then come back and and let me know what you think. I’ll be looking forward to seeing your comments.
~Clara
What’s That? You Need a Slow Cooker?
If you’re in the market for a new crockpot, check out these highly-rated picks on Amazon…
Kamado Grill Cookbooks – this page features our Top 10 recommendations for the best cookbooks for your kamado, whether you own a Big Green Egg, Kamado Joe, Primo, or similar kamado style grill. You’ll find our picks for people who are new to the world of kamado cooking as well as other books we believe are great for more experienced users – in short there is something for everyone. So who’s hungry for some knowledge? Cookbook-style!
Best Kamado Grill Cookbooks for BEGINNERS
Cooking on your kamado grill can be a zen-like experience (or) it can be super frustrating – this usually depends on if you know what you’re doing.
The fact is that there IS a learning curve with your kamado grills and the sooner you realize this the faster you can advance through it.
These following three books are not just awesome cookbooks from a recipe standpoint but they’re actually great ‘user manuals’ that will help you learn the craft of kamado cooking faster.
If you own a BGE, you may want a Big Green Egg specific cookbook. Eric Mitchell’s Smoke it Like a Pro (above) has a BGE focus but if you may also like…
AFTER you’ve checked out the recommendations above (which also have some great recipes), if you’re looking for kamado cookbooks with LOTS of recipes, here’s a couple books to consider…
If you’re already a pro on your kamado but still looking to up your game to keep the “Best Cook in the Neighborhood” Crown then the following books are for you. To be honest, kamado cooks of ANY level will benefit from the knowledge in these books but experienced users will SOAR with the wisdom in these pages.
Yes, it’s true these three books are not ‘only’ for kamado grilling, but the techniques taught here can definitely be used on your kamado and anyone who’s applied them to their kamado cooking can attest to this. Use the tips in these books and get your kamado grilling to the next level – then you can thank me with some BBQ!
If you’ve ever been to Sanibel, Captiva, or Fort Myers, Florida it’s likely you’ve heard of Doc Ford’s Rum Bar (and hopefully you’ve been there). If you have, then for sure you have had their signature dish – Yucatan Shrimp. This peel-n-eat shrimp appetizer is hands down awesome. It’s spicy, it’s addictive, it’s messy, and it’s oh-so-good. In the video I’ll show you how we make Doc Ford’s Yucatan Shrimp recipe at home. It’s really easy and you can do it too. In this article I’ll give you the traditional recipe (shell-on) and which I made for about a decade.
As a bonus, I’ll also give you my NEW version of Yucatan Shrimp which I’ve been using the last couple years (HEAD-on, but no shells). Why might you want to have shrimp with the heads on but no body shells? So you can suck on the heads and get an amazing mouthful of flavor! In addition, all the ‘Yucatan’ spices will be on the shrimp body and not the shells so the shrimp will be more flavorful. And best of all it’s less messy because you don’t have to peel anything at the table.
That said, both versions are outstanding so Enjoy!
To wet your appetite check out this pic I snapped from the first time I had Yucatan Shrimp at Doc Ford’s marina in Fort Myers…
Doc Ford’s Yucatan Shrimp at the Fort Myers marina
Yucatan Shrimp Recipe Ingredients List:
8 tablespoons unsalted butter
1-2 Large cloves of Garlic (minced)
Juice of two large limes
1-2 tablespoon Sambal Oelek Chili Sauce (or substitute Siracha in a pinch)
1-2 pound large, fresh, shell-on shrimp without heads
2-4 tablespoons chopped cilantro.
Kosher salt and freshly ground black pepper to taste
1 loaf crusty bread
Step-by-Step Directions to make Yucatan Shrimp at home
In a small saucepan melt **2** tablespoons of butter over low heat.
Add the garlic and cook, stirring for 2 minutes.
Add remaining **6** tablespoons butter to saucepan. When it melts, stir in the lime juice, chili sauce, salt and pepper, then turn off the heat. Well done – you’ve just made the sauce for Yucatan Shrimp! Now let the sauce rest while you cook the shrimp.
Meanwhile, bring a large pot of well-salted water to a boil.
Add the unpeeled shrimp and cook for 2 minutes (or until they are just firm and pink). Important: Do not overcook the shrimp — as soon as they are pink get the shrimp out because they will keep cooking a bit in the sauce while on your plate.
Drain the shrimp in a colander and shake over the sink to remove excess moisture.
In a large bowl, toss the shrimp and Yucatan sauce mix together.
Plate the shrimp and be sure to put plenty of sauce in the bowls.
Serve with crusty bread (lots of it) for dipping.
Congratulations, you’ve just made Doc Ford’s Yucatan Shrimp at home!
Serves 4 very happy people – just be sure to give them lots of napkins!
Source: recipe adapted from Doc Ford’s Rum Bar of Fort Myers, FL
Yucatan Shrimp Recipe Video
Version 2 – Yucatan Shrimp HEADs On, but no shells on body
The ingredients are the same but for the shrimp – in this case you want shrimp with the HEADS on. They will come with the shells on the body too, but we’ll be taking those off. Additionally, this is a one pan dish so that means less clean up later!
Yucatan Shrimp Recipe Ingredients List:
8 tablespoons unsalted butter
1-2 Large cloves of Garlic (minced)
Juice of two large limes
1-2 tablespoon Sambal Oelek Chili Sauce (or substitute Siracha in a pinch)
1-2 pound large, fresh, unpeeled Shrimp with HEADS on
2-4 tablespoons chopped cilantro.
Kosher salt and freshly ground black pepper to taste
1 loaf crusty bread
Step-by-Step Directions to make Yucatan Shrimp at home
Peel the shrimp but leave the heads on.
In a large frying pan melt **2** tablespoons of butter over low heat.
Add the garlic and cook, stirring for 2 minutes.
Add remaining **6** tablespoons butter to fry pan. When it melts, stir in the lime juice, chili sauce, salt and pepper and let the flavors marry together for a minute or two.
Add the shrimp with the heads on to the frying pan that has the sauce still in it and cook for 1-2 minutes until the side that’s down turns pink. Then flip the shrimp and cook for 1-2 minutes until the entire shrimp is pink.
Serve the shrimp WITH ALL THE SAUCE in a large wide bowl that allows for the shrimp to be spread out AND allows the buttery sauce to be accessible for dipping.
Serve with crusty bread (lots of it) for dipping.
Here’s an example of cooking this version with the heads-on shrimp…
As you can see the bodies of the shrimp are absorbing all that buttery goodness and the heads are going to produce an amazing flavor bomb when you suck on the heads before you eat the shrimp body. (Note – it should go without saying that you do not EAT the heads, you just suck out the juices and then you throw away the heads just like the tails).
This version is far less messier at the table and in my opinion tastier too!
Want to know more about Doc Ford’s?
View from the Marina at Doc Fords in Fort Myers, Fl
Tired of the same old K-cups? Why not give yourself something to look forward to with your morning cup of Joe? Even better, how about a cup of coffee that not only tastes great but is also healthy for you AND won’t break your fasting routine? If this sounds interesting to you then I’ve got another practical solution for you to try – I call it the CinnaBUTTER Coffee Cup.
I’ll give you two versions of the CinnaBUTTER Coffee Cup to try – the super simple, super fast, anyone-can-do-it version and the Pimp My Cup AwesomeR version.
If you just want the recipe without all the details, here it is, however, if you want to know more about why it’s healthy, how it relates to fasting, and get some tips for taking this coffee and more to the next level, keep reading.
CinnaBUTTER Coffee Cup Super Simple Recipe
Put a ½ Tablespoon of Grassfed Butter in the bottom of your coffee mug
Brew your favorite cup of coffee into the mug that has the butter so it melts the butter as it pours into it.
Sprinkle some cinnamon on the top.
Stir
Enjoy
You can use your regular K-Cup for this version of the recipe or any other regular coffee that you normally brew. The goal of the super simple CinnaBUTTER Coffee Cup recipe is just to introduce the idea to you and kick up your regular cup a notch with flavor while also allowing you to experience the potential health benefits of this coffee. This is a speedy way to enjoy the CinnaBUTTER Coffee Cup for those in a rush – you’ll get 75% of the overall benefits from using this method and anyone can do it.
How long does it take? How fast can you cut the butter and sprinkle the cinnamon? It adds about 30 seconds to your normal routine.
What about my cream and sugar? I encourage you to at least try the CinnaBUTTER Coffee Cup without any additional cream and sugar. The flavor is already there so you shouldn’t need to add anything to it. Also if you add cream on top of butter it will end up breaking your fast. And if you add sugar, you’ll really spike your blood sugar. Add them if you must and you’ll enjoy the flavor but try to work yourself towards the non-additive version so you can get the health benefits too.
CinnaBUTTER Coffee Cup – Pimp My Cup AwesomeR Recipe
Put a ½ Tablespoon of Organic Grass-fed Butter in the bottom of your mug.
Grind fresh coffee beans.
Simple: use a motorized coffee/spice grinder.
Advanced: practice mindfulness and use a ceramic burr-grinder for the freshest possible taste.
Brew your coffee with a French Press or an Aeropress (my choice) – pressing it into the mug that has the butter.
Sprinkle organic cinnamon onto the top.
Stir with an organic cinnamon stick.
Smell the amazing aroma.
Enjoy.
For the Pimp My Cup AwesomeR version of the CinnaBUTTER Coffee Cup we’re moving beyond instant coffee, K-Cups, or even pre-ground beans. Here we want only the freshest beans, we want to brew them with a French Press or an Aeropress (see below), we’re using organic grass-fed butter, organic cinnamon, and we’re adding an organic cinnamon stick into the mug at the end too. The goal here is to get the best possible experience. We’re being mindful when we use our ingredients (thus the hand-crank ceramic burr grinder and that use-anywhere Aeropress). And we’re using only the best ingredients. Our goal is taking time to turn the simple into the extraordinary vs. rushing through life.
OMG, How Long Does All This Take? Don’t be afraid of this method from a time standpoint. It’s not like it takes forever. If you use the motorized spice grinder it adds about 30 seconds total to the process. If you go the hand grinder that will add a good minute. The French Press or Aeropress adds another 2-3 minutes. So what’s the total additional time? Let’s call it 5 minutes. Is 5 minutes of additional time worth it to get the full experience of the CinnaBUTTER Coffee Cup Pimp My Cup AwesomeR experience? I think so, but I encourage YOU to give it a try for yourself and let me know.
CinnaBUTTER Coffee Cup Tools of the Trade
This section gives you some tips on what I use to make my CinnaBUTTER Coffee cups. Where available I’m including some Amazon affiliate links – remember I only recommend products I actually use myself and to learn more see my Trust Guarantee. Pick these up on Amazon or find them at your local store. Enjoy…
Favorite Butter – I’ve been using Vital Farms grass fed, pasture-raised butter and KerryGold Irish Butter. Use whatever version you prefer but move beyond the run-of-the-mill butter because a lot of your flavor will come from the butter so don’t skimp on this important ingredient.
Favorite Coffee – Lots of options here. Try to expand your horizons a bit. Yes, you can use your K-Cups but trust me when I say that there is a difference between K-Cups and using coffee grounds. Right now my favorite beans are Sprouts Mountain Gold – it’s bold, rich, and even has hints of chocolate in it. I also like using Organic Colombian Coffee beans as well.
Did you know most places that sell coffee beans have a grinder that you can use for free? Try it, because even if you don’t grind at home, you’ll get a better flavor and aroma by using coffee grounds vs K-Cups, etc.
Coffee Bean Grinders: The reason to grind at home is to experience the freshest coffee aromas and flavors. Did you know that coffee beans lose their freshness just a few hours after grinding? If that’s true then you’ll want to grind at home. Now if you really want to blow your mind with aroma and incredible fresh flavor try the hand-grinding – it takes a minute or two but its nice. That said, if you are not ready to go there just yet, then at least use a coffee/spice grinder — you’ll get 80% of the benefits of fresh grounds. Here’s what I use:
Aeropress: This is a take-anywhere way to make your own fresh coffee in under 5 minutes with just coffee grounds and hot water. I have another article about the Aeropress, there’s tons more online, and there’s even a Wikipedia page for Aeropress. The bottom line about Aeropress is that it’s inexpensive compared to a french press and yet many believe it provides a better cup. Pick up one on Amazon using this link.
BTW, the pic doesn’t do it justice – check out this video too…
Cinnamon: Lots of options here. I’ve always been a fan of McCormick’s spices, but here are a few options. Find them on Amazon or your local grocer…
Hot Water/Tea Kettle: If you are going to to the Aeropress route, you’ll need a way to heat hot water quickly. I love using an electric tea kettle – it’s fast, you can control the temp (Aeropress recommends 175-185 degree hot water), and easy to pour.
Do you use something else besides these tools? If so, please share your tips with me.
Why is the CinnaBUTTER Coffee Cup Healthy for you?
Assuming you are not adding cream and sugar to the cup and that you are not using coffee with any artificial sweeteners, etc, then you should be able to benefit from the potential health benefits of this style of coffee. I say potential because I am not a doctor nor do I play one on TV. That being said I’m not the first to tout the benefits of adding healthy fats to your coffee or the pro’s of using cinnamon in your diet.
What about my fasting? Will the CinnaBUTTER Coffee Cup break my fast? One of the best things about the CinnaBUTTER Coffee Cup (either version) is that it won’t break your fast AND it fits in great with an Intermittent Fasting routine. I’m a big fan of Intermittent Fasting and I have an article with lots of tips for that lifestyle.
Tips for Intermittent Fasting
Using grass fed butter is great because not only do you get lots of flavor but you also get access to ‘good’ fats to use as an energy source and brain-food during your fasting stage. Can you say Double-Bonus? Remember there are no carbs in the butter or we don’t want to add any to your CinnaBUTTER Coffee Cup so we can stay in the fasting stage. But you do need energy and that butter provides a great way to bridge yourself to the end of your fasting period.
For me, a single cup of CinnaBUTTER Coffee takes me all the way through to the end of my 16-hour fasting cycle.
As for the cinnamon – again using it is for more than just flavor (although let’s not overlook the fact that cinnamon is great tasting and there was a famous Seinfeld skit from “The Dinner Party” episode about cinnamon too.
What’s super important about cinnamon for our purposes is that cinnamon regulates blood sugar and while were in the fasting stage we want to ensure we’re using energy from fat not carbs so we can get all the benefits of the Intermittent Fasting routine. Cinnamon helps us to do that.
Do you see the magic of the CinnaBUTTER Coffee Cup? To use the old ad line… it tastes great AND it’s less filling!
CinnaBUTTER Coffee Cup – Give it a try
OK, it’s time to stop reading and start brewing.
Give the Cinnabun Coffee Cup a try and let me know what you think. I’m guessing you’ll find yourself happy you gave it a try.
If you’re like me, you love your pets like a member of the family. You want them to have only the best in their lives and that means you want them to have the best diet too, right? So why buy store bought dog food that sits on the shelves for months (and has who-knows-what ingredients inside) when you can make your own homemade dog food recipe with human-grade ingredients?
Hi, I’m Mike, AKA That Helpful Dad. I’ve been making homemade dog food for my pups for over a decade and I’m here to help you learn how to make it too. Cooking homemade dog food for your pets is easy, it’s fun, and it’s oh so good for them. In this article, I’ll show you one of my favorite recipes for homemade dog food.
Cooking for your dog is easier than you think!
One of the most popular vids I’ve put on YouTube over the years is a homemade dog food recipe – it has over 400,000 views on YouTube and ranks in the top 5 on Google Search for Videos about homemade dog food – yet it’s a really just a simple vid about me doing something I love for my pets. Who knew?
I think the reason it’s been so popular is that this homemade dog food recipe is easy to make, chock full of healthy goodness for your dog, it’s super fresh, and yields positive results for your pet.
Gather ingredients. Note that you may need to adjust the quantities for your ingredients based on the size of your pets. The recipe here is enough to feed 2 small Yorkies (6-8 lbs each), 1/2cup of food twice per day, for about 4 days.
Heat 2T of EVOO in your pot
Use your Food Processor to roughly chop all your vegetables (NOT the meat). You don’t need to liquify them, just chop them into ‘bite-size’ pieces appropriate for your pet.
Put all vegetables and the raw meats into the pot.
After 20-30 minutes, remove your meats and use the food processor to chop the meat. Then return the meat to the pot – at this point, it should start to look like a stew.
If you are going to serve immediately, be sure to let it cool first – maybe add an ice cube or two to your pet’s bowls.
Refrigerate any unused portion. It should keep for 3-4 days in the fridge (OR) you can also freeze it for long-term use.
Watch your pets go crazy for this food!
Homemade Dog Food Recipe Source
This homemade dog food recipe is adapted from the book “The Whole Pet Diet” by Andi Brown. This book is very helpful on many topics related to helping your pet – beyond just a good diet. It not only provides you with a lot of recipes like the one I’m recommending but also a wide variety of holistic tips about caring for your dogs the natural way (without simply relying on medications). You can pick it up on Amazon here…
Editor’s Note: Where available I’ve included Amazon affiliate links on this page to help you find these products faster – while I may earn a small fee if you buy the products I recommend, know that using my links does NOT cause you to pay higher prices AND most importantly understand that I ONLY recommend products I actually use myself. To learn more, see my Trust Guarantee. Regardless of where you may buy these items, I honestly do believe they will help you.
The Stars of the Homemade Dog Food Video
Bonus – in this video you’ll see our beloved Yorkies Bella and Sassy. This vid was filmed a while back and while Bella is still with us (and still eats this stew every day), Sassy passed away a few years ago. This video is part of their legacy. For more on Sassy’s story, check out this free book I’m writing…
Do You Have a Homemade Dog Food Recipe?
If you’ve tried this recipe or have to share, please do so. I’m eager to learn your tips so we can help each other improve.
If this post helped you feel free to share it with a friend.