If not, this video will introduce you to Amazon Treasure Truck, find out if the Treasure Truck is in your city yet, tell you how to sign up for it, what types of things you can buy on the Treasure Truck, and give you other fun tips.
Amazon describes the Treasure Truck as follows:
“At Treasure Truck, we hand-pick our favorite new, trending, local, or delicious items, load them on the Truck, then cruise around town spreading joy for everyone with a smartphone and an appetite for fun. Every time you swing by the Truck, you’ll find something new to enjoy, like games, giveaways, tasty treats, and other surprises.”
Here’s the link to check if YOU can sign up for the Treasure Truck…
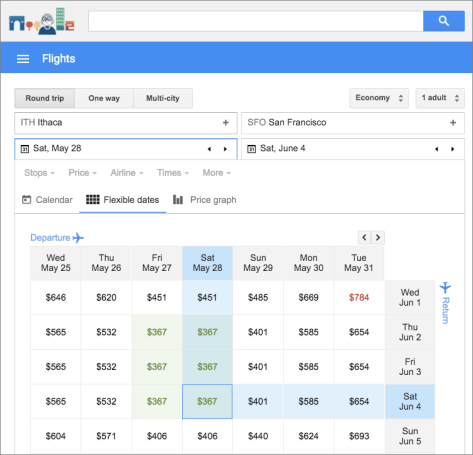
Google Flights is a travel booking service like Expedia, Kayak, etc but Google Flights has some cool features that make it convenient to use. In this video I will show you how to use Google Flights and discuss the bonus features Google Flights offers that make booking your travel more convenient with Google Flights.
Google Flights – Screenshot Samples
You can save your search for laterCool Feature – see alternate prices on different datesFlexible Dates vs Price View
Google Flights – What’s the bottom line?
Google Flights is my new go-to travel booking site. It has lots of great features, is easy to use, and offers me numerous ways to find the best price for my travel options – especially if my dates are flexible. Give Google Flights a try and let me know what you think.
One of the things that is so magical about children is their sense of adventure and imagination; their imagination is without limitations. They come up with the wildest and spirited dreams and goals for themselves. Highlight their sense of adventure in this fun, literary, and historical activity by helping them create their own Dream Book.
Creating a Dream Book is a great way to spend some quality time with your child. For more fun and engaging reading and writing activities, visit my friends at Education.com who submitted this idea to us.
Creating a Dream Book – What You Need:
Paper
Pencil
Stapler
That’s it? Yup, nobody said it had to be hard. Gather your supplies and let’s focus on building that Dream Book.
Creating a Dream Book – What To Do:
The process of building a Dream Book is not hard. It starts with getting your child talking – once they begin to open up, their dreams will emerge. Here are some ideas to get the conversation started…
Talk with your student about her values. Which values does she treasure the most? Loyalty? Caring for others? Intelligence? Generosity?
What would she like to see in the world in the future (specifically, non-materialistic things)? World peace? People caring for one another? Different people having fun together?
Have her write down her answers to create a book of her dreams for her future. This is the core of the Dream Book process and capturing her dreams on paper will not only create a keepsake that you will both treasure, but it’s the first step to empowering your child to turn her dreams into reality.
Dream Book Discussion Starter Example
Discussion: Talk about Martin Luther King Jr.’s “I Have a Dream” speech.
What was it about?
Are there any things your student’s dreams have in common with the speech?
Why was it important?
How did Martin Luther King Jr. turn his dreams into a reality. How can your child do the same?
Dream Book Enrichment/Variations/Modifications:
Your child’s Dream Book is only limited by their imagination – which means it has NO limits. But if you need a bit of help, consider the following ideas…
Talk about different dreams (goals and achievements) that people have. What do those dreams tell you about what kinds of values they treasure? What does your child treasure?
The possibilities are endless. But what isn’t endless is time – so don’t wait, get started on helping your child create their own Dream Book today!
A Message from That Helpful Dad
This article is from my friend’s at Education.com. As you know I’ve written multiple articles about the importance of having a plan to help you reach your dreams and spend more time on your Legacy Life goals. Since this article focuses on helping your child identify and achieve their dreams, I’m pleased to share it with you because it fits well with the goals of our website – it’s a great example of a practical solution to one of life’s little problems.
More about Today’s Contributor: Education.com aims to empower parents, teachers, and homeschoolers to help their children build essential skills and excel. With over 12 million members, Education.com provides educators of all kinds with high-quality learning resources, including worksheets, lesson plans, digital games, an online guided learning platform, and more.
In this article I’ll show you how find your Kindle Notes, Highlights and Bookmarks and then how to download Kindle notes and highlights for each book in your Kindle book library to your computer. It’s quick. It’s easy. It works. After you download your Kindle notes and highlights, then you can print them or save them as PDF.
[lwptoc]
IMPORTANT: Save This Link!
By far the easiest way to export, download, and print your Kindle notes is by using a direct link to YOUR personal notes and highlights.
You can use this link to access your notes via your desktop or mobile device WITHOUT having to connect your Kindle.
Here is how to get YOUR link to download Kindle Notes (be sure you are signed in to Amazon)…
So now that you have the link to download Kindle Notes, what do you do with it?
The easiest way for me to show you how to download and print your Kindle notes and highlights is actually with a video so check out this helpful video from our YouTube Channel…
If you watched the video you should now know how to easily export, download or print your Kindle notes. But if you want to know more about Kindle Notes and Highlights, keep reading…
What are Kindle Notes and Highlights?
If you need a basic refresher on Kindle Notes and Highlights these tips can help you.
Did you also know? You can add or remove bookmarks, highlights, and notes at any location in a Kindle book or personal document. Here’s how…
How to Manage Kindle Bookmarks
1. How to add a Kindle Bookmark:
Tap the top-right corner of the screen to show the Bookmark icon, and then tap + in the dialog box that appears. The Bookmark icon turns black when the page has been bookmarked.
2. How to view your Kindle bookmarks:
Tap the top-right corner of the screen to show the Bookmark icon. Tap a bookmark from the list to see a preview of that location in the book. You can tap the preview window to go to that location in the book.
Remove a bookmark: Tap the top-right corner of the screen to show the Bookmark icon, select the desired bookmark, and then tap x to remove the bookmark.
How to manage Kindle Highlights
1. How to add a Kindle highlight:
Press and drag to highlight the desired text, and then tap Highlight. To highlight multiple pages, press and drag the desired text to the bottom-right corner of the screen and the page will turn. The highlight will automatically continue to the first period on the next page.
Pro Tip: You can drag the handles at the start or end of the highlighted text to edit your selection before you tap Highlight. Handles only appear when you have selected two or more words for most device languages.
2. How to remove a Kindle highlight:
Press and hold a word in the highlighted area, tap More, and then tap Delete.
3. How to view your Kindle highlights:
Tap the top of the screen to show the reading toolbar, tap Go To, and then tap the Notes tab.
Tap the Yours tab to view notes and highlights that you created. Tap a note or highlight to go to that location in the book.
How to Manage Kindle Notes
You can add, view, edit or remove notes at any location in a Kindle book or personal document.
1. How to add a Kindle Note:
Press and hold a word or press and drag to highlight the desired text. If you selected a word, tap More, tap Add Note, and then type your desired text. If you selected a phrase, tap Add Note, and then type your desired text. Tap Save to create your note.
2. How to edit a Kindle Note:
Tap the number where the note appears, and then tap Edit Note.
Make your desired changes, and then tap Save.
3. How to remove a Kindle Note:
Tap the number where the note appears, and then tap More.
Tap Delete Note.
4. How to view Kindle Notes:
Tap the top of the screen to show the reading toolbar, tap the Menu icon, and then tap Notes. Tap Yours to view the notes and highlights that you created. You can type a note or highlight to go to that location in the book.
How to see Popular Highlights from Other People
Did you know? Amazon displays Popular Highlights and Public Notes by combining highlights and notes of all Kindle customers and identifying passages with the most highlights and notes.
1. How to turn on Popular Highlights or Public Notes: Tap the Menu menu icon and then tap Settings.
Tap Reading Options and then tap Notes & About This Book.
Next to Popular Highlights or Public Notes, tap Off. The switch will moves to the On position.
When reading, highlights people have frequently selected will appear.
2. How to view a list of Popular Highlights or Public notes: While reading, tap the top of your screen to show the reading toolbar.
Tap Go To, and then tap the Notes tab.
Tap the Popular tab to view Popular Highlights or tap the Public tab to view Public Notes.
How to find YOUR Kindle Notes and Highlights
Remember, use this link to find YOUR personal Kindle Notes and Highlights:
In order to download Kindle Notes you first have to actually have a Kindle! 🙂
I have multiple Kindles, my favorites are the Kindle Paperwhite and the basic Kindle. I’m also including some recommended covers and power adapters. Here are the current links and prices for all of them…
[amazon bestseller=”kindle e-reader” items=”3″]
[amazon bestseller=”Kindle Covers” items=”3″][amazon bestseller=”Kindle Power Adapters” items=”3″]
Google Rewards is a free app you can download from the Google Play store. You may also hear Google Rewards called Google Opinion Rewards or Google Surveys.
Regardless of what you call, it the fact is that the Google Rewards app is an easy way to earn some free money!
After you download the app and answer some basic demographic questions about yourself, Google will begin sending you notifications on your phone when a new survey is available. Open the survey and answer the questions.
Each survey has 1-7 questions and takes about 10-seconds to a minute to answer. Questions range from, “Which logo is best?” and “Which promotion is most compelling?” to “When do you plan on traveling next?”
Once you complete the survey you get your rewards instantly. You can then spend them immediately. Here are some screenshots…
HD’s Pro Tip: Regarding frequency of surveys and earning more money – Google says they send surveys about once a week, but I’ve found that if you visit a lot of places that are tied to Google Maps (hotels, restaurants, etc) the frequency tends to increase. More Surveys = More Money. Also these surveys are usually tied to Google Reviews – if you tend to leave a review anyway, why not get paid for it? Here’s an example…
How Much Money Can You Earn from Google Opinion Rewards?
For each survey, you will receive between 10cents and $1.00 in Play credit.
Most surveys I’ve done pay out about $16-25-cents.
That may not sound like much, but it does add up over time. In the past 6 months I’ve made over $35 – just from taking a few seconds 1-2 times a week to answer a few questions. It’s easy money. I’ve used that money to buy premium apps, e-books, and music.
You can then spend the money you earn from Google Opinion Rewards on whatever you like in the Google Play universe – that means music, books, tv shows, apps, and more.
Google Rewards – What’s YOUR Take?
Have you tried Google Rewards? What’s been your experience?
Do you know any other tips to make the most of Google Rewards? If so, please share them.
Did this article help you? Drop me a comment and let me know. Feel free to share this with a friend.
The first step towards gaining wisdom is to recognize the value of advice.
Our life lesson today comes to us from King Solomon who said “Listen to advice and accept instruction and in the end you will be wise” (Proverbs 19:20).
What This Means to YOU…
If you’re like me, you have people trying to give you advice every day.
Unfortunately, if you’re like me, that means you probably also find it difficult to listen to that advice!
If that’s true, it could mean you’re letting a great deal of knowledge just slip through your fingers and that’s a problem because it means you’re making your life harder than it needs to be.
Don’t let that happen to you – learn to accept advice and allow this wisdom to improve your life.
3 Ways to Use This Wisdom Today
Recognize what could be stopping from you accepting advice.
Understand how to recognize good advice from bad.
Use this wisdom to help others.
I-Overcome Your Pride Perhaps the biggest obstacle that keeps us from accepting advice is our own pride. There are many reasons for this — it could be that we feel like we should be able to figure things out for ourselves, or we foolishly believe our ideas are always better than anyone else’s, or we are embarrassed to ask for help because we don’t want to appear stupid, etc.
Regardless of the reason, the important thing to understand is that when you allow pride to stop you from listening to advice, you end up making your life more difficult than it needs to be because you limit yourself to only one solution source — you! The fact is that nobody knows everything and the sooner you and I realize that, the sooner we’ll know it’s foolish to let our pride stand in the way of gaining knowledge from others.
I know it’s hard, but the next time you find yourself in a situation that you know you could use help with, do yourself a favor, swallow your pride, and be open to letting someone help you. You’ll be glad you did.
II-Recognize Good Advice
Now that I have you at least willing to listen to advice, let me throw you a curveball – not all advice is good advice and it’s important to have some guidelines for sifting out the good from the bad.
Perhaps the most important thing for you to do is to recognize the SOURCE of the advice – is the advice coming from someone who truly cares about you? If so, then it’s worth your while to at least listen. If not, move on. However, even if the advice is coming from a person you trust, that still doesn’t mean it’s going to help you. You can recognize good advice by asking yourself a few questions.
Here are some examples…
Is the person giving you advice qualified to provide it based on their own life experiences?
Did the person listen to you and attempt to understand your situation before giving you advice?
Does the advice give you realistic options that you feel motivated to pursue?
Are you certain the person giving the advice is not just trying to take advantage of you?
Does the advice still leave the final decision in your hands?
Does the advice make sense and do you feel good about it in your gut?
These questions are just examples; I encourage you to develop ones that make sense to you — come up with a list of simple and easy to remember questions that you can ask yourself when you are presented with advice. If the advice provided overcomes these Challenge Questions then it’s probably worth listening to.
Remember this — just because you listen to someone’s advice doesn’t mean you necessarily have to follow it — the final decision on what to do remains with you.
One bonus of seeking that advice is that you’ll have more confidence when you do take action to tackle your problem because you’ll know you invested extra time to seek wisdom and that extra confidence could be the final key you need to overcome your obstacle.
III-Provide Good Advice to Others Let’s face it, the world needs more people who are willing to help others. I encourage you to be one of them.
If you find yourself in a situation where you have the opportunity to give advice to someone else and you have the knowledge you believe could help them, then why not do it? You never know when your words could change or even save somebody’s life so don’t ignore helping someone if you can. That being said, it’s important that you give good advice not just any advice. But how?
For starters, you can apply the Challenge Questions from #2 above to yourself. In addition, you can use this simple formula: Listen First, Advise Second. After all, how can you give advice to someone if you don’t listen and understand their situation? Once you do that you’ll be in a position to know if you can truly help them. If you can, then give them your advice, but be sure to respect their right to accept it or not – understand your job is only to share wisdom, the final decision rests with them.
But what if you listen and realize that you can’t give them any helpful advice? That’s ok. You can still encourage them, pray with them, and perhaps point them towards someone else who can help them. It would be better to do this than to give them questionable advice because you are too proud or scared to admit you don’t know the answers either. Part of giving good advice is knowing your own limitations – recognize that and you’ll come full circle in understanding this lesson.
Don’t Wait, Use This Wisdom TODAY…
Pick a problem, any problem, then challenge yourself to ask someone you trust for advice.
Was this helpful?
If so, take a quick sec and…
Share this page with a friend so they can benefit too
Share your wisdom – did you have a similar experience or great photo to share? Drop me a line below and tell us about it.
Follow my blogand let’s stay connected – we can help each other reach new heights.
If you’re like me, you love your pets like a member of the family. You want them to have only the best in their lives and that means you want them to have the best diet too, right? So why buy store bought dog food that sits on the shelves for months (and has who-knows-what ingredients inside) when you can make your own homemade dog food recipe with human-grade ingredients?
Hi, I’m Mike, AKA That Helpful Dad. I’ve been making homemade dog food for my pups for over a decade and I’m here to help you learn how to make it too. Cooking homemade dog food for your pets is easy, it’s fun, and it’s oh so good for them. In this article, I’ll show you one of my favorite recipes for homemade dog food.
Cooking for your dog is easier than you think!
One of the most popular vids I’ve put on YouTube over the years is a homemade dog food recipe – it has over 400,000 views on YouTube and ranks in the top 5 on Google Search for Videos about homemade dog food – yet it’s a really just a simple vid about me doing something I love for my pets. Who knew?
I think the reason it’s been so popular is that this homemade dog food recipe is easy to make, chock full of healthy goodness for your dog, it’s super fresh, and yields positive results for your pet.
Gather ingredients. Note that you may need to adjust the quantities for your ingredients based on the size of your pets. The recipe here is enough to feed 2 small Yorkies (6-8 lbs each), 1/2cup of food twice per day, for about 4 days.
Heat 2T of EVOO in your pot
Use your Food Processor to roughly chop all your vegetables (NOT the meat). You don’t need to liquify them, just chop them into ‘bite-size’ pieces appropriate for your pet.
Put all vegetables and the raw meats into the pot.
After 20-30 minutes, remove your meats and use the food processor to chop the meat. Then return the meat to the pot – at this point, it should start to look like a stew.
If you are going to serve immediately, be sure to let it cool first – maybe add an ice cube or two to your pet’s bowls.
Refrigerate any unused portion. It should keep for 3-4 days in the fridge (OR) you can also freeze it for long-term use.
Watch your pets go crazy for this food!
Homemade Dog Food Recipe Source
This homemade dog food recipe is adapted from the book “The Whole Pet Diet” by Andi Brown. This book is very helpful on many topics related to helping your pet – beyond just a good diet. It not only provides you with a lot of recipes like the one I’m recommending but also a wide variety of holistic tips about caring for your dogs the natural way (without simply relying on medications). You can pick it up on Amazon here…
Editor’s Note: Where available I’ve included Amazon affiliate links on this page to help you find these products faster – while I may earn a small fee if you buy the products I recommend, know that using my links does NOT cause you to pay higher prices AND most importantly understand that I ONLY recommend products I actually use myself. To learn more, see my Trust Guarantee. Regardless of where you may buy these items, I honestly do believe they will help you.
The Stars of the Homemade Dog Food Video
Bonus – in this video you’ll see our beloved Yorkies Bella and Sassy. This vid was filmed a while back and while Bella is still with us (and still eats this stew every day), Sassy passed away a few years ago. This video is part of their legacy. For more on Sassy’s story, check out this free book I’m writing…
Do You Have a Homemade Dog Food Recipe?
If you’ve tried this recipe or have to share, please do so. I’m eager to learn your tips so we can help each other improve.
If this post helped you feel free to share it with a friend.
Summary: Use these 5 tips to make sure you are getting the most value from your Amazon Prime Membership. The 5 tips focus on:
How to save money with The Amazon Warehouse.
How to use an Echo Dot to stream music to your in-ceiling speakers.
Using Prime Photos as a Screensaver for your Fire Stick.
5% cash back on all Amazon.com and Whole Foods purchases.
Using Prime Video to cut cable re NFL Network.
Watch this tip as a VIDEO
My Experience with Amazon Prime
I’ve been a prime member since the very beginning (2005) and an Amazon customer since 2002. If you’ve followed my blog, you know I’ve talked about Amazon Prime many times so I won’t rehash it all again but there are a few things I continually see people overlooking and I wanted to make sure that you know about them so you can get the full value for your Amazon Prime membership.
When most people think of Amazon Prime they just think of the free 2-day shipping and while that’s certainly a great benefit (if you order a lot of items), Amazon Prime gives you a lot more than just free shipping. You also get lots of free music, videos (tv/movies), books, and more. For the full list, visit this Amazon Prime Benefit Page. Again, we’ve talked about this already so I’m going to assume you know it and skip to the tips for today.
Get more out of Amazon Prime
1-Amazon Prime Visa Rewards
5% Cash-Back on the Amazon Prime Rewards Signature Visa Card – that’s 5% cash back on ALL Amazon.com purchases and also a Whole Foods too! You can’t beat that. Also, there is no annual fee. We order everything on Amazon using this card. It’s really a no-brainer. Click the pic of the card below to learn more…
Pro Tip: Get an even bigger discount when you combo your purchases on Amazon with the Prime Rewards Visa card this AND the Amazon Subscribe & Save program. The Subscribe and Save program saves you another 5-15% off of your regularly ordered items (think toilet paper, detergent, protein, etc) and now you are talking some serious savings! To learn more about the Subscribe and Save Program click on this pic…
2. The Amazon Warehouse
Shopping with Amazon Prime is simple and efficient and (for me) faster than going to the store, but do you know about theAmazon Warehouse? If you don’t click this pic now and learn more…
Do yourself a favor and always check the Amazon Warehouse when you are shopping on Amazon! You can find a lot of ‘like new’ items (that still carry an Amazon warranty) for 25% off or more. This isn’t junk off-brands, it’s name-brand high-quality stuff. We’ve saved over a $1,000 by using Amazon Warehouse the last couple of years and rarely have we been dissatisfied with the quality (and if you then just send it back for a full refund without questions via UPS — which Amazon will send to you for free pickup at your door).
Here’s a video I made to help you…
Things I purchased on the warehouse include my entire home theater system (Yamaha receivers, speakers, etc) and all my zone-2 speakers (bedrooms, lanai, etc), kid’s bikes, home appliances, tools, and lots more. I almost hate telling you about this tip because I’m afraid you might steal my deals! Haha
3. Prime Music
Why pay for a subscription on Pandora or use other music apps when they are free on Prime Music? Click the following Amazon Link to learn more:
Again it’s just simpler. Plus it can be an interface to also play all the music on your phone too so it’s a one-stop shop for all your music. And just to be clear, while you can pay $7.99 month for the full version of Prime Music, you can use the standard version of Prime Music for free indefinitely (it’s already included in your Prime membership). Prime Music standard has all the artists I’ve ever been looking for, all their popular songs, and you can even download them to your phone. Seriously, it’s crazy good.
Pro Tip: Connect an Amazon Echo Dot with your stereo receiver’s Zone 2 and then use the Alexa app to stream music throughout your house, patio, and more.
This is so simple. I don’t know why more people don’t do this? Why would you buy an expensive system like Sonos, etc when (assuming you already have a receiver and you already have speakers throughout your house) you can just connect a $40 Echo Dot and stream music that way? It’s another no-brainer. Here’s a link to find the Echo Dot on Amazon now…
4. Prime Video
With lots of binge-worthy tv and a variety of free movies (with options to rent/buy new ones and have them stored on your Amazon account) and you’ve got entertainment largely covered.To learn more about Prime Video, click this link…
Pro Tip #1: Did you know you can order your favorite ‘channels’ (HBO, Showtime, etc) from inside the Amazon Prime network? That means you don’t have to go hunting for your channels back/forth on TV. They’re all in one place AND this makes the process of searching to find your favorite shows even easier too. To learn more about Amazon Channels, here’s a helpful link:
Pro Tip #2: with Amazon Video now streaming Thursday Night Football you can cut/reduce the cable bill because you don’t the NFL network. Here’s a link for that too… Stream NFL on Amazon Video
5. Prime Photos
Prime Photos is still a bit raw but I’ve found Prime Photos to be an inexpensive way to order some prints and get them pretty quickly. Plus you can use it as another auto-backup for your pics and have another location to store them in.
Pro Tip: if you use the Amazon FireStick as your streaming resource you can set up a ScreenSaver that shows your Prime Photos via an automatic slideshow too – it’s pretty cool.
There are a lot of pics and links on this page – I have included them here to try to save you time but if you do not like this format, please let me know so I can modify going forward.
We are a participant in the Amazon Services LLC Associates Program, an affiliate advertising program designed to provide a means for us to earn fees by linking to Amazon.com and affiliated sites. It’s worth noting that I only use affiliate links for products that I actually pay for and use myself and that honestly believe will be helpful to you too. To learn more, please visit our Transparency Page.
Did you enjoy this article?
If so, take a quick sec and…
Share this page with a friend so they can benefit too
Share your wisdom – did you have a similar experience or great photo to share? Drop me a line below and tell us about it.
Follow my blogand let’s stay connected – we can help each other reach new heights.
Here’s a super simple quick tip if you are a WordPress.org or WordPress.com author and you want to add a horizontal line to break up your posts like this…
How to Add a Horizontal Line to WordPress Posts & Pages.
Here’s how.
Instead of using the Visual Editor to write the post, you’ll need to switch to the ‘Text” Editor. Notice the RED box on this pic. You’ll want to click on “Text” editor to change the view.
Once you switch the view it may look a bit funky because you’ll start seeing some of the code but that’s what you want. Then, to get the horizontal line you find the text location where you want to add the horizontal line (you may need to scroll up/down the page to find your desired spot) and then simply type the following on a new line…
“<hr />”
Just to be crystal clear, you type “<” then “hr” then “a space” then “/” then “>”. So that should be a total of 6 keystrokes.
Don’t worry, if you forget the space and just type “<hr/>” you’ll still get the line so I guess either way is ok but I was taught to do the space I that’s how I’m telling you too. 🙂
Did you enjoy this article?
If so, take a quick sec and…
Share this page with a friend so they can benefit too
Share your wisdom – did you have a similar experience or great photo to share? Drop me a line below and tell us about it.
Follow my blogand let’s stay connected – we can help each other reach new heights.
Summary: Save time (and money) with Google Keep’s Voice Transcription Capabilities and File Sharing
As always, my goal is to share practical wisdom you can use to make life easier. Here are a couple more tips…
Use Google Keep as your voice recorder and save time because the file can be instantly exported to a Doc/Word file with no file conversion time (ah, that’s huge).
Additionally, you can capture all these voice memos to your heart’s content and they’ll be instantly available for follow-up on all your devices.
My Dilemma: I Found Myself in Need of a Voice Recorder.
Like you, I am always on the lookout for ways to increase my productivity. I have a lot of drive time at work (often four hours per day or more) and to make the most of it I listen to lots of podcasts.
We probably listen to many of the same ones (Ferris, Robbins, Goins, etc) and that’s all well and fine, but what I found is that just passively listening to these recordings was doing myself a great disservice — there’s a lot of wisdom being shared by these thought leaders, yet I wasn’t retaining enough of it so I couldn’t take action on it later and actually benefit from the knowledge.
Taking handwritten notes while driving obviously wasn’t an option, so I looked into buying a voice recorder that would allow me to capture tidbits and ideas I could follow-up on later. Unfortunately, I didn’t like what I found…
The Problem with Voice Recorders
Minor: They are expensive: $50–100 or more depending on the features you want.
Minor: You can’t see what you recorded during the process.
Big: You take extra time to download/convert the voice file to a word/doc file.
BIG: Voice recording is all they do.
Enter Google Keep
Just in case you are not familiar with Google Keep…
It’s marketed as a note taking app.
It’s not new (it was launched 2013), but not a lot of people I know use it. Sadly, Google Keep is often overlooked in favor of other more ‘robust’ apps like Wunderlist, Evernote, and others. While those other task tools may be more powerful than Google Keep, I found that I didn’t need all their extra features, didn’t want to pay for them, and didn’t want to invest the time necessary to learn them. I just wanted something that works and “G-Keep” hit the mark for me.
What’s great about Google Keep for new users is that it has an easy to understand, minimalist interface, and that means pretty much a zero learning curve.
Although it’s considered a minimalist app, G-Keep is a little beast that offers a set of powerful tools that make it a super effective for reminding you to get things done. You can use Keep to create lists, store pics/files/more, collaborate with others on action items, and much more.
Here’s what I was already doing with Google Keep
For years I’ve been using Keep to create a series of ‘to do’ lists (shocking, I know). It’s very effective for this purpose and what’s great is that my lists are automatically shared between all my mobile and home devices. As we speak I currently have 7 widgets on my phone and 10 active lists. These include work reminders, home projects, shopping lists, voice recording notes, my 3 to Thrive lists from my SMART Morning Routine, reminders on wisdom tips I want to share with my sons, blogging ideas, and more.
I use the G-Keep Android widget to SHOW my to do lists on various home pages of my phone so that I have them ‘always up’ and thus always on my mind. This lets me SEE the tasks so I can be reminded to DO them.
I use the checkbox feature on G-Keep to turn my to-do lists into action items so they are easy to remove from view once complete. You can also use G-Keep in paragraph form for standard notes — for example when you are doing the voice recording.
As shown in the pic, you can use G-Keep similar to Evernote or Dropbox and store files and share them with others. I work in the medical field and there’s a lot of complex terms, etc to remember…
But what about the Voice Recording?
This is something I only recently discovered with G-Keep as a capability. Now obviously it’s not rocket science and maybe you already knew this, but honestly it was new to me (wait, maybe I shouldn’t I admit that).
Specifically, when I found myself in need of a voice recorder, rather than buy yet another device, I tried using G-Keep as my de facto voice recorder in lieu of getting a dedicated one — it exceeded my expectations for this purpose!
G-Keep is an effective speech-to-text voice recorder.
Suddenly all that podcast wisdom had a place where I could capture it…and easily follow-up on it later. My 4+ hours of drive time was no longer a chore — dare I say I began looking forward to it? (Well, let’s not go that far).
G-Keep is easy to use as a voice recorder. If you know how to type a text, then you already know how to take a note in G-Keep. Additionally, if you know how to push the microphone button on your text keyboard, then you already know how to take a voice-to-text note in G-Keep. Like I said, there’s no learning curve!
Also G-Keep is free — you don’t have to spend money buying a dedicated voice recorder. (Send your donations to The Human Fund please — you’re welcome, George).
Key Features of Google Keep for Speech-to-Text Usage
You can use G-Keep in hands-free mode while driving. (Thanks to its integration with the “OK, Google” Assistant). Just say “OK, Google…Open Google Keep.” Then speak your note.
Using G-Keep as your voice recorder means you don’t need to carry around yet another device.
G-Keep will save you tons of time because it automatically transfers all your speech-to-text notes to your other devices. As soon as the note goes in G-Keep it’s available on all your connected devices (phones, tablets, Chromebooks, Mac, etc).
G-Keep can save you even more time because all your notes can be instantly converted to Google Docs/Word files. You don’t have to do any extra steps (for example if you used a traditional voice recorder, you’d have to possibly convert the file format, download it yourself, etc). With Keep it’s already done. Print your voice notes out, send them to someone else, etc. It’s so easy.
Was this quick tip helpful?
Hey, I realize we’re not splitting the atom here, but I’m hoping that my tips do make a difference for you — even if it saves you 15–20 minutes, that’s more time to spend with your family, right?
If this tip helped you I’d invite you to take action by doing one or more of the following:
Share this page with a friend so they can benefit too
Share your wisdom – drop me a line below so I can learn from you.
Follow my blogand let’s stay connected – we can help each other reach new heights.
Let’s talk again soon!
Practical Wisdom YOU can use today to make a difference in YOUR Life


 As always, my goal is to share practical wisdom you can use to make life easier. Here are a couple more tips…
 Just in case you are not familiar with Google Keep…

