
Chili’s Honey-Chipotle Chicken Crispers Recipe

Ask any table at Chili’s what they’re ordering and there’s a good chance somebody says “the honey chipotle ones.” There’s a reason that basket of crispy chicken tenders tossed in sticky, smoky-sweet sauce has stuck around on the menu for years — it hits that sweet, spicy, crunchy combo that’s almost impossible to stop eating.

Chili’s Honey-Chipotle Chicken Crispers are hand-breaded chicken tenders, fried until golden and crackly, then tossed in a sauce built from honey, chipotle, and a little tang from vinegar and ketchup. It’s the kind of dish that works as a game-day appetizer, a weeknight dinner the kids will actually eat, or something to bring to a potluck when you want to show up with something better than a bag of chips. Best part? You skip the drive and the wait for a table.

This post may contain affiliate links. As an Amazon Associate I earn from qualifying purchases.

Why You’ll Love This Recipe

  • Tastes just like the original — that sweet, smoky, slightly tangy honey chipotle sauce is the star, and it’s easy to nail at home.
  • Crazy crispy — a wet batter followed by a seasoned dry breading gives you that same crackly Chili’s-style crunch under the sauce.
  • Family-friendly — dial the heat up or down and everybody at the table is happy, from picky kids to guys who want it spicier.
  • Great for a crowd — whether it’s game day, a backyard hang, or just a Tuesday, this one disappears fast off a big platter.

Ingredients

For the Chicken

  • 1 1/2 pounds chicken tenderloins (about 10-12 pieces) – tenderloins fry up faster and stay juicier than cutting your own strips from breasts, but sliced chicken breast works fine in a pinch.
  • 6-8 cups vegetable or canola oil – for frying; you want enough to come at least 2-3 inches up the sides of your pot.

For the Batter

  • 1 large egg – helps the batter cling to the chicken and gives it a little richness.
  • 1/2 cup whole milk – thins the batter out; buttermilk works too if you want extra tang.
  • 1/2 cup chicken broth – adds savory depth you won’t get from milk alone.
  • 1 1/4 teaspoons salt – seasons the batter itself, not just the coating.
  • 1/4 teaspoon black pepper – basic background seasoning.
  • 1/4 teaspoon paprika – a little color and mild flavor.
  • 1/4 teaspoon garlic powder – rounds out the batter’s flavor.
  • 3/4 cup all-purpose flour – whisked in last to thicken the batter to a pancake-batter consistency.

For the Breading

  • 1 1/2 cups all-purpose flour – the dry coating that turns golden and crunchy in the fryer.
  • 1 1/2 teaspoons salt – don’t skip seasoning the breading itself — it’s your last chance to season the crust.
  • 3/4 teaspoon paprika – adds color and a mild smokiness to the crust.
  • 1/2 teaspoon black pepper – balances the sweetness of the sauce to come.
  • 1/2 teaspoon garlic powder – more savory backbone in every bite.

For the Honey Chipotle Sauce

  • 2/3 cup honey – the backbone of the sauce; use a mild honey so the chipotle doesn’t get buried.
  • 1/4 cup water – thins the sauce so it coats instead of clumping.
  • 1/4 cup ketchup – adds body and a little tomato tang.
  • 1 tablespoon apple cider vinegar – cuts through the sweetness so the sauce doesn’t taste like straight syrup.
  • 1-2 teaspoons ground chipotle chili powder – start with 1 teaspoon for mild heat and smoky flavor, add the second if you want more kick.
  • 1/2 teaspoon salt – balances the honey’s sweetness.
  • 1/2 teaspoon hot sauce (optional) – for a little extra heat on top of the chipotle.

Directions

Make the Sauce

  1. Combine the honey, water, ketchup, vinegar, chipotle chili powder, salt, and hot sauce (if using) in a small saucepan.
  2. Bring to a simmer over medium heat, stirring occasionally, and cook for about 2 minutes until slightly thickened. Remove from heat and set aside — it’ll thicken a bit more as it cools.

Mix the Batter and Breading

  1. In a mixing bowl, whisk together the egg, milk, chicken broth, salt, pepper, paprika, and garlic powder until smooth.
  2. Whisk in the 3/4 cup of flour until you have a batter about the consistency of pancake batter.
  3. In a separate shallow dish or pie plate, stir together the breading flour, salt, paprika, pepper, and garlic powder.

Fry the Chicken

  1. Heat the oil in a Dutch oven or deep, heavy pot to 350°F. Use a thermometer if you’ve got one — guessing on oil temp is the number one way frying goes sideways.
  2. Dip each chicken tenderloin into the batter, letting the excess drip off, then drop it into the breading mixture and press to coat thoroughly on all sides.
  3. Working in batches of 3-4 pieces so you don’t crowd the pot, carefully lower the chicken into the hot oil. Fry for about 4 minutes, flipping once, until deep golden brown and cooked through to 165°F internally.
  4. Remove with a slotted spoon or spider strainer and drain on a paper towel-lined plate or wire rack. Let the oil come back up to 350°F between batches.

Toss and Serve

  1. Once all the chicken is fried, transfer it to a large bowl.
  2. Pour the honey chipotle sauce over the top and toss gently until every piece is coated.
  3. Serve immediately while it’s hot and the coating is still crispy.

Tips & Variations

  • Let the breaded chicken rest for a couple minutes before frying. This helps the coating set so it doesn’t slide off in the oil.
  • No deep fryer? No problem. A Dutch oven or heavy-bottomed pot with a thermometer clipped to the side works just as well.
  • Bake or air fry instead. Skip the batter, bread the chicken in just the seasoned flour mixture pressed on with a little buttermilk, then bake at 425°F for 18-20 minutes or air fry at 400°F for 12-14 minutes, flipping halfway, before tossing in sauce.
  • Turn up the heat. Add extra chipotle powder or a spoonful of the adobo sauce from a can of chipotles in adobo for a smokier, spicier version.
  • Serve the sauce on the side instead of tossing if you’re feeding picky eaters — that way everyone controls their own heat level.

FAQ

How spicy is this recipe?
With 1 teaspoon of chipotle powder it’s more smoky-sweet than hot — kid-friendly for most families. Bump it up to 2 teaspoons or add the hot sauce if you want more of a kick.

Can I use chicken breasts instead of tenderloins?
Yes, just slice boneless, skinless chicken breasts into strips about the same size as tenderloins so they cook evenly and stay crispy all the way through.

Why did my coating fall off in the fryer?
Usually it’s oil that’s not hot enough, which lets the coating soak up oil and separate, or not letting the excess batter drip off before breading. Keep the oil at a steady 350°F and give the breaded chicken a minute to rest before it goes in.

What to Serve It With

These crispers are made for classic sides — crinkle-cut fries, a cool and creamy coleslaw, or corn on the cob all balance out the sweet heat. A simple ranch or blue cheese dip on the side never hurts either, especially if you’ve got kids at the table who want to dunk everything.

Storage & Reheating

Store leftovers in an airtight container in the fridge for up to 3 days. For the best texture, reheat in a 400°F oven or air fryer for 6-8 minutes until hot and crispy again — the microwave will leave you with soggy breading. Freezing isn’t recommended once the chicken is sauced, since the coating loses its crunch when thawed.

Recipe inspired by / adapted from Chili’s Honey-Chipotle Chicken Crispers. This is a homemade version built from widely shared copycat techniques — it’s not an official recipe, and this post isn’t affiliated with or endorsed by Chili’s.


Chili’s Honey-Chipotle Chicken Crispers (Copycat Recipe)

Servings: 4
Prep Time: 20 minutes
Cook Time: 20 minutes
Total Time: about 40 minutes

Ingredients

  • 1 1/2 pounds chicken tenderloins (about 10-12 pieces)
  • 6-8 cups vegetable or canola oil, for frying
  • 1 large egg
  • 1/2 cup whole milk
  • 1/2 cup chicken broth
  • 1 1/4 teaspoons salt (for batter)
  • 1/4 teaspoon black pepper (for batter)
  • 1/4 teaspoon paprika (for batter)
  • 1/4 teaspoon garlic powder (for batter)
  • 3/4 cup all-purpose flour (for batter)
  • 1 1/2 cups all-purpose flour (for breading)
  • 1 1/2 teaspoons salt (for breading)
  • 3/4 teaspoon paprika (for breading)
  • 1/2 teaspoon black pepper (for breading)
  • 1/2 teaspoon garlic powder (for breading)
  • 2/3 cup honey
  • 1/4 cup water
  • 1/4 cup ketchup
  • 1 tablespoon apple cider vinegar
  • 1-2 teaspoons ground chipotle chili powder
  • 1/2 teaspoon salt (for sauce)
  • 1/2 teaspoon hot sauce (optional)

Instructions

  1. Combine honey, water, ketchup, vinegar, chipotle chili powder, salt, and hot sauce in a saucepan. Simmer 2 minutes, then set aside.
  2. Whisk together egg, milk, chicken broth, salt, pepper, paprika, and garlic powder, then whisk in 3/4 cup flour to make the batter.
  3. Mix breading flour, salt, paprika, pepper, and garlic powder in a shallow dish.
  4. Heat oil to 350°F in a Dutch oven or deep pot.
  5. Dip chicken tenderloins in batter, then coat in breading mixture.
  6. Fry in batches of 3-4 for about 4 minutes, flipping once, until golden brown and cooked through to 165°F.
  7. Drain on paper towels, then toss all the fried chicken with the honey chipotle sauce.
  8. Serve immediately.

Related Recipes

How to Use “Learning with YouTube” in Gemini AI

Recently, Google introduced a feature within its Gemini AI ecosystem called the “Learning with YouTube” Gem. In this article I’ll tell you what it is, how to use it, and give you specific examples you can try.

Let’s first review of a “Gemini Gem” is. In simple terms, a “Gem” is a custom, specialized version of Google’s Gemini AI designed to handle a specific task. Other AI’s might call these “agents” or “projects.”

The Learning with YouTube Gem is pre-programmed with a specific mission: to analyze YouTube videos, extract the core educational content, and help you digest, understand, and test yourself on the material.

Instead of simply watching a 30-minute video passive-style, this Gem turns the video into an interactive workspace. It can summarize lengthy tutorials, break down step-by-step instructions, generate practice quizzes, explain complex concepts in simpler terms, and answer specific questions about precise moments in a transcript.

How to Access and Set Up the Gem

You don’t need a degree in computer science to get this up and running. Here is the simple, step-by-step setup:

  1. Open Gemini: Head over to the Gemini interface on your computer or mobile device and sign into your Google account.
  2. Navigate to Gems: In the left-hand sidebar, click on the Gems manager or Gem Manager option.
  3. Select “Learning with YouTube”: Google provides several pre-made premade Gems in its library. Look for the one titled Learning with YouTube and click to open it.
  4. Pin It for Easy Access: Click the pin icon next to the Gem so it stays anchored to your sidebar for quick access whenever inspiration hits.

4 Practical Ways to Use “Learning with YouTube” for Real-Life Growth

1. Master Practical DIY Fixes Without the Fluff

We’ve all been there: your household appliance makes a strange grinding noise, or you need to tackle a home repair project. You search for a tutorial, find a 15-minute video, and then spend the first seven minutes watching the creator ask you to “smash that subscribe button” and talk about their sponsor.

How to use the Gem:

  • Copy the URL of the repair tutorial video.
  • Paste it into the “Learning with YouTube” Gem prompt bar.
  • Type: “Extract the exact tool list needed for this job, and give me a numbered, step-by-step text guide of the physical repair process.”

The Gem reads the underlying transcript in seconds and hands you a clean, printable checklist. You get straight to work, execute the repair, and get back to enjoying your weekend with your family.

2. Turn Educational Cooking Videos into Precise Recipes

Outdoor cooking and custom spice rubs are great hobbies, but watching someone cook for 20 minutes doesn’t always translate cleanly to standing in the kitchen with all your ingredients ready to go…

How to use the Gem:

  • Paste a link to a barbecue masterclass or culinary technique video.
  • Type: “Create an ingredient list with exact proportions mentioned in this video, along with the targeted internal temperatures and cooking time benchmarks.”

Instead of scrubbing back and forth through a video with messy hands while standing over a hot fire, you have a clean, formatted recipe card right on your phone screen.

3. Help Your Kids Study Complex Academic Topics

If you have kids in high school or middle school, you know that modern coursework—whether it’s advanced algebra, biology, or world history—can sometimes leave a dad scratching his head. You want to support them, but you might not remember the exact formulas you learned thirty years ago.

How to use the Gem:

  • Find a highly rated educational video covering the exact subject your child is studying.
  • Paste the link into the Gem and type: “Create a 5-question multiple-choice practice quiz based on the key concepts in this video, along with an answer key that explains WHY each answer is correct.”

Now, instead of just sitting your kid down in front of a screen to passively watch a video, you have turned that content into an active, engaging study session. You get to play the role of an encouraging coach, testing their knowledge and working through the solutions together.

4. Deepen Your Personal Growth and Perspective

Whether you are studying history, trying to understand personal finance, exploring music theory, or reading through classic literature, learning should never stop just because you finished school. Perspective is hard-won, and keeping your mind sharp requires deliberate effort.

How to use the Gem:

  • Paste a link to a long-form lecture, a documentary, or a deep-dive educational presentation.
  • Type: “Provide a 3-paragraph summary of the core thesis of this video. Highlight the key historical life lessons or overarching principles, and suggest 3 thoughtful follow-up questions I should consider about this topic.”

This allows you to engage with deep, meaningful content on a higher level, extracting the timeless wisdom without getting bogged down in filler.

Tips for Getting the Most Out of the Gem

To ensure you are getting the highest quality output, keep these simple guidelines in mind:

  • Use Videos with Clear Transcripts: The Gem relies on YouTube’s auto-generated or creator-uploaded transcripts. Spoken-word heavy videos—like lectures, tutorials, reviews, and essays—work exponentially better than purely visual, music-driven content.
  • Ask Specific Questions: Don’t just ask for a summary. Ask the Gem to “Explain timestamp 04:12 to 06:30 in simple, layperson terms” or “What were the three main reasons the presenter gave for doing step two first?”
  • Verify Practical Safety: While AI is an incredible tool for organization and distillation, always use good old-fashioned common sense when dealing with structural home repairs, high-voltage electrical work, or heavy machinery.

The Legacy CTA: What Will You Do With the Time You Save?

In the long run, technology is only as valuable as the purpose it serves. Tools like the “Learning with YouTube” Gem aren’t meant to help you hoard digital information or squeeze more tasks into a hyper-stressed day.

Their true value lies in efficiency. By cutting through the digital noise and helping you master new skills faster, these tools hand you back your most valuable currency: time.

So here is my challenge to you today: Don’t just use this tool to consume more content. Use the time you save to invest in what matters most.

Put the phone down after you’ve learned your lesson. Go out into the garage and build that project with your son. Sit down at the table and help your daughter with her homework. Cook a great meal for your spouse, or call an old friend you haven’t spoken to in months.

Knowledge is great, but the time you spend nurturing relationships and building a meaningful life—that is what builds a real legacy. Now go out there, learn something new, and make it count.


LongHorn Steakhouse Parmesan Crusted Chicken Recipe

If you’ve ever sat down at a LongHorn Steakhouse and watched that golden, bubbling layer of cheese hit the table in front of you, you know the little thrill that comes right before the first bite. That parmesan crust is the reason half the tables in that restaurant order the same thing.

LongHorn Steakhouse’s Parmesan Crusted Chicken has been a menu staple for years, and it’s easy to see why — a juicy, marinated chicken breast gets topped with a melty parmesan-provolone blend and a garlicky, buttery panko crust, then run under the broiler until it’s golden and bubbling. It’s the kind of dish that feels like a restaurant treat but is honestly pretty simple to pull off in your own kitchen — no reservation, no wait for a table, and you can make it exactly as cheesy as you want.

This post may contain affiliate links. As an Amazon Associate I earn from qualifying purchases.

Why You’ll Love This Recipe

  • Tastes just like the original — the marinade and cheese-and-panko crust nail that same rich, savory flavor you remember from the restaurant.
  • Weeknight-friendly — from marinating to broiling, you’re looking at well under an hour of actual hands-on time.
  • Family-friendly — even picky eaters come around for melted cheese and crispy panko on top of chicken.
  • Flexible — sear it in a skillet, bake it, or throw it on the grill depending on what you’re in the mood for (or what the weather’s doing).

Ingredients

For the Chicken & Marinade

  • 4 boneless, skinless chicken breasts – pounded to an even 1/2-inch thickness so they cook evenly and stay juicy.
  • 1/3 cup olive oil – the base of the marinade; adds richness and helps everything else stick.
  • 1/3 cup ranch dressing – this is the secret to that tangy, herby LongHorn flavor. Use your favorite bottled ranch.
  • 2 tablespoons Worcestershire sauce – adds a savory, almost steakhouse-y depth.
  • 1 tablespoon minced garlic – fresh is best here, but jarred works in a pinch.
  • 1 teaspoon lemon juice – brightens up the marinade so it doesn’t taste flat.
  • 1/2 teaspoon black pepper, plus salt to taste – keep it simple; the ranch and cheese bring plenty of flavor later.
  • 2-3 tablespoons vegetable oil – for searing the chicken in a skillet (skip this if you’re grilling).

For the Parmesan Crust

  • 1/2 cup grated Parmesan cheese – the backbone of the crust; use the real stuff if you can, not the shelf-stable shaker kind.
  • 1/2 cup shredded provolone cheese – melts beautifully; Swiss or mozzarella work as substitutes if that’s what you’ve got on hand.
  • 6 tablespoons ranch dressing – mixed with the cheese to make a spreadable, tangy layer.
  • 3/4 cup panko breadcrumbs – gives the topping its signature crunch; regular breadcrumbs work but won’t be quite as crispy.
  • 4 tablespoons butter, melted – coats the panko so it toasts and browns instead of just sitting there.
  • 2 teaspoons garlic powder – stirred into the panko for extra flavor in every bite.

Directions

Marinate the Chicken

  1. Whisk together the olive oil, ranch dressing, Worcestershire sauce, garlic, lemon juice, and pepper in a bowl until combined.
  2. Place the chicken breasts in a zip-top bag or between two sheets of plastic wrap and pound to an even 1/2-inch thickness.
  3. Season lightly with salt, then add the chicken to the marinade, seal, and refrigerate for at least 30 minutes (or up to overnight for deeper flavor).

Cook the Chicken

  1. Heat 2-3 tablespoons of vegetable oil in a heavy skillet (cast iron if you’ve got it) over medium-high heat. Remove the chicken from the marinade, letting the excess drip off.
  2. Sear the chicken for 4-5 minutes per side, until golden brown and cooked through to 165°F internally.
  3. Prefer the grill? Cook the chicken over medium-high direct heat for 4-6 minutes per side instead — you’ll get a little smoky char that makes this even better.
  4. Transfer the cooked chicken to a baking sheet or oven-safe skillet and tent loosely with foil while you make the topping.

Build the Crust

  1. In a bowl, stir together the Parmesan, provolone, and 6 tablespoons of ranch dressing until well combined. If it’s too stiff to spread, microwave in 15-second bursts, stirring in between, until it loosens up.
  2. In a separate bowl, mix the panko, melted butter, and garlic powder until every crumb is coated.

Broil & Rest

  1. Set your oven to broil (or low broil around 450°F) and position a rack about 6 inches from the heat source.
  2. Spread the cheese mixture evenly over each piece of chicken, then top with the buttered panko mixture, pressing gently so it sticks.
  3. Broil for 3-4 minutes, watching closely, until the cheese is bubbling and the panko is golden brown.
  4. Let the chicken rest for 2-3 minutes before serving — this keeps all that cheesy topping in place instead of sliding off the second you cut in.

Tips & Variations

  • Pound the chicken evenly. This is the step guys skip, and it’s the one that matters most — an even thickness means the chicken finishes cooking at the same time all the way through instead of drying out on the thin end.
  • Make it spicy. Stir a pinch of cayenne or a few dashes of hot sauce into the cheese mixture if you want some heat behind that crust.
  • Bake instead of sear. If you’d rather not deal with a hot skillet, bake the marinated chicken at 425°F for 15-18 minutes, then add the toppings and broil as directed.
  • Prep ahead. The chicken can marinate overnight, and you can mix the panko topping a few hours ahead — just keep it in the fridge until you’re ready to broil.

FAQ

Can I use chicken thighs instead of breasts?
Yes — boneless, skinless thighs work well and stay extra juicy. Just keep an eye on your cook time since thighs are often a bit smaller and can cook a touch faster than breasts.

What’s the best way to reheat leftovers without drying them out?
Skip the microwave — it turns that crispy topping soggy. Reheat in a 350°F oven for 8-10 minutes instead, which brings the panko crust back to life.

Can I make this ahead of time for a dinner party?
You can marinate the chicken and mix the crust topping a day ahead, but hold off on searing and broiling until right before you serve — that panko crust is at its best fresh out of the oven.

What to Serve It With

Round out the plate with garlic mashed potatoes, a simple steamed green vegetable like broccoli or green beans, or a side salad to cut through all that cheese. If you’ve already got the grill fired up, grilled asparagus or corn on the cob makes an easy, no-fuss side to go with it.

Storage & Reheating

Store leftover chicken in an airtight container in the fridge for up to 3-4 days. I don’t recommend freezing this one — the cheese and panko topping loses its texture once thawed. To reheat, place it on a baking sheet in a 350°F oven for 8-10 minutes until warmed through and the topping re-crisps.

Recipe inspired by / adapted from LongHorn Steakhouse’s popular Parmesan Crusted Chicken. This is a homemade version built from widely shared copycat techniques — it’s not an official recipe, and this post isn’t affiliated with or endorsed by LongHorn Steakhouse.


LongHorn Steakhouse Parmesan Crusted Chicken (Copycat Recipe)

Servings: 4
Prep Time: 20 minutes (plus 30 minutes to overnight marinating)
Cook Time: 15 minutes
Total Time: about 35 minutes active, plus marinating time

Ingredients

  • 4 boneless, skinless chicken breasts, pounded to 1/2-inch thickness
  • 1/3 cup olive oil
  • 1/3 cup ranch dressing (for marinade)
  • 2 tablespoons Worcestershire sauce
  • 1 tablespoon minced garlic
  • 1 teaspoon lemon juice
  • 1/2 teaspoon black pepper, plus salt to taste
  • 2-3 tablespoons vegetable oil (for searing)
  • 1/2 cup grated Parmesan cheese
  • 1/2 cup shredded provolone cheese
  • 6 tablespoons ranch dressing (for crust)
  • 3/4 cup panko breadcrumbs
  • 4 tablespoons butter, melted
  • 2 teaspoons garlic powder

Instructions

  1. Whisk olive oil, 1/3 cup ranch dressing, Worcestershire sauce, garlic, lemon juice, and pepper together for the marinade.
  2. Pound chicken breasts to an even 1/2-inch thickness, season lightly with salt, and marinate for 30 minutes to overnight in the fridge.
  3. Heat vegetable oil in a skillet over medium-high heat and sear chicken 4-5 minutes per side until cooked through to 165°F (or grill over medium-high heat 4-6 minutes per side).
  4. Transfer chicken to a baking sheet and tent with foil.
  5. Mix Parmesan, provolone, and 6 tablespoons ranch dressing until spreadable.
  6. Mix panko, melted butter, and garlic powder until coated.
  7. Preheat broiler and position rack 6 inches from heat. Spread cheese mixture over chicken, top with panko mixture.
  8. Broil 3-4 minutes until bubbling and golden brown. Rest 2-3 minutes before serving.

Related Recipes

Mike’s AI Tips: The Fridge Snap Solution for Busy Nights

When it’s dinner time and the mental tax of deciding what to make feels heavier than the actual cooking, leverage Gemini’s visual recognition instead of stressing over a recipe search.

Does this sound like you?

It is 5:45 PM on a Tuesday. You just got home from work, the kids are asking what is for dinner, and you are standing in front of an open refrigerator with zero mental energy left to figure out a meal. Deciding what to cook after a long day often feels harder than the actual cooking.

When “dinner fatigue” sets in, you do not need to sit down, type out a long list of ingredients, or scroll through food blogs trying to find a recipe.

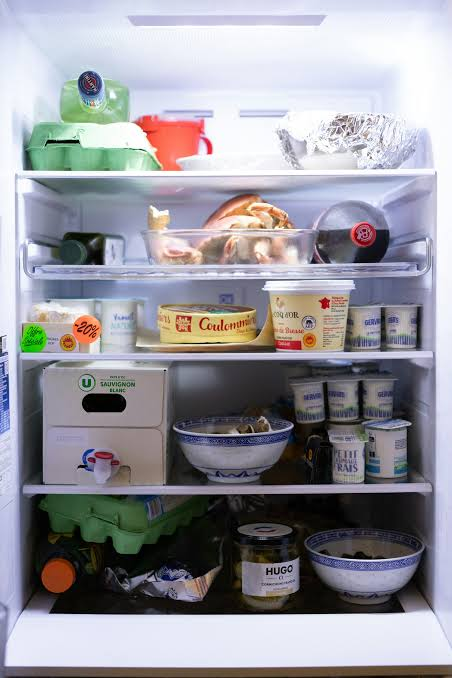
Did you know – You can solve this in under 30 seconds by taking a quick photo with Google Gemini. By leveraging Gemini’s visual recognition capabilities, you turn your smartphone camera into a instant sous-chef that reads your fridge shelves, identifies your ingredients, and gives you realistic meal options on the spot.

How to Use the Fridge Snap Tonight

Instead of pulling out ingredients one by one or settling for takeout, use this quick three-step routine:

1.Take a Clear Photo:

Open the Gemini app, tap the camera icon in the prompt bar, and snap a quick photo of your open refrigerator shelves or pantry setup. Make sure the main proteins, produce, and open jars are reasonably visible.

2.Send the Specific Prompt:

Type or speak this exact prompt alongside your photo:

“Give me 3 realistic 20-minute dinner ideas I can make using ONLY what you see here, plus basic pantry staples like oil, salt, pepper, and butter. Keep prep time under 10 minutes.”

3.Pick and Refine:

Gemini will analyze the image, recognize your ingredients, and give you brief, actionable ideas. If one looks good, reply: “Give me the step-by-step instructions for option #2.”

Why It Works So Well

  • Zero Brain Power Needed: You skip the endless scrolling through food blogs with 10-page backstories.
  • Reduces Food Waste: Uses up items sitting in the crisper drawer before they go bad.
  • Adapts to What You Have: If you’re missing an ingredient, tell Gemini on the spot (e.g., “I don’t have heavy cream, what can I swap in?”) and it adjusts instantly.

Practical Tips to Get the Best Results

  1. Include the Crisper Drawer: If you have fresh veggies hidden in drawers, pull the drawer open slightly before taking the photo so Gemini can see what greens or vegetables you have left.
  2. Mention Household Preferences: Add quick constraints to your prompt if needed, such as “Make option #1 kid-friendly” or “Keep it gluten-free.”
  3. Pantry Add-Ons: If you have canned black beans, rice, or pasta in the cupboard, mention them in your text prompt alongside the fridge photo to give Gemini more building blocks to work with.

Give this quick visual trick a try tonight before reaching for a delivery app—it takes 30 seconds to snap the picture, saves money, and gets dinner on the table fast.


What Is Claude Projects? A Beginner’s Guide

If you’ve ever caught yourself re-explaining the same background information to an AI chatbot every single time you open a new conversation, Claude Projects was built to solve exactly that problem. It’s one of the most useful — and most underused — features inside Claude, Anthropic’s AI assistant. Here’s what it actually is, how it works, and how to set one up in a few minutes.

Original illustration showing a central Project workspace card connected to three satellite cards labeled Instructions, Knowledge Base, and Conversations, in a green and gray color palette
A Claude Project bundles instructions, a knowledge base, and organized conversations into one workspace.

The Problem Projects Solves

Picture this familiar routine: you open a new chat with an AI tool, and before you can ask for anything useful, you spend three paragraphs explaining who you are, what your business does, what tone you want, and what you’re trying to accomplish. The next day, you do it all over again in a brand-new conversation.

That repetition wastes time and breaks your flow. Claude Projects exists to eliminate it by giving you a persistent workspace that remembers your context so you don’t have to keep repeating yourself.

So What Exactly Is a Claude Project?

At its core, a Project is a self-contained workspace inside Claude that bundles together three things:

  1. Project instructions — standing guidance that tells Claude who you are, what the project is for, and how you want it to behave in every conversation that happens inside that workspace.
  2. A knowledge base — files you upload (documents, spreadsheets, policies, brand guides, transcripts, whatever’s relevant) that Claude can reference automatically, without you re-uploading them each time.
  3. Organized conversations — every chat you have inside a given Project stays grouped together, separate from unrelated work, so a client project doesn’t bleed into your personal writing or a coworker’s task.

Instead of starting from zero in every new chat, you open a Project and Claude is already briefed on the context that matters.

Who Can Use It, and What Does It Cost?

Projects are available to everyone, including free Claude accounts — you don’t need a paid plan to try it. Free accounts can create up to five Projects, and paid plans allow more.

One helpful technical detail: if the files you upload to a Project grow larger than Claude can fit into a single conversation, Claude automatically shifts into a retrieval mode that searches your documents for relevant information rather than trying to hold everything at once. In practice, this means you don’t have to worry about hitting a hard wall if your knowledge base grows over time.

How to Create Your First Claude Project

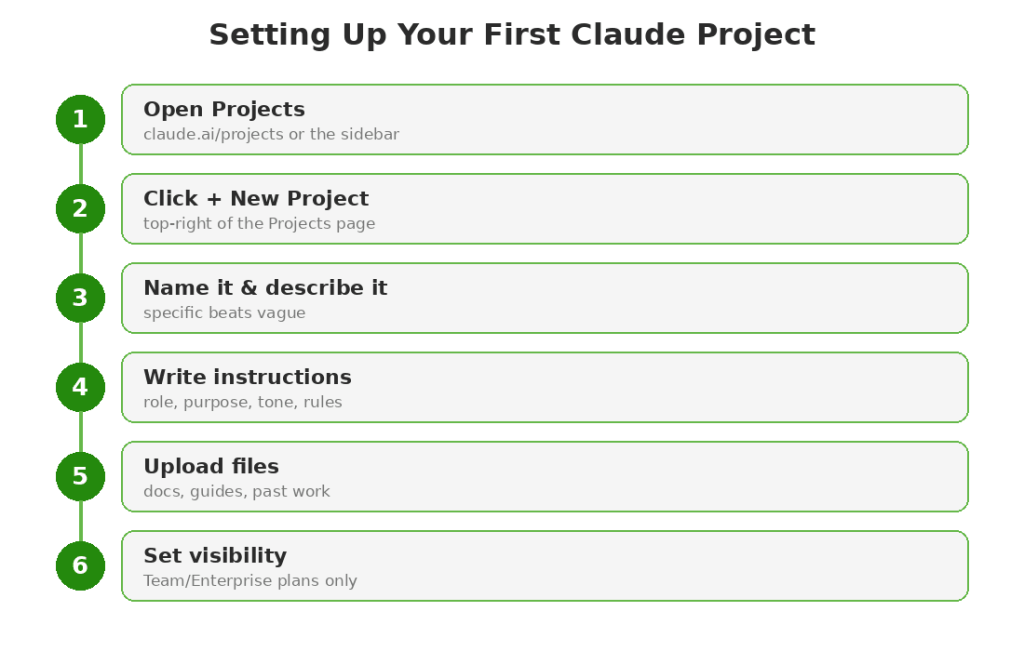
Setting one up takes about five to fifteen minutes, depending on how much context you want to load in upfront. Here’s the process:

The six steps to setting up your first Claude Project.

1. Open the Projects section. In the Claude interface, look for “Projects” in the left-hand sidebar, or go directly to claude.ai/projects in your browser.

2. Click “+ New Project.” You’ll find this button in the upper right corner of the Projects page.

3. Name your project and add a description. Give it something clear and specific — “Q3 Marketing Campaign” is more useful than “Work Stuff.” Worth noting: Claude doesn’t actually read the project name or description as context, so don’t rely on them to communicate instructions — that’s what the next step is for.

4. Write your project instructions. This is the most important part of setup. Good instructions typically cover four things:

  • Your role or organization (who you are and what you do)
  • The specific purpose of this project
  • The tone and format you want Claude to use
  • Any standing rules that should always apply

A focused half-page of instructions is usually far more effective than three vague pages. Specificity beats length.

5. Upload relevant files. Add documents, spreadsheets, policies, or reference material that Claude should draw on throughout the project — things like style guides, financial reports, research notes, or past examples of work you like.

6. Set visibility (Team and Enterprise plans only). If you’re on a Team or Enterprise account, you’ll choose whether to keep the project private to you and invited collaborators, or share it with your broader organization.

Once it’s set up, every new conversation you start inside that Project automatically inherits the instructions and files — no re-explaining required.

When Should You Actually Use a Project?

Not every task needs one. A one-off question doesn’t call for a dedicated workspace. But Projects earn their keep when you find yourself returning to the same context repeatedly. Good candidates include:

  • A recurring task tied to your role, like drafting weekly client updates or writing proposals in a consistent format
  • Ongoing work tied to one client, product, or account that has its own background and reference material
  • A body of work with reference material you keep consulting, like a style guide or a company policy

If you’re using Claude for the same kind of task more than once or twice, that’s usually the signal it’s time to build a Project around it. If you’re still getting a feel for what AI tools are good for day to day, our 10 Simple & Actionable AI Tips to Make Your Life Easier is a good starting point before you build out a full Project.

Projects vs. Claude’s General Memory

If you’ve used Claude for a while, you may have noticed it can also remember things from past conversations on its own, even outside of a Project. So what’s the difference?

General memory is broad and follows you across every standalone chat — it might recall your job, your writing preferences, or a recurring topic you’ve discussed. A Project’s memory works differently: it’s scoped specifically to that workspace. The instructions, files, and context you build inside a “Client A Proposals” Project stay separate from your “Personal Blog Writing” Project, even though both belong to the same account. That separation is the whole point — it keeps unrelated work from bleeding together and lets you build genuinely specialized workspaces instead of one big undifferentiated pile of context. It’s a similar idea to what we covered in AI Agents Explained: Your Personal Digital Assistants — giving an AI tool a defined scope makes it dramatically more useful than treating it like one giant, undifferentiated assistant.

Tips for Getting the Most Out of a Project

A few practical habits make Projects noticeably more useful:

  • Be specific in your instructions, not exhaustive. A tightly written half-page beats a sprawling document Claude has to wade through. Focus on the details that actually change how Claude should respond — your role, your audience, your tone, and any hard rules.
  • Update instructions as things change. If your project’s purpose shifts, or you’ve learned that Claude keeps making the same kind of mistake, go back and adjust the instructions rather than repeating corrections in every chat.
  • Keep your knowledge base current. Swap out outdated files and add new reference material as it becomes relevant, the same way you’d keep a shared drive folder tidy.
  • Use one Project per distinct body of work. Resist the urge to dump everything into a single mega-project. Separate workspaces for separate clients, topics, or types of work keep Claude’s context focused and relevant.
  • Revisit old conversations inside the Project. Because chats are grouped together, you can scroll back through prior conversations in the same workspace to find a past draft or decision instead of digging through your entire chat history.

A Quick Example

Say you’re a freelance writer who juggles three regular clients. Instead of one long, tangled chat history, you could set up three separate Projects — one per client. Each one holds that client’s style guide, past approved articles, and specific instructions like “always write in second person” or “avoid using the word ‘leverage.’” When you open a new chat inside the “Client B” Project, Claude already knows the voice, the audience, and the ground rules, and you can jump straight into drafting instead of re-briefing it from scratch.

That’s the practical payoff: less setup overhead, more consistency, and a workspace that actually gets more useful the longer you use it.

The Bottom Line

Claude Projects turns Claude from a tool you re-explain yourself to every time into a workspace that already knows the context of what you’re working on. It costs nothing to try, takes just a few minutes to set up, and can save a meaningful amount of repeated typing if you use Claude regularly for the same kind of work. If you haven’t tried it yet, picking one recurring task in your week and building a Project around it is a good place to start.

How to use AI as a helpful Digital Advisor

In this article, I’ll explain how you can use AI tools to not only save time, but also produce results faster – whether that be at work or at home.

Listen, I’ve spent a lot of my life looking for answers. Whether it was scouring the library for history lessons back in the day, or more recently, wading through countless pages of “sponsored results” on Google just to find a good recipe for ribs, the hunt for knowledge has always been a passion of mine. And that extends now to AI.

I’ve been using AI tools for a couple years now and lately I’ve noticed a shift. It’s clear to me that we’ve moved past the era of the “Search Bar” and into the era of the “AI Digital Advisor.” Tools like Gemini, ChatGPT, and CoPilot aren’t feeding uncurated search results that we have to wade to, instead these AI tools are becoming something else – perhaps even a bit like a friendly neighbor you can glean wisdom from?


Beyond the Search Bar: The Death of the “Blue Link”

We’ve all been there. You type a question into a search engine, and you’re met with a wall of ads, SEO-optimized articles that take five paragraphs to get to the point, and cookie pop-ups that make you want to toss your laptop out the window.

Traditional search is like a librarian who points to a massive pile of books and says, “It’s in there somewhere. Good luck.”

New AI tools, on the other hand, are like the librarian who has actually read the books. When you ask a question, AI doesn’t just give you a list; it synthesizes the answer. AI filters out the noise. In the long run, the time saved isn’t just about “productivity”—it’s about reclaiming the minutes of your life for what matters most. Instead of thirty minutes researching the best hiking boots for a trip to the Smokies, you spend thirty seconds getting a curated recommendation and twenty-nine minutes actually planning the trail with your kids.

The Evolution: From “What” to “How” and “Why”

The real magic, the hard-won realization I’ve had while using these tools, is that they’ve evolved from simple Large Language Models (LLMs) into conversational partners.

When I was reviewing my journals from years past—looking at my 2021 goals or my 2023 reflections—I noticed a pattern. I spent a lot of time “planning to plan.” I was stuck in the “what.”

  • What exercise should I do?
  • What should I cook for the boys?
  • What is the best way to handle a work dilemma?

AI has shifted that burden. Now, I can bounce an idea off Gemini. I can say, “Hey, I’m feeling a bit burnt out on my fitness routine, and I want something that focuses on longevity rather than bulk. Here’s what I’ve done in the past. What do you think?”

It’s not just a search result. It’s a sounding board. It’s a way to get a “second opinion” on your own thoughts before you commit to a path. This speed of decision-making is a game-changer for those of us trying to build a legacy while juggling a career and a family.


The “Trust but Verify” Rule (The Dad Disclaimer)

Now, let’s get one thing straight. Just because your neighbor is wise doesn’t mean he’s always right. He might misremember a date or give you a “shortcut” that actually leads to a dead end.

The same goes for AI.

Think of AI as a friendly advisor, not an infallible deity.

You wouldn’t take 100% of what a buddy says at the bar as absolute gospel without checking it yourself, right?

  • Verify the Big Stuff: If it’s medical advice or financial strategy, use the AI to narrow down your options, then talk with your trusted humans advisors.
  • Check the “Hallucinations”: Sometimes AI still gets a bit too confident and makes things up. But I guess that happens to the best of us after a long day too, right?
  • Maintain Your Agency: The goal of these tools is to help you make more informed decisions, not to make the decisions for you! Your life, your legacy, and your character are still your responsibility.

Practical Wisdom: How to “Talk” to Your AI Advisor

If you want to start using AI to improve your daily life, don’t just ask it one-off questions. Use it for “Iterative Thinking.”

  1. The Brain Dump: Tell the AI everything you’re thinking about a project. Don’t worry about grammar. Just get it out. Then ask for AI to organize things and create your project template. Decide what you like. Iterate again. Repeat until you get what you want. Congrats you just saved 90% of the time you would have spend creating the project on your own.
  2. The Critique: Have an idea in mind? Ask, “What am I missing here?” or “What are the potential downsides of this plan?” This works great for investing ideas, workout plans, work dilemmas, and more.
  3. The Synthesis: Ask it to summarize the best path forward based on your specific values (e.g., “Keep it simple and low-cost”). This is a great way to get from a ‘dream’ to a ‘goal’.

This isn’t about “maximizing your hustle.” It’s about using modern tools to get results so you have more time to live your life—that space where you’re prepared, present, and purposeful.


The Corporate Force Multiplier: Why Microsoft 365 Copilot is a Game-Changer

If your org uses MSFT apps and you have access to use CoPilot 365 this section is for you!

Does this sound familiar – you spend half your morning hunting for that one specific SOP (Standard Operating Procedure) or digging through a mountain of emails to find a client’s feedback from three weeks ago. It’s “busy work” that eats the soul and kills the clock.

But let’s talk about a real course correction for the modern office: Microsoft 365 Copilot.

This isn’t just another “chat” tool. Because it lives inside the Microsoft ecosystem—Word, Excel, Teams, and Outlook—it has what we call “contextual intelligence.” It’s like having a Chief of Staff who has read every file in your company’s SharePoint and attended every meeting you missed.

The real power here is the integration. Within a controlled company ecosystem, Copilot can securely access your internal work files.

  • Instant Recall: Instead of searching keywords and hoping for the best, you ask, “Summarize the last three emails from the project lead regarding the budget.” Boom. Done.
  • The “Blank Page” Killer: Need to draft a project proposal based on a rough set of notes in OneNote and a spreadsheet in Excel? Copilot can synthesize those separate pieces into a formal draft in seconds.
  • Org-Specific Accuracy: Because it’s pulling from your company’s SOPs and data, the output isn’t generic—it’s tailored to your organization’s specific voice and rules.

In the long run, this is a massive force multiplier. It allows you to move from “searching” to “executing” at a speed that was simply impossible a few years ago. It’s about working smarter so you can protect your time for what matters most.


The Legacy Takeaway

At the end of the day, technology is still just a tool. A hammer can build a house or break a window. AI can be a distraction that sucks you into a screen, or it can be the engine that clears your “To-Do” list so you can go outside and play catch with your son or take your wife to a nice dinner.

We’re living through a massive shift in human history. We have access to a mentor in our pockets 24/7. Don’t fear it, and don’t worship it. Use it to find more time for your Life’s Path.


The Legacy CTA

Start that “one thing” you’ve been putting off. Whether it’s writing a book, cooking a brisket, or finally getting in shape. Open up an AI tool tonight, tell it your goal, and ask: “Give me a simple, three-step plan to start this tomorrow that won’t overwhelm me.” Then—and this is the important part—put the phone down and go tell your family you love them.

Be the rock they can soar from.

That Helpful Dad


Starve the Fear, Feed Your Hope, and Step in to a New Life

I’ve spent a lot of years—fifty-some-odd now, if you’re counting—looking at the balance sheet of life. And if there is one hard-won truth I can pass down to you, it’s this…

Your life is a reflection of what you choose to nourish.

Think of your mind like a plot of garden soil. It’s fertile. Something is going to grow there whether you like it or not. You have two types of seeds in your pocket: the “Fear and Doubt” variety and the “Faith and Confidence” strain. The one that ends up taking over the yard isn’t the one that’s “right” or “true”—it’s simply the one you decide to water every morning.

The Year the Weeds Took Over

I remember back in 2017, I was staring down a lot of unknowns. I was working for a company on the verge of bankruptcy that kept me up at 2:00 AM wondering if I was about to sink the family finances ship. On top of that, I’d stopped working out and my health was a uncertain—I was dealing with an intermittent edema that doctors couldn’t explain and the occasional vertigo that only added to the ‘spinning’ of my world.

I knew at the time I was feeding the wrong things. I was feeding the “What if I fail?” and “Why don’t I have any energy?”. I was watering the frustration and the anger. And you know what grew? A thick, thorny hedge of anxiety that started to choke out the things that actually mattered—like the joy of watching my older son grow or the “indomitable spirit” of youngest one.

It took a course correction to realize that if I kept giving life to the negative, I was never going to have the energy to build the legacy I so desperately wanted.

Starving the Weeds

You see, we all have those “weeds”.

We have the insecurity that tells us we’re not talented enough, or the guilt that nags us about past mistakes, or the fears that we’ll never get healthy again.

In 2020, during the height of the lockdowns, I felt that old anger and frustration creeping back in. My relationship with with my wife was feeling the strain because I was withdrawing into my own head, feeding fears about those uncertain times and all the external chaos that went with it.

I had to make a choice.

I had to “starve the discouragement.” For me, that meant shutting off the news and picking up my personal journal. It meant replacing the “What if the world ends?” thoughts with affirmations like: “I am the rock that my family soars from” or “My mind is a sea of happiness”.

It sounds simple, maybe even a little “woo-woo” to some, but it’s practical as a hammer. When you stop feeding the doubt—when you quit talking about it, quit ruminating on it, and quit giving it your “Now Moments”—the negatives in your life eventually lose their power – they wilt and you begin to win.

Planting Seeds for the Long Run

So, what does “feeding the positive” look like in the real world? It’s not about ignoring reality, instead…

It’s about choosing a different focus.

In my own life, I’ve found that feeding my faith and confidence means doubling down on the “Legacy” activities that bring me joy. In 2023 and 2024, I tracked my “Top 10” activities. You know what was at the top? The Bible, journaling, “Now Moments” with my family, and working out.

I started feeding the relationship with my boys and my wife. Instead of worrying about my older son’s struggles in Middle School, we fed his confidence through basketball and weightlifting. Instead of feeding my own career frustrations, I fed my passion for writing—finally getting my fantasy book series moving. My younger son and I went fishing more – and we discovered he’d really good at it. My wife and I went out for more walks together and enjoyed talking again.

When you feed your “Faith,” you aren’t just hoping for the best; you are actively investing in the version of yourself that can handle the worst. You’re building a foundation of love and determination that makes the obstacles of life look small.

The Practical Integration: The “Morning Audit”

If you want to change what’s growing in your life, you need a daily maintenance plan. Here is a hard-won hack I use every morning:

  1. The Affirmation Anchor: Before you check your phone (which is basically an IV drip of “Doubt Seeds”), write down three things you know to be true about your value. Use “I am” statements. “I am a provider,” “I am a finisher,” “I am grateful”.
  2. The “Now Moment” Hunt: Throughout the day, look for one small thing—a sunset, a laugh with your kids, a good cup of coffee—and mentally say, “I’m feeding this” by remembering it and focusing on it.
  3. Starve the Complaint: Try to go until noon without voicing a single complaint or worry. Every time you complain, you’re just watering a weed.

Perspective from the Front Porch of Life

In the long run, nobody remembers the fears that didn’t come true. They remember the man who was a “foundation of love”. They remember the father who was “consciously aware of his life’s focus”.

You have a limited amount of energy. Don’t waste it on the things you don’t want to see grow. Quit giving life to the negative. Starve the inferiority. Feed your confidence. You’ll be amazed at how quickly the garden changes when you start planting the right seeds.

The Legacy CTA

Start that “one thing” you’ve been putting off because you were afraid you weren’t “talented enough.” Whether it’s writing a book, starting a garden, working out, or just sitting down to have a real “wisdom chat” with your kids—do it today. Feed the action, and the doubt will starve.

Stay helpful,

Mike (“That Helpful Dad”)

Open Your Locked Doors: Why Your Past Failures are Sometimes Your Greatest Assets

Throughout my life I’ve spent a lot of time staring at closed doors. I’m talking about those heavy, industrial-grade doors we bolt shut ourselves because we’re convinced we aren’t “talented enough,” “qualified enough,” or we think because we messed up once and decided we don’t deserve another shot at the title.

Looking back at my journals from the last decade, I’ve noticed see a pattern. In 2017, I was wrestling with the “unknowns” related to changing companies, feeling like I was stuck on a sinking ship. In 2021, I was beating myself up over a home remodel idea that never seemed to get off the ground. Last year it was anxiety about not progressing at my workout goals and feeling like it was all pointless. And the list goes on…

We are our own toughest landlords, aren’t we? We lock the doors to our potential and then complain that the room is too small.

But here is the hard-won wisdom I’ve gathered from years of course corrections: That door you think is dead-bolted? It’s actually just waiting for a change in perspective.

The Myth of the “Permanent Mistake”

We often think that if we fail at something—a business venture, a fitness goal, or even a parenting moment—that door is locked forever. I remember a day in 2023 when I chose not to eat with my boys at McDonald’s because I was so focused on “clean eating goals.” Later that night I felt like I’d robbed us of a “Now Moment.

I could have locked the door right there and labeled myself a “rigid dad.” But the truth is that a legacy life isn’t built on a single perfect day. It’s built on the boldness to open the door again the next morning, and the one after that, and so on.

In the long run, your mistakes aren’t walls; they are the very things that qualify you to lead.

You can’t teach a son how to handle a loss if you’ve never struck out yourself. You can’t show a friend how to find “mental peace” if you haven’t navigated the storms of anxiety or frustration in your own life.


Why the God (and Life) Often Knocks Twice

I believe there is a Momentum in the Universe that wants us to grow – you may choose to call it Divine Providence, the Tao, or just the relentless “Force of Life,” – I’ll stick with “GOD.”

I’ve witnessed God act in my own life. I spent years worrying about if my career was a “fulfilling way” to provide for my family and still build a legacy. Although I did well in my role I never seemed to be able to progress forward. I pondered the question of changing jobs more times than I can count. But I was afraid of the unknown.

But then, I stopped worrying about work and started focusing more on what I could control – especially the activities that make up my “Legacy Life”—my writing, my coaching, my role as a father and husband who is the “rock my family soars from,” my mind and body goals, and more. That’s when the doors of LIFE started to open up – not because I suddenly became a genius and made major changes, but because I stopped leaning my whole body weight against the locked doors of my mind.

Over time, with family life better than ever, my career also blossomed, opening up new opportunities that gave me a chance to make an exponentially greater impact on others that led to more fulfillment for me. It became the best of both worlds and I’m so grateful for God’s MANY blessings.

When an opportunity presents itself that seems “overwhelming,” perhaps it’s not a mistake. Perhaps it’s an invitation. If you feel a new confidence or a sudden spark of boldness, don’t over-analyze it. Perhaps that’s God breathing in your direction, telling you that your past failures have actually been a specialized training program for your future.


The Practical Integration: How to “Unlock” Today

Wisdom without action is just a nice sentiment, and That Helpful Dad doesn’t do “just nice.” We need a plan. If we want to open those doors, we have to prepare the room.

1. Audit Your “Locked Rooms”

Take ten minutes tonight. What is the one thing you’ve told yourself you “can’t” do because of a past hurt or a perceived lack of talent? Is it writing that book? Getting heart healthy? Improving your relationship with your spouse? Write it down. Acknowledging the door is the first step to unlocking it.

2. The “10-Minute Rule”

In my 2022 goals, I wrote: “The key to all this is not only scheduling a goal but also DOING it… try to just 10 mins a day and see what happens.” If the door feels too heavy to swing open, just crack it. Do 10 minutes of that “tough” thing and do it early in your day. You’ll find that God often meets you in the effort, not the contemplation.

3. Upgrade Your “Legacy Tools”

Sometimes we keep doors locked because we feel unorganized or overwhelmed. If your “door” is mental health, stop over-complicating it. In 2024, I focused on “Now Moments” and simple “Family Dinners” an that focused led so many wonderful memories I was able to enjoy because I was ‘present’ with those I cared about most.

  • The Practical Hack: Grab a high-quality physical journal or journal app (like Daylio) and starting tracking your day. When you document your “wins”—even the tiny ones—you build the “Legacy Evidence” you need to prove to your fear that you are capable.

The Legacy CTA

Here’s your homework, and I’m saying this with all the “Dad energy” I can muster: Stop disqualifying yourself!

That mistake you made five years ago? It’s over. That talent you think you lack? You’ll develop it on the job. Today, I want you to re-open one door. Send the email. Make the call. Forgive yourself for the “McDonald’s moment” of your past and step into what my youngest son calls the “Cravaganza” of your future.

God knows what’s in you. It’s time you believed it, too.

What is the one “locked door” you’re going to put your hand on today? Sometimes just saying it out loud is the key turning in the lock.


The Click-Clack of a Busy Home IS Life

If I could go back and tell my younger self that peace of mind isn’t only found by making money or having a good gym workout, but sometimes just by enjoying the noisy sounds of a busy household, he wouldn’t have believed me. This article is about that life lesson.

In this “Life Playbook” entry, I’m looking back at a recent Saturday afternoon where I let the ordinary sounds of my family living their lives spiral me into a “blah” mood. Something I’ve learned over the years it that there’s a specific kind of silence we often chase that doesn’t actually exist. Try though I might, I sometimes fall into this trap, but when I’m at my best I remind myself that the noise that irritates us is actually the heartbeat of our greatest legacy.

As a ‘driver’ personality, I sometimes equate ‘peace’ as a mindset I can achieve ONLY by checking every box on a to-do list and ending the day with a quiet household. I could just finish my chores early… If I can just get the gym… If I can help everyone get their homework done… If… If… If… THEN I can finally relax.

But my perception of a “perfect” day is often a trap — the very sounds that sometimes irritate us are actually the heartbeat of a life well-lived.

The “Blah” Day

Recently, I had what should have been a great Saturday. I finished my morning chores early and the gym was a great option. Even better my boys were around for some basketball shooting or baseball catch. Or maybe we could have cooked dinner together. But instead of leaning into that abundance, I let a wave of laziness take over and spent the afternoon laying in bed doing Sudoku, watching TV, and spiraling into a late nap. None of which made me feel better.

I was jolted about of my nap by the ‘click clack bang’ sounds of my wife in the next room . She was simply doing her own chores and moving things around in her closet, but in my downward spiraling mood, those ordinary sounds felt like an assault on my peace. The sounds of my boys whooping in the driveway playing ball with their friends, further frayed my nerves. I felt the anxiety rise – followed closely by a heavy blanket of depression because I hadn’t “used” my free time “correctly.”

What did I do? I stayed in my room watching TV and self-medicated with a drink and some mindless snacks. I told myself it would quiet the noise in my head – it didn’t work.

What I missed that day a failure to recognize that “peace” isn’t the absence of noise—it’s the presence of perspective.

The Illusion of the “Quiet Life”

If I could go back and tell myself one thing, it would be this: The “click-clack” of your wife in the other room and the “hooting” of your boys sports aren’t distractions from your life. They ARE your life.

We spend so much of our time “laboring for the wealth of this world,” thinking that financial freedom or a perfectly ordered home will finally bring contentment. We sometimes treat our family’s needs and even their mere presence as hurdles to jump over so we can get to ‘our’ goals. But true riches aren’t found in the silence of a finished to-do list; they are grown in the “memorable moments” that often look like interruptions.

When you feel that irritation rising because the house is “loud” or your plans for a “perfect” productive day have shifted into a “blah” afternoon, remember that you are currently living the days you will one day look back on with a bittersweet ache. The anxiety I felt from those “click-clack” sounds was really just my own internal resistance to the “Tao” or the flow of the moment. I was trying to control the environment rather than being grateful for the people in it.

Don’t Miss the Chance to ‘Reset’ the Day

When you find yourself spiraling into that “off” mood—where you’re too tired to move but too restless to relax—you need a circuit breaker.

On that day, I asked myself later…

  • Could going to the gym have ‘reset’ the day?
  • Could playing with my kids increased my joy?
  • Could helping my wife with her chores, brought me happiness?

The answer is almost always YES – well maybe not doing the chores, but hey nobody is perfect right? Even still, the point is that going to the gym (for example) isn’t about the calories burned, but the fact that movement changes your state of mind. When you move your body, you move the stagnant energy that allows anxiety and depression to take root.

When the “noise” of life gets too loud, the solution isn’t to demand silence. The solution is to change your own frequency. Whether it’s a quick workout, a walk with your spouse, or choosing a “Now Moment” with the kids over a mindless snack and a beer, the fact is that you have the power to course-correct.

That Helpful Dad’s Pocket Guide: The Golden Rules for Household Peace

  • The 10-Minute Movement Rule: If you’re feeling “off” or irritable, don’t give up and lie down to wallow. Move for 10 minutes—walk, lift, or stretch. Movement is the best medicine for a “blah” mood.
  • Reframe the Noise: Next time you hear the “click-clack” of your family, stop and say a quick prayer of gratitude. That noise means you aren’t alone.
  • Audit Your “Self-Medication”: If you’re reaching for a drink or a snack because you’re “sensitive” or “anxious,” you’re just borrowing trouble from tomorrow. Choose a “vibrant life” choice instead – one that brings a smile to your face.
  • Prioritize the “Five Good Minutes”: Even on a bad day, you can find five minutes to truly connect with your kids or spouse. These golden minutes can anchor the day in what matters most.

The Legacy Life Call to Action.

Listen, life is fleeting. Don’t waste another afternoon being “too sensitive” to the sounds of the people you love living their lives.

Your Action Step Today: Go to the “noisiest” part of your house—wherever the kids are playing or your spouse is working—and instead of asking them to quiet down, join them for five minutes. Ask about their day, give a hug, or just sit in the “click-clack” and be grateful you’re there to hear it.

In the long run, that’s the only thing that’s going to matter and you’ll be glad you added to the noise!

Naked Sparkling Energy Drinks Review and Tips for How to Use it

Hey there, it’s Mike, That Helpful Dad, and I’m glad you stopped by again.

You know, in this journey of living a “Legacy Life” — where we focus on being better husbands, fathers, and friends—it’s easy to get caught up in the daily grind. The demands of work, family, and personal improvement can leave you feeling drained. I’ve been there. You hit that mid-afternoon wall, and the temptation to grab a sugary coffee or a chemical-laden energy drink is real. But if you’re anything like me, you know that those quick fixes often lead to a crash, bloating, and that general feeling of regret. They don’t support the long-term goals we’re working so hard to achieve.

That’s why I’ve been a big fan of the Naked brand for a while now. They’re all about no-nonsense products with clean ingredients that you can actually understand. No BS, just real-world solutions that I can personally verify work. I’ve talked about their collagen creamer before and how it’s become a staple in my routine. So when I heard they were launching a new product—Naked Sparkling Energy—I had to get my hands on it. I wanted to see if it held up to the high standards the brand has set and if it was something I could honestly recommend to you.

Spoiler alert: it’s a game-changer.


Naked Sparkling Energy: My First Impressions

When the cans arrived, the first thing I noticed was the clean, simple design. No flashy colors or aggressive marketing slogans promising to make you a superhero. Just a simple, crisp can that looks as clean as the ingredients inside. The specific flavor I got to try was Lemonade, and let’s just say, the first sip was pure refreshment. It’s light, crisp, and has a natural lemon flavor without the syrupy sweetness you find in so many other drinks. It’s exactly what I’d expect from a brand that prides itself on being transparent.

This isn’t your average energy drink. It’s a clean, plant-based, and non-GMO product that gives you a genuine energy boost. It’s designed for people who want to feel good about what they’re putting in their bodies while still getting the results they need.


Key Ingredients and Nutritional Profile: What’s Inside Matters

As a guy who is mindful of what he consumes, especially with intermittent fasting and fitness being part of my routine, the ingredient list is the first thing I check. And this is where Naked Sparkling Energy really stands out.

First, let’s talk about the caffeine. It contains 200mg of natural caffeine. Where does it come from? Organic unroasted coffee beans. This is a crucial detail. Unlike synthetic caffeine that can hit you hard and then leave you in a crash, natural caffeine provides a smoother, more sustained lift. It’s like a gentle push, not a violent shove. For me, that means no jitters, no anxious energy, just a clean, focused alertness.

Next up, the sweeteners. Many energy drinks are loaded with artificial sweeteners that can mess with your gut, cause bloating, and just generally make you feel crummy. Others are packed with sugar, which can completely derail your health goals and lead to that dreaded blood sugar spike and subsequent crash. Naked Sparkling Energy is different. It’s sweetened with monk fruit and fermented sugar cane (Reb-M). These are plant-based sweeteners that provide a subtle, delicious taste without the negative side effects. The drink has only 15 calories and 0g of sugar per can. This is a huge win for anyone on a low-carb diet or practicing intermittent fasting like me. It won’t break your fast and it won’t cause that uncomfortable bloating that so many other drinks do.

It also contains organic lemon juice, which not only provides a great flavor but also works with the natural caffeine to offer antioxidants and support better absorption. It’s a simple, effective combination that makes a lot of sense.


Naked Sparkling Energy Potential Benefits: More Than Just an Energy Boost

So, what does all this mean for you? The benefits go beyond just a quick pick-me-up.

  • Clean, Sustained Energy: This is the big one. The natural caffeine and clean ingredients provide a smooth, lasting lift that helps you stay focused and productive for hours without the classic energy drink crash.
  • Gut-Friendly: With no artificial sweeteners, sugar, or other hidden ingredients, this drink is easy on your digestive system. It won’t cause the gas, bloating, or discomfort that other products might.
  • Supports Your Lifestyle: Whether you’re intermittent fasting, following a specific diet, or just trying to eat cleaner, this drink fits right in. Its low-calorie, zero-sugar profile makes it a guilt-free option.
  • Mental Clarity and Focus: I found that the clean energy helped me not only with physical tasks but with mental ones as well. It gave me the clarity and focus I needed to tackle long work days and new learning challenges.

Why I Liked Naked Sparkling Energy: Putting It to the Test

I don’t just review products; I live with them. I’ve been using this drink for a couple weeks now, and it has earned a spot in my routine. I’ve used it on a few different occasions.

One day, I had a big project at work that required a lot of focus and extra hours. Instead of reaching for a second cup of coffee that would just make me jittery, I grabbed a can of Naked Sparkling Energy. The difference was night and day. I stayed sharp and productive, and when I was done, I didn’t feel that overwhelming exhaustion. It was a smooth transition to winding down for the night.

I’ve also used it as a pre-workout when I felt a little sluggish. It gave me the perfect boost to power through my workout without feeling like my heart was going to beat out of my chest. It’s the kind of energy that helps you push for that extra rep or an extra mile, not the kind that makes you feel frantic.


Ideas on HOW to Use Naked Sparking Energy: Beyond Just for Drinking Straight

While it’s delicious straight from the can, I’m always looking for ways to maximize the products I use. Here are a couple of ideas you can try:

  • The “Legacy Life” Pre-Workout Mocktail: Mix a can of Naked Sparkling Energy (Lemonade) with a scoop of a clean, unflavored creatine or a BCAAs powder. It gives you the perfect combination of energy and muscle support for your workout.
  • The Afternoon Reset: Pour a can over a cup of ice with a sprig of fresh mint and a slice of lemon. It feels like a fancy, refreshing drink but with all the functional benefits. It’s a great way to break up the monotony of the afternoon and re-energize your mind.

Ideas on WHEN to Use Naked Sparkling Energy: Finding Your Moment

  • Pre-Workout: About 30 minutes before you hit the gym or go for a run.
  • The Mid-Afternoon Slump: When you feel your energy start to dip around 2 or 3 PM.
  • Mental Marathon: During long work sessions, studying, or any activity that requires sustained focus.
  • Road Trips: When you need to stay alert and focused on a long drive without stopping for a sugary coffee.

Where to Buy Naked Sparkling Energy

You can find this product on the official Naked Nutrition website. I always recommend going directly to the source to ensure you’re getting the genuine product and to check out any special offers they might have. You can also find their products on major online retailers like Amazon, as well as in select health food stores.

Here’s the direct link to Naked Sparkling Energy on Amazon


Conclusion: My Final Verdict

In a world full of over-the-top claims and questionable ingredients, Naked Sparkling Energy is a breath of fresh air. It’s a no-nonsense, clean energy drink that does exactly what it says it will. It gives you a clean, sustained lift without the crash, jitters, or bloating. It fits perfectly into a healthy, active lifestyle and supports the kind of living we’re all striving for.

This is a product I can personally verify works, and it’s something I’m proud to recommend to all of you. It’s not about being perfect; it’s about making better choices, one day at a time. And choosing a clean energy drink that fuels your body and mind in a positive way is a step in the right direction.

Until next time, live your best life NOW.

-Mike