Tag Archives: recipe

Santa Maria Style Tri-Tip Recipe Two Ways – Weber Kettle vs Traeger

Ah, Santa Maria! Just the name conjures images of sun-drenched vineyards and the smoky aroma of perfectly grilled tri-tip. This regional barbecue tradition from California’s Central Coast is all about simple, high-quality ingredients and letting the flavor of the beef shine through.

Today, we’re diving headfirst into the deliciousness of Santa Maria Style Tri-Tip. I’ll not only give you the classic recipe for the rub and the accompanying salsa but also provide two methods for cooking this fantastic cut: the traditional Santa Maria vibe using a Weber kettle with a Santa Maria attachment, and the ever-convenient Traeger pellet grill. So, whether you’re looking for that direct-heat char or the ease of pellet smoking, we’ve got you covered!

The Star of the Show: Santa Maria Tri-Tip

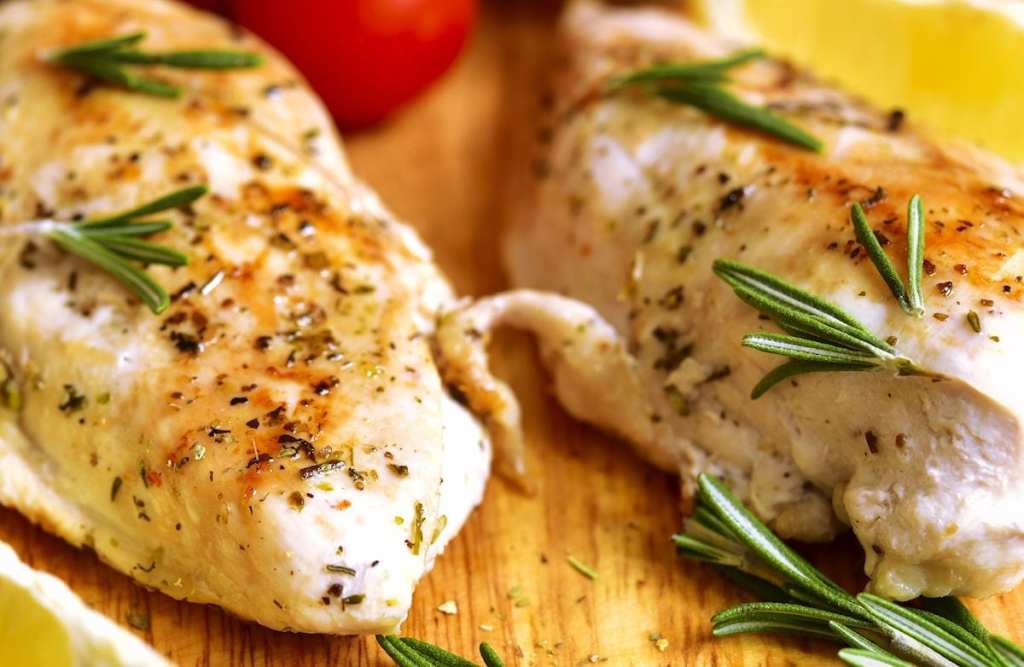
Tri-tip is a triangular cut of beef from the bottom sirloin. It’s known for its rich, beefy flavor and tender texture when cooked correctly. The Santa Maria style emphasizes this natural flavor with a simple yet impactful seasoning.


The Essential Santa Maria Rub

This rub is the heart and soul of Santa Maria barbecue. It’s minimal but delivers maximum flavor.

Ingredients:

  • 2 tablespoons coarse ground black pepper
  • 2 tablespoons kosher salt (or 1 tablespoon fine sea salt)
  • 1 tablespoon garlic powder

Instructions:

  1. Combine all ingredients in a small bowl.
  2. Generously rub the mixture all over the tri-tip, ensuring all surfaces are coated.
  3. Let the seasoned tri-tip rest at room temperature for at least 30 minutes, or up to a few hours in the refrigerator. Bringing it closer to room temperature before grilling helps it cook more evenly.

The Classic Accompaniment: Pico de Gallo (Santa Maria Style Salsa)

While not strictly part of the grilling process, a fresh and vibrant salsa is a must-have with Santa Maria tri-tip. This simple pico de gallo complements the richness of the beef perfectly.

Ingredients:

  • 2 ripe tomatoes, diced
  • 1/2 white onion, finely diced
  • 1-2 jalapeños, seeded and minced (optional)
  • 1/4 cup chopped fresh cilantro
  • Juice of 1 lime
  • Salt to taste

Instructions:

  1. Combine all ingredients in a bowl.
  2. Gently toss to combine.
  3. Season with salt to taste.
  4. Let it sit for at least 15 minutes to allow the flavors to meld.

Method 1: The Traditional Santa Maria Vibe on a Weber Kettle

While a dedicated Santa Maria grill would be awesome – that’s also a pretty penny, but fear not, you can still capture that classic flavor with an inexpensive Weber Kettle and a Santa Maria attachment like this one – now you can easily transform your Weber kettle into a Santa Maria-style cooker.

Best of all this method utilizes direct heat, allowing for beautiful searing and that signature smoky essence from the coals.

What you’ll need:

Instructions:

  1. Set Up the Attachment and Coals: Install the Santa Maria grill attachment onto your Weber kettle. Light your charcoal in a chimney starter and pour the hot coals onto the charcoal grate, directly beneath where the tri-tip will sit on the elevated grate of the attachment. You’ll want a medium-hot bed of coals.
  2. Position the Tri-Tip: Place the seasoned tri-tip on the elevated grate of the Santa Maria attachment. This positions the meat closer to the heat source than the standard Weber grate, which is key for Santa Maria-style cooking.
  3. Sear: Since the meat is closer to the heat, it will sear relatively quickly. Keep a close eye on it and flip after about 3-4 minutes per side to develop a nice crust.
  4. Cook to Temperature: Continue to cook, flipping occasionally (about every 10 minutes) until the internal temperature reaches 130-135°F for medium-rare (or your desired level of doneness). The Santa Maria elevated grate allows you to control the heat by raising or lowering the cooking surface, or by adjusting the amount of charcoal. This will likely take another 20-40 minutes depending on the thickness of your tri-tip and the heat of your coals.
  5. Rest: Once cooked, remove the tri-tip from the grill and let it rest on a cutting board for 10-15 minutes.
  6. Slice and Serve: Slice the tri-tip against the grain and serve with the fresh pico de gallo, grilled garlic bread, and pinquito beans.

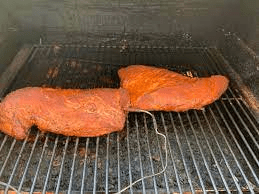
Method 2: Traeger Pellet Grill

Using a Traeger offers consistent temperature and a wonderful smoky flavor, making it a fantastic alternative.

What you’ll need:

Instructions:

  1. Preheat the Traeger: Preheat your Traeger to 225°F (107°C).
  2. Smoke the Tri-Tip: Place the seasoned tri-tip directly on the grill grates. Smoke for about 45-60 minutes, or until the internal temperature reaches around 115-120°F. This allows it to absorb that delicious smoky flavor.
  3. Increase the Heat: Crank up the Traeger to 450-500°F (232-260°C).
  4. Sear: Sear both sides of the tri-tip for about 3-4 minutes per side to create a nice crust.
  5. Cook to Temperature: Continue cooking until the internal temperature reaches 130-135°F for medium-rare (or your desired level of doneness).
  6. Rest: Remove the tri-tip from the Traeger and let it rest on a cutting board for 10-15 minutes.
  7. Slice and Serve: Slice against the grain and serve with your homemade pico de gallo and other favorite sides.

Which Method is Right for You?

Both methods yield fantastic results, just with slightly different nuances. The Weber with the Santa Maria attachment provides that direct heat sear and smoky charcoal flavor reminiscent of the traditional Santa Maria experience. The Traeger offers ease of use and consistent smoky flavor. Ultimately, the best method is the one that fits your equipment and preferences!

So, fire up your grill (whichever kind you choose!), grab a tri-tip, and experience the deliciousness of Santa Maria barbecue.

What are your favorite ways to cook tri-tip? Let us know in the comments below!

3 Best Prime Rib Recipes for your Traeger Grill

Looking for some great prime rib recipes to cook on your Traeger Grill? Check out these delicious ideas to cook your next Rib Roasts on a Traeger Grill: Smoke Prime Rib Recipe, Roasted Herb Crusted Prime Rib Recipe, and Roasted Prime Rib with Garlic and Coffee Rub. Best of all, these 3 recipes are from the Official Traeger Store on Amazon so you know they’re tried and true tips that will work great!

[lwptoc]

Best Prime Rib Recipes on Traeger Grill

Recipe: Smoked Prime Rib with Traeger Prime Rib Rub

Tip: Click the pics if you want to enlarge the recipe

Best Prime Rib Recipes on Traeger Grill
Traeger Smoked Prime Rib Recipe

What you’ll need: (click links to see the item on Amazon)

Stock up on what you need:

amzn_assoc_tracking_id = “grill-site-20”; amzn_assoc_ad_mode = “manual”; amzn_assoc_ad_type = “smart”; amzn_assoc_marketplace = “amazon”; amzn_assoc_region = “US”; amzn_assoc_design = “enhanced_links”; amzn_assoc_asins = “B071LCB15G”; amzn_assoc_placement = “adunit”; amzn_assoc_linkid = “bc550f074a1c11678f83815989b266c6”; //z-na.amazon-adsystem.com/widgets/onejs?MarketPlace=US amzn_assoc_tracking_id = “grill-site-20”; amzn_assoc_ad_mode = “manual”; amzn_assoc_ad_type = “smart”; amzn_assoc_marketplace = “amazon”; amzn_assoc_region = “US”; amzn_assoc_design = “enhanced_links”; amzn_assoc_asins = “B0011BPMUK”; amzn_assoc_placement = “adunit”; amzn_assoc_linkid = “aaff3a372f77a1728d118c4c0626257d”; //z-na.amazon-adsystem.com/widgets/onejs?MarketPlace=US

You can also shop for Prime Rib on Amazon now too!


Recipe: Roasted Herb Crusted Prime Rib

Best Prime Rib Recipes on Traeger Grill
Roasted Herb Crusted Prime Rib

What you need: (click links to shop the item on Amazon)

Save time: shop for Prime Rib on Amazon and have it sent directly to your door.


Recipe: Roasted Prime Rib with Garlic and Traeger Coffee Rub

Best Prime Rib Recipe on Traeger Grill

What you need: (click links to shop the item on Amazon)

Stock up on what you need:

amzn_assoc_tracking_id = “thathelpfulda-20”; amzn_assoc_ad_mode = “manual”; amzn_assoc_ad_type = “smart”; amzn_assoc_marketplace = “amazon”; amzn_assoc_region = “US”; amzn_assoc_design = “enhanced_links”; amzn_assoc_asins = “B071HRP789”; amzn_assoc_placement = “adunit”; amzn_assoc_linkid = “cc51674cf05a81bb2dd096201e935a65”; //z-na.amazon-adsystem.com/widgets/onejs?MarketPlace=US amzn_assoc_tracking_id = “grill-site-20”; amzn_assoc_ad_mode = “manual”; amzn_assoc_ad_type = “smart”; amzn_assoc_marketplace = “amazon”; amzn_assoc_region = “US”; amzn_assoc_design = “enhanced_links”; amzn_assoc_asins = “B0011BPMUK”; amzn_assoc_placement = “adunit”; amzn_assoc_linkid = “aaff3a372f77a1728d118c4c0626257d”; //z-na.amazon-adsystem.com/widgets/onejs?MarketPlace=US

Save time: shop for Prime Rib on Amazon and have it sent directly to your door.


Looking for Your First/Next Traeger?

If you need advice on buying your first Traeger Grill or upgrading to a new Traeger Grill model, we can help.

Click the pic to read the article “What’s the Best Traeger Grill?”


What to Read Next

Are these the best Prime Rib recipes for your Traeger Grill? Give them a try, let us know what you think.

If you have a different idea you want us to feature on this site, contact us today.

If you’re looking for more ‘official’ Traeger Grill Recipes, find them here.

Meanwhile, check out these other articles from The Traegerhood.

    Buffalo Chicken Wing Recipe – How to Make Crispy, Juicy Hot Wings Full of Flavor!

    This weekend I made my dad’s world-famous Buffalo Chicken Wing Recipe again – and man was it good! If you like Buffalo Wings that are crispy, juicy, and full of flavor, you’ll want to try this Buffalo Wing recipe for yourself – it’s got a secret ingredient that adds so much flavor you’ll wonder why you didn’t think of using it before.

    I’m cooked my Buffalo wings in an Ooni Pizza Oven for a wood-fired effect but u can make this buffalo chicken wing recipe on any grill or oven. Best of all this Buffalo Chicken Wing Recipe is EASY to make, easy to customize to your tastes, and so much fun to eat!

    Give it a try & let me know what tips YOU have to share.

    Buffalo Chicken Wing Recipe – The Video

    SKIP AHEAD in the video with these timestamps:

    • 00:38 Kamado & Ooni Pizza Oven views
    • 01:10 Fuel Source (lump charcoal + cooking wood)
    • 01:20 Wings in Marinade
    • 01:50 Getting the Ooni Oven up to temp (watch the temp gauge climb!) 02:20 FIRE – it’s a beautiful thing!
    • 02:35 Wings are ready to cook WITHOUT sauce
    • 03:30 Buffalo Sauce Recipe Ingredients. Discussion on Hot Sauce to Butter Ratio
    • 06:40 Buffalo Sauce Mixed (see below for recipe itself)
    • 07:10 Wings at 10 Minutes
    • 07:30 Wings at 20 Minutes
    • 07:38 Wings IN SAUCE
    • 07:55 Sauced Wings ready to CRISP
    • 08:09: Wings back in oven to CRISP
    • 08:37 Wings DONE
    • 09:00 Let’s Eat!
    • 10:00 Bonus: The Drippins!
    • Share this vid: https://youtu.be/N1mR_M31MB8

    Buffalo Chicken Wing Recipe – Step by Step

    I have the full text version of the Buffalo Chicken Wing Recipe – including a step-by-step – on my grilling website called LordoftheGrills.com. Here’s a link you can use to go to that page…

    Buffalo Chicken Wing Recipe
    Click this pic for the text version of the recipe.

    About the Products used:

    Because of the Coronavirus pandemic, chicken wings are in short supply so I could only find I Costco Party wings – normally I’d cook the whole wing with all 3 sections (drumstick, wing, and tips).

    Here are the other products I cooked with if you are interested…


    Did You Know?

    If you enjoy reading That Helpful Dad’s articles, you may also like…


    What to Read Next…

    Best Buffalo Wing Recipe | How to make CRISPY Hot Wings

    Why is this the BEST Buffalo Wing Recipe? Because I’ll show you how to make CRISPY hot wings that are FULL of flavor – using my Dad’s secret ingredient! I’ll share my Buffalo Sauce Recipe & also discuss the RATIO of Hot Sauce to Butter (it’s a ‘hot’ topic!).

    [lwptoc]

    Buffalo wing recipe

    Cook this Buffalo Wing Recipe on Any Grill or Oven

    Today I’m cooking Buffalo wings in an Ooni Pizza Oven for a wood-fired effect but u can make this buffalo chicken wing recipe on any grill or oven. Best of all this Buffalo Wing Recipe is EASY to make, easy to customize to your tastes, and so much fun to eat!

    Give it a try & let me know what tips YOU have to share.

    Best Buffalo Wing Recipe – The Video

    Buffalo Wing Recipe Video

    SKIP AHEAD in the video with these timestamps:

    • 00:38 Kamado & Ooni Pizza Oven views
    • 01:10 Fuel Source (lump charcoal + cooking wood)
    • 01:20 Wings in Marinade
    • 01:50 Getting the Ooni Oven up to temp (watch the temp gauge climb!) 02:20 FIRE – it’s a beautiful thing!
    • 02:35 Wings are ready to cook WITHOUT sauce
    • 03:30 Buffalo Sauce Recipe Ingredients. Discussion on Hot Sauce to Butter Ratio
    • 06:40 Buffalo Sauce Mixed (see below for recipe itself)
    • 07:10 Wings at 10 Minutes
    • 07:30 Wings at 20 Minutes
    • 07:38 Wings IN SAUCE
    • 07:55 Sauced Wings ready to CRISP
    • 08:09: Wings back in oven to CRISP
    • 08:37 Wings DONE
    • 09:00 Let’s Eat!
    • 10:00 Bonus: The Drippins!
    • Share this vid: https://youtu.be/N1mR_M31MB8

    Best Buffalo Wing Sauce Recipe

    Before we get into the recipe for the Buffalo Wing Sauce, let me give you a few notes:

    • This recipe is so freaking easy I didn’t show the actual melting of butter or mixing of ingredients in the video because I figured you are smart enough to know how to do that.
    • IMPORTANT:we do NOT cook the wings with the sauce on to start. Instead we cook the wings WITHOUT sauce first.
    • U can make the Buffalo Sauce Recipe after you get the wings started cooking. See Step 4 in the Buffalo Wing Sauce Recipe below for more on how & when to sauce the wings.

    Buffalo Wing Sauce Recipe Step-by-Step

    Step 1: Marinate the Wings (OPTIONAL)

    Wing Marinade
    Wings in Marinade
    1. Put defrosted wings into zip lock bag with a combo of rub of your choice (I used Paul Prudhomme’s Red Magic which is great on chicken too) + 1 TB of EVOO + 1 TB of Kosher Salt.
    2. Mix the wings around in the bag with the marinade ingredients so wings are well coated
    3. Marinate the wings for up to 24 hours.
    4. I did 12 hours for the vid, but you can do it in as little as 1 hour if you don’t have time.
    5. Although u can skip this step, if you do it, you’ll get an extra ‘depth’ of flavor beneath the buffalo sauce so do the marinade if you can.

    Step 2: Gather Ingredients for Buffalo Sauce

    Best Buffalo Wing Recipe
    Buffalo Wing Sauce Ingredients
    • Franks Red Hot Sauce (ORIGINAL not the “Buffalo” version)
    • Butter
    • Good Season’s Italian Dressing Dry Mix (1 Packet) – the SECRET Ingredient!
    • My vid only used 3 basic ingredients in the sauce itself (salt was added later), but you can experiment next time with a little Lemon Juice, Fresh Basil, Worcester Sauce, Smoke Paprika, other Rubs, or whatever you like

    Step 3: Decide YOUR Ratio of Hot Sauce to Butter

    The ratio of hot sauce to butter that produces the best Buffalo Wing Recipe it a ‘HOT’ Topic and one that’s full of controversy. But the answer is really quite simple – the correct ratio of Franks Red Hot Sauce to Butter depends on YOUR preference.

    What’s the “Official” ratio of Frank’s Red Hot Sauce to Butter?

    On the Frank’s Red Hot Sauce website you’ll find this answer

    The Official ratio is 3 parts butter to 2 parts hot sauce

    But that’s NOT my preference.

    Instead I like to use a ratio of hot sauce to butter that’s MY preferred ratio is the opposite…

    3 parts hot sauce to 2 parts butter.

    In my opinion, this will give you a nice MEDIUM heat buffalo wing that looks like this when sauced…(BUT do NOT sauce the wings yet – we’ll do that later in the recipe AFTER the wings cook). This pic is must a little preview 🙂

    Best Buffalo Wing Recipe
    Wings in Sauce

    But that’s my preference. YOURS may be different so change the hot sauce to butter ratio depending on what you like.

    What’s the Math on 3: 2 hot sauce to butter like in my vid?

    • For 2 tablespoons of butter, use 3 tablespoons of Hot Sauce.
    • In this vid I used 1/4 cup melted butter (4 TB) to 1/3 cup hot sauce (6 TB).

    HOT OFF THE PRESSES – My “Buffalo Insider” says here are the TRUE ratios from hoods of his town…

    • MILD Wings: 3 parts butter to 2 parts hot sauce
    • MEDIUM Wings: 4 parts hot sauce to 2 parts butter
    • HOT Wings: Only Frank’s, no butter (and find the Frank’s Xtra Hot version if you can)
    • NUCLEAR Wings: 1 Cup of Frank’s Xtra Hot to 2 TB of Habanero Mash (but be careful – it’ll put hair on your chest for sure!)

    How much sauce do you need?

    In my vid, I had enough sauce for 12 wings + extra to dip in. If you are making more wings, make more sauce.

    Step 4: Mix Buffalo Sauce Ingredients:

    1. Melt Butter
    2. Add ingredients to a medium size mixing bowl and mix
    3. Do NOT put the wings in the mix until AFTER you cook them to temp (165F)

    It will look something like this…

    Step 5: AFTER wings are cooked at or near temp (165 F), THEN…

    At this point YOU have a decision to make. Do you want your Buffalo wings WET or DRY? I.E. do you want the Buffalo sauce dripping on the wings or do you like the Buffalo Sauce cooked onto the wings?

    The answer to that question will determine if you are done cooking or not. If you like WET Buffalo Wings then sauce them & either serve them immediately. If you like DRY Buffalo Wings then you’ll put them back in the oven. In BOTH cases you’ll put cooked wings in sauce for this step…

    Buffalo Wing Sauce Recipe

    It’s YOUR CHOICE:

    • If you like WET wings, sauce wings AFTER they are cooked & serve immediately.
    • If you like CRISPY wings, sauce wings AFTER initial cook to temp & then put them back in oven for 5 mins with sauce ON so wings will crisp up with sauce on them.

    If you do like CRISPY Buffalo Wings like me, then here’s what they’ll look like if you cook the sauce onto them.

    CRISPY Buffalo Wings
    These Buffalo Wings are Crispy and Amazing!

    Step 6: EAT & ENJOY

    Congratulations, you’ve just made the best Buffalo Wing Recipe on the planet. Now grab a beer (if you don’t already have one) and enjoy eating your awesome Buffalo Wings.

    I’m guessing when you’re done, it will look something like this…

    What happened to the wings?

    These wings are AWESOME. They are the Best Buffalo Wings you will ever have because they are easy to make and have the perfect combo of FLAVOR + HEAT AND the wings are CRISPY.

    It’s time for YOU to try this recipe. Give it a shot and let me know what you like or what you might do different.


    About the Products used:

    Because of the Coronavirus pandemic, chicken wings are in short supply so I could only find I Costco Party wings – normally I’d cook the whole wing with all 3 sections (drumstick, wing, and tips).

    Here are the other products I cooked with if you are interested…


    What to Read Next

    best outdoor pizza ovens
    Big Green Egg Best Accessories

    Slow Cooker Chicken Breast Recipe

    If you’re a fan of home cooked meals that are easy to make and taste delicious, you’ll enjoy today’s tip – a recipe for healthy Chicken Breast in the Slow Cooker by our friend Clara Holtz of the TheFryerHouse.com.

    Slow Cooker Chicken Breast

    Editor’s Note: This article is written by Clara Holtz – a part-time guest blogger and administrator of TheFryerHouse.com. Clara and the team at TheFryerHouse.com work to provide honest and accurate articles and reviews on all things relating to Airfryers. ThatHelpfulDad.com is happy to be able to share Clara’s recipe with you today. I enjoyed reading her recipe and felt like I was transported into her kitchen as she was making this dish. Keep up the good work, Clara.

    Clara Holtz

    Introduction

    Knock! Knock!!

    Wait, don’t open that door! You could get a pie your face! 🙂 Instead let’s get straight to the kitchen so that we can get something amazing done today.

    Let’s use our slow cooker and make an easy and delicious chicken breast recipe.

    I love to cook my chicken breast in broth in a slow cooker. Why? Because no significant culinary skill is required and and using a slow cooker makes sure the meat is evenly cooked. As a matter of fact, I like cooking my chicken breasts in broth in my crockpot before any other thing. I often use my slow cooker to cook my butchered chicken breast meat for 4hrs-6hrs, depending on the time frame I prefer for that day.

    The result of making chicken in the slow cooker? It’s awesome and my children love to eat it — that makes me happy too because I know this recipe is healthy for them.

    The Setting

    Gone are the days that my family and I slave over our stove to make dinner. Now, I prefer my slow cooker because it’s safer and I can multitask (that means more time with family and friends). Just set the preset on the crockpot and let it work it’s magic. What could be easier?

    Letting our crockpots work their magic

    You do have a crockpot, right? I’m sure you do but just in case you need a new one or you’re looking for some top-notch features, check out these picks from Amazon…

    amzn_assoc_placement = “adunit0”; amzn_assoc_tracking_id = “thathelpfulda-20”; amzn_assoc_ad_mode = “manual”; amzn_assoc_ad_type = “smart”; amzn_assoc_marketplace = “amazon”; amzn_assoc_region = “US”; amzn_assoc_linkid = “7dac6f657d443ad6e48b25aac2bc32fe”; amzn_assoc_asins = “B07DKXNW2M,B0196B3P1E,B07GH89F6H,B00EZI26GO”; amzn_assoc_design = “text_links”; amzn_assoc_rows = “4”; amzn_assoc_title = “My Amazon Picks”; //z-na.amazon-adsystem.com/widgets/onejs?MarketPlace=US

    What’s great about slow cookers like this is that they’re well built, have loads of presets to make cooking easier, and can be operated intuitively. Just be sure to read the manual so you understand how to use your crockpot safely. Once you know how to operate your slow cooker, you can preset the functions, and take a break with your family and friends.

    But enough about crockpots – let’s get to the recipe!

    If you make this dish, I know you’ll enjoy it. You won’t believe how easy this recipe.

    Are you ready? Oh yeah, let’s do this!

    Preparation

    First of all, we need to make sure the kitchen is sanitized including the cooking utensils (let’s keep our family safe, right?).

    Next, let’s take a look at the ingredients….

    Slow Cooker Chicken Breast Recipe Ingredients

    • 3 lbs of chicken breast meat.
    • 2-4 tablespoon of butter.
    • ¼ quart chicken broth
    • 2-3 pinches of salt.
    • ½ teaspoon onion powder
    • ½ teaspoon of garlic
    • ¼ grounded pepper.
    • Pinch of paprika
    • sprig of rosemary to garnish
    • Slow cooker.

    Tip: The amounts per seasoning are a guide – if you like more bold flavors then double the amounts of onion and garlic.

    Once you have these ingredients, it’s time to take our focus to this super easy preparation process.

    How to Prepare Slow Cooker Chicken Breast Recipe

    1-Rinse the chicken

    Would you like to sear the meat before or after you cook it in the crockpot? You can do that if you prefer, but it’s not really necessary, however I do recommend that you rinse the meat first. Here’s what I do to ensure my chicken is cleaned…

    • Pour the meat in an empty bowl, take the bowl to the faucet, and while the water is running, pick up each of the chicken breasts and use your fingers to remove any stuck on blood or other bits you want to remove. Then pat dry.

    2-Preparation & Seasoning

    I properly arranged the meats in the crockpot then fill the crockpot with the seasoning ingredients. I make sure that the seasonings are mixed around and then I add the chicken broth. (As an alternative, I also sometimes steam the chicken breast with the seasoning in the slow cooker for about 30 minutes before I add the broth. Both ways are fine and I encourage you to experiment to see which you like better). Most of the time I add the seasoning, chicken, and broth all at the same time and that’s what we’re doing today.

    At this point I’ll add in the butter. I think you need at least 2 Tablespoons of butter, although I prefer to use 4 tablespoons (and sometimes even more – ssshhhh!).

    • There is just something about butter and what it does to your cooking. Do you know what I mean?
    • BTW, if you use margarine, write me a comment below. I would love to see what you have to say and don’t forget to tell me how you make your dish magical.

    With your ingredients added, it should look something like this.

    Chicken Breasts in the Crockpot

    3-Cooking in the crockpot

    The aim is that never overcook the chicken breast. So put this into consideration whenever you’re setting the time for your slow cooker.

    Avoid timing it for a long period of time unless you want the meat to be overly juicy because you’re looking to shred it for a particular dish. Personally I like to serve these chicken breasts whole so my family and I don’t cook it too long.

    Usually I set the time to 4 hours.

    Important tip: one thing I don’t do is continually opening the cover of the slow cooker. This will let all the steam escape and ruin your cooks. It’s ok to check once or twice but I’d rather wait until the time elapsed and let the slow cooker work its magic.

    Once the time is reached, I then check the meat by stirring the chicken breasts so as to ensure that the flavors are evenly distributed.

    4- The Final Evaluation – Does the Family like it?

    As the cook, before you serve this dish, you’ll want to check that the chicken breasts are up to your preferred temperature (165F) and then taste the meat (and that lovely broth) to decide if you’ve hit the mark. You may need to add some salt to taste, drizzle on some EVOO, or perhaps add a sprig of rosemary to garnish like in my pic above.

    Once you open the lid of the crockpot I’m sure your family will notice the aroma – it’s sure to steal the show!

    After you’ve cooked your chicken breast to your satisfaction, scoop the meat out (with that broth!) and serve it with your favorite sides. (Might I suggest some green beans along with some air fried potato wedges?)

    Conclusion

    Wasn’t this recipe easy? Definitely!

    Best of all, if you don’t finish all the chicken for dinner, you can store in the refrigerator – that means another meal is already done. Bonus!

    Another tip: if you are storing the chicken for later, I’d recommend you separate out the broth – you can use it later for all kinds of soups and to flavor other side dishes.

    Well, what are you waiting for? Go make the recipe for easy slow cooker chicken breast, then come back and and let me know what you think. I’ll be looking forward to seeing your comments.

    ~Clara


    What’s That? You Need a Slow Cooker?

    If you’re in the market for a new crockpot, check out these highly-rated picks on Amazon…

    amzn_assoc_placement = “adunit0”; amzn_assoc_search_bar = “true”; amzn_assoc_tracking_id = “thathelpfulda-20”; amzn_assoc_ad_mode = “manual”; amzn_assoc_ad_type = “smart”; amzn_assoc_marketplace = “amazon”; amzn_assoc_region = “US”; amzn_assoc_title = “My Amazon Picks”; amzn_assoc_linkid = “7dac6f657d443ad6e48b25aac2bc32fe”; amzn_assoc_asins = “B07DKXNW2M,B07GH89F6H,B0196B3P1E,B00EZI26GO”; //z-na.amazon-adsystem.com/widgets/onejs?MarketPlace=US

    What to Read Next?

    In the mood for something new? Don’t miss our story about the cookbook Salt, Fat, Acid, Heat. Or try these articles on for size…

    Doc Ford’s Yucatan Shrimp
    Stranger Things Season 3 Questions
    10 Questions about Stranger Things Season 3