When the company Naked Nutrition recently contacted me to review their supplements, I almost passed; I get tons of these requests and my time is limited so I am very selective on what I agree to review. That said, I took a moment to review their site and after seeing their focus on the use of pure ingredients vs marketing hype, I made an exception and had them send me their Naked Greens supplement. I chose Naked Greens Superfood Powder specifically because I was impressed by the ingredients they chose for this blend.
I’m now adding Naked Greens to my list of favorite superfood supplements!
Why do I like Naked Greens Superfood Powder so much?
I don’t know about you, but when I am considering a superfood supplement built on GREENS, I want a product that has the following qualities:
Organic
Non-GMO
No Added Sugars
A specific list of only ‘whole food’ ingredients that is clearly described
No additives
Not a lot a lot of products meet that criteria, and for those that do, they usually carry a premium price (i.e. the uber popular Athletic Greens).
Naked Greens is an exception – it meets all my desired superfood qualities AND sells for a great price (about 1/3 the price of Athletic Greens!). That’s a GREAT DEAL!
That’s a total of TEN ingredients – all of which are Non-GMO, Soy Free, Gluten Free, and Dairy Free. It’s Vegan and has no Artificial Sweeteners, Flavors, or Colors.
There are a LOT of ‘green’ superfood supplements, but I haven’t found many (read: any) with this mix of ingredients – specifically the addition of not only pre & probiotics but also the Ginseng and Ashwagandha (two ‘brain’ foods that you usually have to source separately).
How do I feel when I use Naked Greens?
I add a scoop of Naked Greens to my morning smoothies – the flavor is so mild I can’t even tell it’s in there, but the impact on my energy is noticable – I get a bit of pep in the step and a clear focus. I also feel good about the day and that’s a winning combination in my book!
Check out Naked Nutrition for Yourself
If you read my blog, you’ve probably read my Trust Guarantee so you know I don’t endorse a company or become an affiliate unless I use their products myself. When I recommend Naked Greens to you it’s because I have seen the results for myself – therefore I feel good about telling you to check it out too.
With the new year in full swing, you’ll want to improve your website traffic. But, how do you do it? What are some strategies to drive traffic to your website in droves? Read on to find out. Here, we’ll give you some invaluable strategies you should be using to increase traffic to your website and get leads and conversions right away.
Why Traffic?
Traffic is very important for websites, and you should always consider working towards building traffic.
With traffic, you get the following from it:
• More interest in the site
• A higher ranking on Google and other search engines
• Conversions, which will give you money
• Leads, which can lead to conversions
Remember, if you want people to show up, the best way to do it is to drive traffic. Granted, not every single one will convert, but if you want people to find it, you get that word out, and do it fast!
Performing On-Page SEO-friendly
If you’re not performing SEO tactics to get onto website pages and get more visitors, you’re going to not get traffic. This is actually one of the simplest ways to increase rank and get visitors to flock to you. Some of the different actions you can use include the following:
• Creating content that is of high quality
• Crete content the audience is looking for
• Using concise meta descriptions so that people can find the links and go to your site
This alone will drive traffic to you. If you really want to get people to find your site, sometimes even just performing on-page SEO is the best way to do it, since ultimately it can help drive future traffic to the site, and get interest going.
“Upside down” Guest Posting
This is a different type of guest posting. Usually, when you look at a guest post, you see the author name, and maybe some info on them. But, there is actually a different means to do this, and it does drive website traffic and increase it. it’s something that you should consider because it does build links, and get people interested.
The steps to take this include the following:
• Write the Guest post as you would
• Add “helpful resource sections throughout the post that will give resources to the topic just covered
• include your specific content in helpful resources
• Add the bio and author name at the top versus the bottom
Creating links to your content throughout the posts is actually an awesome way to drive traffic. You can see an increase of about 80% on the traffic if you’re doing this right, and it does give you a lot more traffic to a site than what you’d expect.
With guest posting, try to utilize this strategy, since it allows for more engagement, more people looking at your guest posts, and generally, more success.
Social Media Success
Social media is a great way to get content out there and to promote the content that you’ve got on your site. If you have a strong social media, you should start to utilize this. Social media is a big point of SEO, simply because you can generally put together an awesome campaign, and you can post it on different channels. That way, even people who may have not heard of your blog or content before can find you, which is what’s pretty awesome.
To really get a social media campaign going, you need to do the following:
• Promote the content on your social media site
• Create links that the followers can use to see and share your content
• Encourage content sharing at the bottom of the content
• Use hashtags to promote pages
The final one is really what you should be working towards. If you use hashtags, you’ll get more traffic. Why is that? Well, with a hashtag, people will search for it, so fi they search for that keyword, they’ll find your content. it’s that simple, and that’s the main reason why people encourage hashtag use so much, simply because it gets people interested in the topic, and can help new users find out more information.
Overhauling Guest Posts
This is another very simple strategy, but your traffic will increase by manifold super fast.
Old guest posts are good, but if you really want to get traffic to them, you should consider overhauling them. they’re already out there, and usually, if there is something wrong with them, the traffic could decrease. The best part about this is if you already have this type of content out there, you can literally change this in about an hour.
How you do it is simple:
• Find your old guest posts
• Look through to see what needs t be changed
• From there, add either more content, screenshots, or the like
• Change any strategies that are old and shouldn’t be used anymore
• If there are current strategies that are correct, work to improve these
• Choose to update them
And from there, you’ll see the difference. If you didn’t have pictures of screenshots already, you’ll want to implement these, because it’s one of the best ways to really get people interested in this site, and it will help especially if you’re looking to change the guest posts that you currently have, and don’t want to pay any extra to publish new content
Landing Pages
If you don’t have landing pages already, put those in. they’re really the best source of traffic to websites, since many times, people don’t want to have to sift through a ton of content in order to get what they need. Landing pages that have discount codes, a free guide, or even free trials will get interest, and people will choose to click on these. Plus, if you do have free offers, and people redeem these, they’re more likely to convert and from there, move even more forward. it’s very important to consider this since landing pages are really the best way to drive traffic to websites.
“Click to Tweet” links
If you want to increase social media, consider adding a click to tweet link. This is because people use Twitter a lot to share content. It’s where a lot of opinions and voices are, and people love to share links and content. The best thing to do is to find content that you currently have, create a click to tweet link, which you can easily google and create, and from there, you hyperlink it at the bottom of your content, or wherever you want to really get traffic going.
Click to tweet is something that’s super easy, and you should definitely consider trying to implement this, especially if you haven’t already. Even just putting a twitter or Facebook sharing function into your content can change the way it is shared, and the overall result of this as well.
Transform the content!
You want a simple means to increase traffic/ well, why not transform it. Essentially, the way to do this is simple:
• Choose a post
• Convert it into another format, such as an eBook, infographic, podcast, or even videos
• Share it wherever
You can do this with so much content, and if you really want to get your name out there, and get hundreds of website visitors, a ton of views, and conversions galore, it is the way to go. The best thing about this is that if you want to, you can do this with older posts, and they will keep exploding as well with just this simple change.
Join Podcasts
Finally, let’s talk about podcasts. If you’re not using this already, you should consider doing so. About 24% of Americans listen to podcasts, so that’s literally a quarter of the people.
Now, I wouldn’t suggest starting your own, for a few reasons.
• It takes time and money you may not have
• It takes a while for the podcast to get popular
• It may not reach new people
Instead, join others. Joining podcasts is really the easiest way to drive traffic forward, since you can put together a bit of information, appear on there, and most people are decent enough to backlink to your site, so if they want more information on you, or even just more content, this is how.
Driving traffic forward is a key part of Digital Marketing, and there is a reason why people are using driving traffic as the new means forward. These ways allow you to put together new content and get more people interested, which in turn can get more people to your site. Traffic is power, and with these simple techniques, you can explode the traffic by so much, it’s not even funny, and it’s amazing just what it can do not only for yourself, but for your website, and for all of the sweet conversions you will make as a result of these efforts.
About the Author
ThatHelpfulDad.com is pleased to present the work of Adriana Hamilton in this guest post. Here is a bit more about her…
Adriana Hamilton is a content marketer at a Wellfed company. A writer by day and a reader by night, she loves working in the ever-changing world of the food Industry and she really enjoys simplifying complicated nutrition messages so they are easy to understand and inspiring people to live healthfully one decision at a time.
After a long wait, Minecraft Dungeons was released on May 26, 2020. In this article we’ll give you 20 Minecraft Dungeons tips beginners can use immediately to level up faster and do so with the best weapons so you can defeat the bosses easier and have a blast playing this awesome new Minecraft game!
[lwptoc]
Still need to buy a copy of Minecraft Dungeons?
Who Needs These Minecraft Dungeons Tips?
Although you may be a pro at regular Minecraft, right now we are all noobs when it comes to Minecraft Dungeons and NOBODY knows everything yet.
That said, for those of us who’ve already logged many hours on Minecraft Dungeons there are definitely some key strategies beginners can use to make the learning curve on Minecraft Dungeons shorter. Sure, you can slog your way blindly thru the game and learn as you go, but if you do that you may risk carelessly tossing out a ‘unique’ piece of loot you may never see again and you’ll take longer to figure things out. But it doesn’t have to be that way.
Use the following Minecraft Dungeons tips, and they will help you play the game better from the get-go because you’ll KNOW what loot to keep and what to get rid of. The end result is that you’ll level up faster, find and keep the best weapons, defeat the bosses easier, and ultimately ‘win’ the game (at least as it exists now).
Minecraft Dungeons – 20 Tips for Beginners
Please note, that this article is NOT a complete ‘Guide’ to Minecraft Dungeons – plenty of websites have already published some comprehensive guides to the game and we’ve linked to some our favorites, below. Instead this article IS a list of quick actionable tips that you can immediately use to play the game better from the start – even if you are a new player. Use our tips now and then supplement your knowledge by reading through the more detailed strategy guides as you go.
Let’s get started with a BIG one…
Tip #1 – What are the Different Classes of Loot in Minecraft Dungeons?
All items (weapons, armor, & artifacts) in Minecraft Dungeons come in three classes: Common, Rare, and Unique.
The classes of the item is important because it not only determines the overall quality of that piece of loot but it also gives you an idea of its ‘rarity’ (i.e. how often you might find it).
What’s the Difference between Common, Rare, and Unique Items?
Common and Rare items can be found all the time and when you start running out of space in your inventory there is no real risk in getting rid of these types of items because you’ll likely to come across them a lot and and you’ll get more powerful versions of them later as you level up. (See Tip #10 below for more on Salvaging Items).
Unique items are different – think twice before tossing out a Unique item because it could be a looooong time before you see it again.
I love this Crossbow!
Not only are Unique items ultra rare, but they also include extra abilities (a de facto ‘free’ enchantment) vs their more common relatives.
Additionally, Unique Items are the Coolest Items in the Game – Venom Glaives are deadly melee weapons, Spider Armor looks amazing, and Fangs of Frost are deadly fast. My Lightning Harp Crossbow (like u see in the pic above) in combo with the Torment Quiver Artifact is my go-to weapon of choice in the game – it fires 3 arrows that can go through walls and knock back mobs giving you room to breath when mobs try to ambush you…AND it plays music every time I shoot it! What could be better?
Besides collecting loot (armor, weapons, and artifacts), you get rewarded in Minecraft Dungeons with Emeralds.
How to you use Emeralds in Minecraft Dungeons?
Emeralds are what you use to buy things with in the game. Not only can you get emeralds from chests within the levels of the game, but you can also find them in chests hidden around your camp so be sure to look around the camp map between your battles.
You’ll spend your emeralds by trading with various villagers in camp – namely a Blacksmith and a Wandering Trader.
The blacksmith offers you random weapons and armor, while the wandering trader gives you random artifacts. All the items they provide are at a ‘power’ level similar to your current level (thus the importance of trying to level up faster).
There is really no reason to save your emeralds – you can’t buy specific ‘high priced’ items because trading is random so it’s best to just spend your emeralds early and often without fear – by doing so you’ll be able to acquire more weapons, armor, and artifacts that you can immediately use in battle during the game. And since you’ll get more emeralds when battling, you’ll always get more money to spend.
Tip #3 – Learn WHERE to Find SPECIFIC Items
Perhaps the most fun thing about Minecraft Dungeons is the quest to find cool loot. You want an Evocation Robe because you like being a Wizard or perhaps a Totem of Regeneration to protect you? You MIGHT be able to get them from the Wandering Trader or Blacksmith back in camp, but those trades are so random it’s a crap shoot. But you can DEFINITELY find them if you play the right level.
If you want specific gear, play the level where they are located at and find them easier.
How to you know what gear is on each level?
You’ll know what gear is in each level when you look at the level summary before playing it. Here is an example – specifically I want you to notice the GEAR DROPS and ARTIFACTS section on the left (above the Start Mission button) – that what tells you what types of loot are most likely to be found on this level.
As in regular Minecraft, Enchantments help you add power & abilities to your weapons and armor. In Minecraft Dungeons, enchantments are easy (no Enchantment Table is required) and you can start enchanting right away. The process is simple – for every level you get an enchantment point and you apply those enchantment points to your weapons and armor to add various abilities to them.
Don’t worry about wasting Enchantments early in the game – apply your enchantments to whatever your best gear is immediately and when you later get better gear, you can salvage that old gear AND get all your enchantments back!
Bottom line: you never lose enchantments, the amount of enchantment you have is based on your level, and you should be applying all your enchantments at all times because it makes your weapons and armor better, which in turns makes it easier to defeat the levels, which in turn makes it easier for you to level up, which in turn means you get better gear faster and more enchantments faster, which keeps the cycle going!
Tip #5 – Get Comfortable Using Melee, Ranged, AND Artifacts During Combat
How does combat work in Minecraft Dungeons?
If you think you’re just going to rampage your way through Minecraft Dungeons using a single battle style, think again. Yes, you might eventually be able to just grind your way through the game as a warrior using a war hammer but it won’t be easy. Instead you’d be better served to learn how to use each TYPE of weapon (melee, range, and artifact) and what they do or don’t do in battle. (To be clear, I’m NOT saying you have to learn EVERY SINGLE weapon, just the various types – swords, axes, daggers, bows, etc).
It goes without saying that melee weapons like swords, axes, and daggers work well in close quarters, while ranged weapons are great for long range mobs. But all weapons (even those of the same type) are not created equal in terms of their function or ability.
How are Melee Weapons Ranked?
For melee weapons, in addition to their class (common, rare, unique), the amount of damage they do, and any enchantments you may add, they are ranked in terms of their Power, Speed, and Area covered. They are the right choice if you want to battle up close with mobs.
How do ranged weapons work in Minecraft Dungeons?
Use your ranged weapons too! No matter how much fun you’re having rushing into the middle of mobs with your Poisoned Venom Glaive that has a Freeze Enchantment, you’re life would be a lot easier if you (or at least your teammate) used your ranged weapons first (and during the battle). This is critical during the harder levels when Bosses will send large groups of mobs to try to swarm you – if you only use melee weapons there is a big change you’ll be overwhelmed. Instead use your ranged weapons to thin out the enemy ranks and make it easier to melee against fewer mobs. (This is especially true when you start getting to levels which have Enchanters and similar mobs that hang in the background and use their spells to make the melee mobs fighting you more powerful – use your bow or similar ranged weapon to take out those Enchanters, etc early in the battle!).
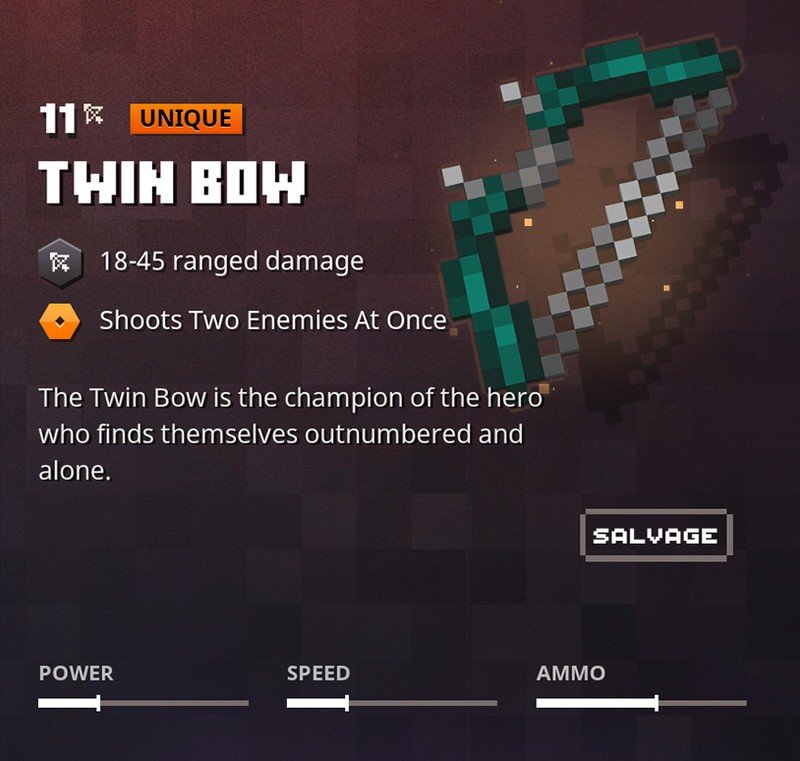
How are Ranged Weapons Ranked?
In addition to their in addition to their class (common, rare, unique), the amount of damage they do, and any enchantments you may add, Range Weapons are ranked by their Power, Speed, and Ammo.
Finally, don’t forget to use your artifacts! Yes, if you are ‘buttoned-challenged’ it may be difficult enough to just try using your melee and ranged weapons, but you’ll do better in the long run if you remember to use those artifacts.
Using your artifacts IN BATTLE is critical because they will either make your melee or ranged weapons more powerful, or they will feature a totally separate power in their own right.
Artifacts in combat is such an important topic, we’ll talk more about later (Tip #16), for now the point is that, if you want to win battles in Minecraft Dungeons you need to be able to use melee, ranged, AND artifacts during the right.
Tip #6 – The Best Weapons & Artifacts are often in CAMP
How do you find the best weapons in Minecraft Dungeons?
It’s not always during level play. Tip #3 is important because playing specific levels is the best way to find specific types of gear, however that does NOT necessarily mean that levels are the only place to find the best gear.
We’ve actually found the most UNIQUE weapons in the CAMP – specifically by trading with the Blacksmith.
Is it better to trade with Blacksmith or Wandering Trader?
Not only is the Blacksmith more economical than the Wandering trader (Blacksmith’s trades are about 1/2 the cost of the Wandering Traders) but he’s given us UNIQUE items a number of times. Specifically we’ve been able to get Spider Armor, Doomsday Crossbows, Fangs of Frost, Nitemare’s Bite, and Venom Glaives from the Blacksmith, as well as that Lightning Harp Crossbow I talked about in Tip #1.
I’m not saying you’ll get unique items from every blacksmith trade, and quite often you just get a lot of junk you end up immediately salvaging. But we’ve found that sticking with the blacksmith over time yields better results.
Our strategy: between each level we do 1-3 trades with the Wandering Trader, and spend the rest of our money with the Blacksmith – it works wonders!
Tip #7 – The MAP is your Friend
How does the Map work in Minecraft Dungeons?
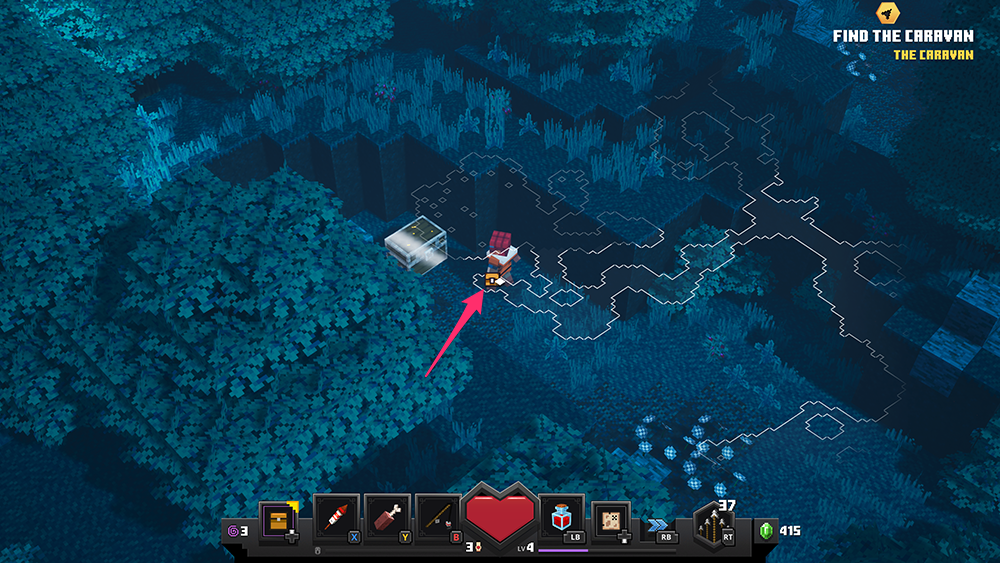
If you really want find chests and secrets in the levels faster then you’ll need to get used to using your map. There are two versions of the map – the overlay you can use while moving around and a more detailed map that pops up by itself.
The overlay map is great for finding all the areas you can possibly get to while playing the game – many of which are easy to overlook until you follow the nooks & crannies of the overlay map. It looks like this…
Overlay Map showing chest location and all accessible blocks
We recommend you keep your map overlaid on the screen at all times except when you are facing Bosses or large swarms of mobs.
The popup map is what you’ll use to find out how many secret locations and total chests are available to find. It also shows you where you have been so far (see the green area on the map below). We recommend you occasionally check the popup map as you play through the level. It looks like this…
Notice the Secrets Found & Chests Opened
It’s important to note that if a block is showing on the map, then there IS a way to get to it.
If there is no easy way to access the block, then you may have to use your ‘fast roll’ ability to ‘jump’ to it (for example if the blocks are separated by water) or you may need to find a hidden doorway or you may need to replay the level when you reach a higher rank, but if the block is on the map, it’s there for a reason and you should try to reach it because a Secret or Chest or an entirely new area could be waiting for you!
Tip #8 – How to Get More Powerful Gear in Minecraft Dungeons
As we said above, the way to get gear in general is by playing through the levels and trading back in camp. As you do those things and as you level up you’ll inevitably get more and better gear, BUT there is another way to get more POWERFUL gear too – especially if you want something specific.
Remember Tip #3 (If you want specific gear, play the level where they are located at and find them easier). you can apply that same tip to getting more POWERFUL gear too.
If you want a higher power version of a specific item, go back and replay the level where it is likely to be found but do it on a higher DIFFICULTY level.
How do you change the Difficulty Level in Minecraft Dungeons?
YOU get to choose the Difficulty Level Setting for each level you play and the higher the Difficulty Level Setting you choose, the more powerful the gear you’ll receive.
The system will give you a Default Setting, but you can elect to move that setting up for down.
Lower the Difficulty Level if you want to practice a level – but get lower value gear.
Raise the Difficulty Level if you want to get more powerful gear – but it will be harder to complete.
We’re not suggesting you increase the Difficulty Level to something far above your current skill level (because you probably won’t get far enough to any loot), but don’t be afraid to try one Difficulty Level above your current skill level because the risk-reward for better gear is worth it, especially because…
Tip #9 – Die WITHOUT Fear of Losing Your Loot
What happens when you die in Minecraft Dungeons?
In regular Minecraft, we’re all scared to die because we fear losing the gear in our inventory, but one of the great things about Minecraft Dungeons is…
When you die in Minecraft Dungeons you do NOT lose your gear – even if you die in the middle of a level!
Additionally, there are a couple more things to know about dying in Minecraft Dungeons:
If you play with friends, so long as one friend is still alive, they can REVIVE you an unlimited amount of times.
Your team gets 3 lives each level AND you get an additional “Last Chance” life – that means the ENTIRE team has to die 4 times before you ‘lose’ that level. This is really helpful in difficult boss battles (see Tip #20)
IMPORTANT – if you are playing with a team and 1 or more people have died, try to revive them as soon as you safely can, otherwise, “Night” will come.
Additional mobs form all around you and AND worst of all a terrifying bat creature repeatedly swoops down and attacks you – savaging your health again and again until you die too!
How do you avoid Night in Minecraft Dungeons?
Revive your friends – so long as everyone is alive, Night will stop.
Tip #10 – Salvage Your Unwanted Gear Quickly
How does Salvage work in Minecraft Dungeons?
You only have so many slots in your inventory and you can’t expand that in Minecraft Dungeons. Because of this it’s important to get rid of your unwanted items quickly. For right or wrong, Minecraft Dungeons does NOT allow trading between players so if you no longer want an item, the only option is to “SALVAGE” it.
Salvaging an item in Minecraft Dungeons gets you a certain number of Emeralds – you can then spend that money back in Camp.
Salvaging an items also gets you back any enchantments you applied to that weapon (see Tip #4).
Salvaging items clears up space in your inventory – don’t be afraid to salvage items you acquire during levels but don’t want even while playing that level. This ensure that you have space to keep new loot you find that you really DO want.
Tip #11 – How to Build Your Character – Experiment
If you read anything about Minecraft Dungeons during the pre-release phase you probably heard a lot of people talking about ‘building’ characters like a Soul Mage, Berserker Warriors, and Frosty Archers (to name a few).
Archer, Warrior, Thief, Mage – It’s YOUR Choice
How do you build a character in Minecraft Dungeons?
The process of ‘building’ a character is neither difficult nor restrictive.
You ‘Build’ your character by equipping it with specific types of weapons, armor, and artifacts AND you can change that as you play the game WITHOUT losing your Level Rank!
Yes, it’s a good idea to know what build you want to play with (warrior, archer, thief, or wizard), because that gives you a plan for what equipment to keep as you acquire it or what levels to replay (Tip #3), HOWEVER you are NOT locked in to a specific build – you can easily change your character as you play the game if you decide you want to.
Tired of playing as a warrior and want to switch to a wizard? Then get an Evocation Robe, some Soul-focused Artifacts & weapons and start casting spells. You just found some Spider Armor and now want to be an Ultra Thief? You can do that too.
One of the best things about Minecraft Dungeons is the ability to create the Custom Character Build of YOUR choice AND to be able to change that as you go WITHOUT creating a new profile and starting over. It’s addictive and fun!
Tip #12 – Pay Attention to Your Health Meter
If you die (and run out of all your lives), then you lose in Minecraft Dungeons and get transported back to camp. If you don’t want to die, then you need to pay attention to your Health Meter – and if you are in the thick of battle it can drain…QUICKLY.
Can you just retreat and regain health in a safe place? No. Unlike in regular Minecraft, (as it stands now) in Minecraft Dungeons you do not get a Health buff just for being idle and resting. Instead, if you lose health, you have to actively DO something in Minecraft Dungeons get it back.
Activate an artifact (such as a Soul Healer or Totem of Regeneration) – doing this may also help your friends.
Have an active enchantment on some of your gear (such as Leeching, Health Synergy or) Explorer
In addition to taking action to REGAIN your health, it’s also a good idea to use a battle strategy that will limit the damage (see Tip #20) and to use artifacts to PROTECT your health. Iron Hide Amulets, Totem of Shielding, and Ghost Cloaks are great for protecting you (and the 1st too help your friends too).
Tip #13 – Choose the Right Weapon for the Job
What are the most powerful weapons in Minecraft Dungeons? Are powerful weapons the best weapons in the game?
That Doomsday Crossbow is cool, but used in the wrong situation it may get your killed. Same goes for the Heartstealer Sword, or the Sun’s Grace Mace.
The higher “power” weapon is not always the best – it depends on the enemy.
If you try to use a high powered, but slow weapon like a Great Hammer against a swarm of Enchanted Baby Zombies, those undead toddlers will eat you alive (literally) – in this case, daggers or another fast weapon (even if it’s low powered) is a better choice.
Just like with the melee weapons, the highest ‘power’ bow may not always be the best choice – particularly if it’s very slow to re-fire like a Heavy Crossbow.
Mob Swarms can Overwhelm you if u have a SLOW weapon
How to Choose the Right Weapon in Minecraft Dungeons:
During level play, when you are NOT facing a boss, you’re better served using faster weapons (even if they are lower powered) so you can withstand the inevitable swarms. When battling zombie, creepers, spiders – sickles, daggers, and multi or rapid fire crossbows are a great choice.
During level play, when you DO face a boss or other stronger enemies, then one or more members of your team would be wise to have a more powerful weapon – because you’ll need that heavy firepower to take down the stronger opponent.
If you need/want to switch weapons, retreat to a safe area and make the change and you’ll be all set.
Tip #14 – Chests are not always visible
How do you find hidden chests in Minecraft Dungeons?
As noted in Tip #7, the map will show you how many Secrets and Chests you’ve found so far. SOMETIMES (but not always) the map will show you where a chest is when you are near it, however there are numerous times where chests and secrets are NOT visible on the map.
In these cases you will have to do one of the following:
Trigger the chest to appear by moving near it;
Open a hidden doorway to find a new area of the map
Defeat a mini-boss or boss mob.
Tip #15 – You Don’t Have to Fight EVERY Battle
When you’re in the thick of combat in Minecraft Dungeons, it’s easy to get caught up in trying to defeat every mob – that’s also a great way to die. But it doesn’t have to be that way.
So long as it’s not a required boss you must defeat for that level, then you can run away from the fight and save your health if need be.
Don’t lose a team life unnecessarily if you are having trouble versus low-level enemy swarms. If you can’t beat them, then simply run through them and move on to the next objective.
Don’t just take my word for it, the Bible says so too! “Anyone who is among the living has hope –even a live dog is better off than a dead lion!” (Eccl 9:4)
Tip #16 – Artifacts are your Best Friends
What are artifacts in Minecraft Dungeons?
In Tip #5 we talked about the importance of using your melee, range, and artifacts in combat and I said we’d revisit the Artifacts later. Well it’s high time we did that.
Learning how to use Artifacts in Minecraft Dungeons is absolutely critical if you want to survive and win the game.
Additionally, artifacts are FUN to use!
Check out that cool WOLF companion
How to use Artifacts in Minecraft Dungeons:
Combo a Death Cap Mushroom to savage faster with a melee weapon.
Enable Fireworks Arrows or (my fav) Torment Quiver with a multi-fire Crossbow and wipe out vast swaths of mobs before they reach you.
Increase your ranks by using the Tasty Bone to call in a wolf companion or the Wonderful Wheat to bring in a Llama to spit on the mobs.
Protect yourself with a Totem of Shielding, Iron Hide Amulet, or Totem of Regeneration.
What’s the bottom line – ranged weapons give you room to breathe, melee weapons are your bread and butter, but artifacts are the key to winning the battle!
Tip #17 – The More People You Play With the Harder the Difficulty
Did you know – you CAN play Minecraft Dungeons alone? It’s true, you can play Minecraft Dungeons Solo and do just fine. In fact, sometimes it may be a wise move to play alone for a bit. Why?
Minecraft Dungeons adjusts the game’s Difficulty Level based on the number of people you play with and the players skill level.
Yes, it’s more fun to play Minecraft Dungeons with friends, however if you are a lower level than the friends you are playing with, and you don’t want to let them do all the work, you can play for awhile by yourself and level up on your own – then rejoin the party when you are at or above their level (and ready to show off some of your fancy new gear!)
Tip #18 – There are Secret LEVELS that don’t appear until you play more.
Although this isn’t necessarily something for Beginners, it’s important to know that one of the early complaints about Minecraft Dungeons is that some players feel the game is too short because they think there are only 10 levels. However, what they don’t realize is that…
Minecraft Dungeons has numerous Secret Levels that don’t appear on the map and some are not accessible until you complete the game one-time through.
The Secret Moo Level of Minecraft Dungeons
Additionally, we know that Mojang already has plans to add more levels in by mid-late 2020 and given the fact that they continually added updates to regular Minecraft, it’s a good bet they will do the same with Minecraft Dungeons.
One of the trickiest things for beginners of Minecraft Dungeons to understand is the concept of using “Soul Power” – in reality it’s not very complicated and it’s worth your while to understand because souls are a powerful weapon in Minecraft Dungeons.
The basic gist is this – some very powerful artifacts use the collected souls of dead mobs to perform their ability.
The Powerful Corrupted Beacon destroys Mobs
What are the best Artifacts that use Souls?
Soul Harvester uses souls to create an explosion
Corrupted Beacon fires a powerful death ray
Soul Healer uses souls to regain your health (and your nearby friends)
Torment Quiver fire slow moving ‘soul arrows’ that knocks back mobs (even behind walls)
Lightning Rod shoots down lightning to destroy mobs
How do you gather souls in Minecraft Dungeons?
The process to gather the souls is easy – you just destroy mobs!
That being said, there are certain things you can do to gather MORE souls. Here are some ideas:
Numerous weapons are designed to collect souls (examples include Soul Knife, Soul Bow, etc).
Certain Armor is better for collecting souls too (Grim Armor, Phantom Armor, Soul Robes, etc)
Using the soul-powered artifacts listed above also generates a small soul collecting ability too.
How do you know how many souls you have?
You’ll know you are collecting souls because you’ll SEE the souls (tiny white circle heads) floating to you after you destroy a mob AND you can look at your Soul Meter (the light blue line beneath your artifacts) to see how full it is.
Soul Meter
For more on the topic of how souls work in Minecraft Dungeons, see this article.
Tip #20 -How to Defeat the Mini-Bosses in Minecraft Dungeons
There are already plenty of guides on how to defeat the big bosses from the Corrupted Cauldron to the Arch Illager, but for players just beginning Minecraft Dungeons, you’ll want to focus on strategies for how to defeat the mini-bosses so you can survive long enough to reach the bigger bosses.
Mini Bosses like Evokers, Enderman, Skeleton Horsemen, and the dreaded Redstone Golem can wreak absolute havoc on new players who aren’t prepared to face them. You think 4 team lives is enough when you’re getting swarmed by mobs AND the mini-boss? Think again.
So what can you do to survive these fights if your new to the game?
When you enter an area that has a mini-boss or boss, before rushing in and losing one or more lives in a flash, stay back, and observe the situation. If need be, retreat to an area of safety and think of a plan. Only then should you enter the battle – this will ensure you save your team lives and don’t end up losing the game and having to start over.
Best Strategies to Defeat Bosses in Minecraft Dungeons:
Clear out the trash first – if the mini-boss is surrounded by lesser mobs, use ranged weapons to thin their ranks, otherwise, that large group may overwhelm you before you get to the mini-boss or they may harass you while you are focusing on the bigger opponent and drain your health while you are not paying attention.
Don’t be afraid to HIDE – nobody said you have to stand toe-to-toe with a larger opponent and let them hit you. If you know the Redstone Golem is on his rampage or the Nameless One is about to attack, run away from them and hide behind something, until things calm down. This is especially important if you are low on health and need time to recover.
Float Like a Butterfly, Sting Like a Bee – like a good boxer, strike with a purpose, then back away. For example, after hiding vs the Nameless One, send a few Fireworks Arrows his way then hide again. For the Redstone Golem, wait till he punches himself out and stops and then attack from behind. Repeat again and again until you defeat them.
Use those Artifacts – at the risk of sounding like a broken record, I’ll say it again – artifacts are your friend. More than anything else they will help you defeat the mobs (big or small) in Minecraft Dungeons.
Totem of Shielding works wonders against missiles coming your way. Totems of Regeneration are a massive help to restore health when you’re low on health potions.
Iron Hide Amulets give you (and your nearby friends) a nice defense buff.
Wind Horns clear out space.
Anything involving Souls is a huge!
And the list goes on
When in doubt, use Ranged Weapons – nobody said you have to make the game harder than it already is. Nobody said you have to get close to the mini-bosses and use melee weapons. If you like fighting hand-to-hand, that’s fine, but it’s far easier to stay away and use crossbows and power bows to defeat mini-bosses in Minecraft Dungeons. It’s a LOT easier this way.
Be Patient – it takes time to bring down a boss or mini-boss. You’ll need to fight wave after wave of lesser mobs, wait for the mini-boss to go through all this attacks, and then be selective in your attacks to remain safe. Let the cycle play itself out, do your part and you’ll be fine.
Minecraft Dungeons – Our Favorite Guides
This website is all about seeking wisdom and sharing wisdom. As I’ve said many times, I don’t know everything and don’t pretend to. I’m just an Average Joe like you and I like playing video games with my family. When I find helpful articles I like to share them with friends. In the case of Minecraft Dungeons, here are the Strategy Guides on other sites we have found to be the most helpful so far.
Are you seeing a blank yellow or black screen on your tv while watching via an Amazon Fire TV Stick? This very problem happened to me while watching Netflix on my Firestick. Luckily I found a fix for the Amazon Fire TV Blank Screen dilemma – the solution worked for me and I wanted to share it with you.
Before the problem, my Amazon Fire TV was working just fine…
This is normal
I was watching a Netflix show and then suddenly the screen went completely yellow and looked like this…
This is NOT good
Is it a TV, HDMI, or an Amazon Problem?
When the Amazon Fire TV Yellow Screen problem first happened, I thought maybe the issue was with my Samsung TV or the HDMI cable.
First I checked the other ‘source/inputs’ on the tv and since they were working fine I figured it wasn’t a tv problem.
Then I checked the HDMI cable and inputs on both ends and that too seemed fine.
It was during the process of checking both the tv source/inputs and the hdmi cable that I discovered that the problem was related to the Amazon Fire TV itself.
Here’s how I learned it was an Amazon Fire TV issue – when I unplugged and replugged the Fire TV Stick into the tv’s HDMI port I noticed that the Amazon Fire TV Home Page came up briefly and then a few seconds later the screen went completely yellow. I repeated the test and the same thing happened.
Now that I knew it was an Amazon Fire TV issue I went online to search for answers. Luckily I found one!
Amazon Fire TV Yellow Screen or Black Screen Fix
Apparently the Amazon Fire TV Blank Yellow or Black Screen is related to screen resolution settings that manage the resolution “communication” between the Amazon Fire TV and the TV itself. For whatever reason that communication got interrupted and needed to be reset. The fix for that is easy to do but not something you’d likely figure out on your own.
Under normal circumstances, when there is a problem with the Amazon Fire TV, the fallback fix is to simply ‘reset’ the Fire TV from the Settings Menu. Unfortunately you can NOT get to the Settings menu when your entire screen is yellow!
So how do you fix it?
Luckily there is a hidden solution you can do with your Amazon Fire TV Remote…
Press and hold the ‘up’ & ‘rewind’ buttons in your Amazon Fire TV Stick remote for 5 seconds
Here’s where the buttons are…
Press Up and Rewind buttons at the same time for 5 seconds
When you press the Up and Rewind buttons on the Amazon Fire TV Stick for 5 seconds you will trigger a reset of resolution ‘communication’ between the Fire TV and your TV. You’ll know it happens when you get a screen like this…
And that my friends is the fix for the dreaded Amazon Fire TV Yellow Screen. It worked for me and I suggest you give it a try too if you are facing this issue.
Amazon Fire TV Blank Screen Fix References.
I didn’t discover this fix on my own and instead found it on the internet. Here are the helpful sites I learned it from…
Getting a dog is a big deal – this cuddly ball of fur will quickly become a beloved member of the family. Before you make the leap to dog ownership, though, make sure you’ve thoroughly planned for the financial responsibilities of giving your pet a good home. You’ll need to make sure you have enough money to provide your pet with food, health care, training if needed, and insurance.
Responsibilities of a Dog Owner
Dogs need plenty of love, but animals can’t survive on only that. They’ll need much more, and as their owner, it’s your job to supply everything they need to grow and thrive.
You may be surprised at how much your dog eats and how much top-quality dog food can cost. You’ll also need to consider grooming, and if you have a puppy or an untrained dog, you might want to have them trained. If you don’t have the money to hire a trainer, you can do it yourself by reading articles and being willing to put the time and effort into it.
Your dog will have to be walked – they need plenty of exercise. You must have your pet on a sturdy leash in public places and take supplies with you to clean up after them when they need to relieve themselves.
You might also want to give your dog some toys. That can provide a lot of entertainment for both you and your dog.
The Basic Costs of Owning a Dog
Wondering how much pet ownership will cost you? It’s more than simply paying for their food, so you’re wise to consider money ahead of time. It shows you’re willing to put in the effort to be a responsible pet owner.
Some of the things you’ll have to pay for may include dog walking, collars, leashes, beds, food, treats, medical care, etc.
Let’s look at four of the basic costs in more detail:
Medical care preventatives: This varies quite a bit depending upon your dog’s health and conditions. It’s important for dog owners to recognize the differences in policy coverage restrictions before selecting the best pet insurance. The average starting premiums for dog insurance coverage is roughly $32.
Food: This is going to depend upon how energetic your dog is, the quality of food, and what size your dog is. Generally, you can expect to pay anywhere from $20 to $60 per month for one dog. Food cost can be as much as $100 per month if they require certain diets.
Grooming: Dog grooming will vary in price depending upon your location, the scope of the grooming, and the size of the dog. Typically, you can expect to pay anywhere from $30 to $90 per session.
Dog walking: If you can’t do it yourself, you’ll have to hire someone. Depending upon where you live, expect to pay $10 to $30 dollars for a half hour of walking. A daily walk could add up to $70 to $210 on your budget per month.
Here’s a good infographic on this topic…
Source: InfographicsShowcase.com
Pet Insurance Costs and Coverages
Pet insurance is optional, but with the rising cost of veterinary care, it may pay off big time. Not only will It help protect your dog, but it will also guard your wallet.
Basic Costs of Pet Insurance
Pet insurance works primarily like your own healthcare plan. You’ll pay a monthly premium, which will cover certain things under the plan. For moderate coverage, you should expect to pay anywhere from $20 to $60 a month. To get the best plan available, for certain breeds, you may pay as much as $100 per month.
What Does Pet Insurance Cover?
Usually, things like annual wellness checks, screenings, and preventatives are included, but it will depend on your plan and the company you buy insurance through.
Wellness plans: Wellness plans cover things like annual exams, vaccinations, heartworm prevention, flea control, and more.
Accident and illness: You might see this one referred to as a comprehensive plan because it’s your most complete and expensive option. It covers accidents, like bone breaks, and illness like infections or cancer. Though it won’t cover pre-existing conditions.
Accident only: This coverage won’t cover illnesses but will cover accidents such as bites from other dogs, accidental poisoning, or injuries from car accidents.
Bottom Line
Before becoming a pet owner, you should take a look at your budget and time. While you don’t need to spoil your dog, you should provide them with their basic needs and properly budget for pet ownership.
About the Author
ThatHelpfulDad.com is pleased to feature the work of ANDY KEARNS in this guest post. Here’s a bit more about him…
Andy Kearns is a Content Associate for LendEDU and works to produce personal finance content to help educate consumers across the globe. When he’s not writing, you can find Andy cheering on the Lakers, or somewhere on a beach.
I recently had the pleasure of testing out a chef knife from Kitsune Cutlery – the flagship product of an exciting new knife company capitalized with Kickstarter funding. In this article I’ll tell you why I enjoy using this knife and how you can check it out for yourself.
About the Editor: Hi, I’m Mike, That Helpful Dad. As noted in my Trust Guarantee, when you see a product mentioned on my site, please know that these are products that I personally use and enjoy – including this new Kitsune Knife.
Why I enjoy the Kitsune Chef Knife
When it comes to the new Kitsune Chef Knives, there are 3 things I really like about them.
They’re sharp! As with similar Japanese knives made with multilayered steel (in this case 67 layers of Damascus Steel), Kitsune’s chef knives have a razor sharp edge – perfect for making fine cuts in your home chef work.
They’re beautiful! The craftsman Kitsune uses to make these blades do a fine job of hammering in beautiful patterns into the blades giving them a stunning appearance you’ll want to show off in your kitchen.
They capture the spirit of Japanese Chefs – each knife comes in a gorgeous wooden gift box that showcases a Kitsune foxes looking at Mount Fuji. The boxes are then wrapped in one of six Furoshiki scarves. I was lucky enough to have mine in the Dancing Fox wrap as you can see here…
Dancing Fox with Lotus Leaf Hat
Overall I found the blade to be a great size for my home chef tasks – at 10 inches it’s in the sweet spot for a variety of tasks and the knife design allows you to easily perform cutting, chopping, rocking, and more.
While my favorite knives are still made by Dalstrong, I also enjoy using my new Kitsune knife too. If you’re in the market for a new chef knife and a Dalstrong is out of your price range, but you still want to try your hand at Japanese Steel, you’d do well to consider a Kitsune Knife.
This weekend I made my dad’s world-famous Buffalo Chicken Wing Recipe again – and man was it good! If you like Buffalo Wings that are crispy, juicy, and full of flavor, you’ll want to try this Buffalo Wing recipe for yourself – it’s got a secret ingredient that adds so much flavor you’ll wonder why you didn’t think of using it before.
I’m cooked my Buffalo wings in an Ooni Pizza Oven for a wood-fired effect but u can make this buffalo chicken wing recipe on any grill or oven. Best of all this Buffalo Chicken Wing Recipe is EASY to make, easy to customize to your tastes, and so much fun to eat!
Give it a try & let me know what tips YOU have to share.
Buffalo Chicken Wing Recipe – The Video
SKIP AHEAD in the video with these timestamps:
00:38 Kamado & Ooni Pizza Oven views
01:10 Fuel Source (lump charcoal + cooking wood)
01:20 Wings in Marinade
01:50 Getting the Ooni Oven up to temp (watch the temp gauge climb!) 02:20 FIRE – it’s a beautiful thing!
02:35 Wings are ready to cook WITHOUT sauce
03:30 Buffalo Sauce Recipe Ingredients. Discussion on Hot Sauce to Butter Ratio
06:40 Buffalo Sauce Mixed (see below for recipe itself)
I have the full text version of the Buffalo Chicken Wing Recipe – including a step-by-step – on my grilling website called LordoftheGrills.com. Here’s a link you can use to go to that page…
Click this pic for the text version of the recipe.
About the Products used:
Because of the Coronavirus pandemic, chicken wings are in short supply so I could only find I Costco Party wings – normally I’d cook the whole wing with all 3 sections (drumstick, wing, and tips).
Here are the other products I cooked with if you are interested…
Why is this the BEST Buffalo Wing Recipe? Because I’ll show you how to make CRISPY hot wings that are FULL of flavor – using my Dad’s secret ingredient! I’ll share my Buffalo Sauce Recipe & also discuss the RATIO of Hot Sauce to Butter (it’s a ‘hot’ topic!).
[lwptoc]
Cook this Buffalo Wing Recipe on Any Grill or Oven
Today I’m cooking Buffalo wings in an Ooni Pizza Oven for a wood-fired effect but u can make this buffalo chicken wing recipe on any grill or oven. Best of all this Buffalo Wing Recipe is EASY to make, easy to customize to your tastes, and so much fun to eat!
Give it a try & let me know what tips YOU have to share.
Best Buffalo Wing Recipe – The Video
Buffalo Wing Recipe Video
SKIP AHEAD in the video with these timestamps:
00:38 Kamado & Ooni Pizza Oven views
01:10 Fuel Source (lump charcoal + cooking wood)
01:20 Wings in Marinade
01:50 Getting the Ooni Oven up to temp (watch the temp gauge climb!) 02:20 FIRE – it’s a beautiful thing!
02:35 Wings are ready to cook WITHOUT sauce
03:30 Buffalo Sauce Recipe Ingredients. Discussion on Hot Sauce to Butter Ratio
06:40 Buffalo Sauce Mixed (see below for recipe itself)
Before we get into the recipe for the Buffalo Wing Sauce, let me give you a few notes:
This recipe is so freaking easy I didn’t show the actual melting of butter or mixing of ingredients in the video because I figured you are smart enough to know how to do that.
IMPORTANT:we do NOT cook the wings with the sauce on to start. Instead we cook the wings WITHOUT sauce first.
U can make the Buffalo Sauce Recipe after you get the wings started cooking. See Step 4 in the Buffalo Wing Sauce Recipe below for more on how & when to sauce the wings.
Buffalo Wing Sauce Recipe Step-by-Step
Step 1: Marinate the Wings (OPTIONAL)
Wings in Marinade
Put defrosted wings into zip lock bag with a combo of rub of your choice (I used Paul Prudhomme’s Red Magic which is great on chicken too) + 1 TB of EVOO + 1 TB of Kosher Salt.
Mix the wings around in the bag with the marinade ingredients so wings are well coated
Marinate the wings for up to 24 hours.
I did 12 hours for the vid, but you can do it in as little as 1 hour if you don’t have time.
Although u can skip this step, if you do it, you’ll get an extra ‘depth’ of flavor beneath the buffalo sauce so do the marinade if you can.
Step 2: Gather Ingredients for Buffalo Sauce
Buffalo Wing Sauce Ingredients
Franks Red Hot Sauce (ORIGINAL not the “Buffalo” version)
Butter
Good Season’s Italian Dressing Dry Mix (1 Packet) – the SECRET Ingredient!
My vid only used 3 basic ingredients in the sauce itself (salt was added later), but you can experiment next time with a little Lemon Juice, Fresh Basil, Worcester Sauce, Smoke Paprika, other Rubs, or whatever you like
Step 3: Decide YOUR Ratio of Hot Sauce to Butter
The ratio of hot sauce to butter that produces the best Buffalo Wing Recipe it a ‘HOT’ Topic and one that’s full of controversy. But the answer is really quite simple – the correct ratio of Franks Red Hot Sauce to Butter depends on YOUR preference.
What’s the “Official” ratio of Frank’s Red Hot Sauce to Butter?
The Official ratio is 3 parts butter to 2 parts hot sauce
But that’s NOT my preference.
Instead I like to use a ratio of hot sauce to butter that’s MY preferred ratio is the opposite…
3 parts hot sauce to 2 parts butter.
In my opinion, this will give you a nice MEDIUM heat buffalo wing that looks like this when sauced…(BUT do NOT sauce the wings yet – we’ll do that later in the recipe AFTER the wings cook). This pic is must a little preview 🙂
Wings in Sauce
But that’s my preference. YOURS may be different so change the hot sauce to butter ratio depending on what you like.
What’s the Math on 3: 2 hot sauce to butter like in my vid?
For 2 tablespoons of butter, use 3 tablespoons of Hot Sauce.
In this vid I used 1/4 cup melted butter (4 TB) to 1/3 cup hot sauce (6 TB).
HOT OFF THE PRESSES – My “Buffalo Insider” says here are the TRUE ratios from hoods of his town…
MILD Wings: 3 parts butter to 2 parts hot sauce
MEDIUM Wings: 4 parts hot sauce to 2 parts butter
HOT Wings: Only Frank’s, no butter (and find the Frank’s Xtra Hot version if you can)
NUCLEAR Wings: 1 Cup of Frank’s Xtra Hot to 2 TB of Habanero Mash (but be careful – it’ll put hair on your chest for sure!)
How much sauce do you need?
In my vid, I had enough sauce for 12 wings + extra to dip in. If you are making more wings, make more sauce.
Step 4: Mix Buffalo Sauce Ingredients:
Melt Butter
Add ingredients to a medium size mixing bowl and mix
Do NOT put the wings in the mix until AFTER you cook them to temp (165F)
It will look something like this…
Step 5: AFTER wings are cooked at or near temp (165 F), THEN…
At this point YOU have a decision to make. Do you want your Buffalo wings WET or DRY? I.E. do you want the Buffalo sauce dripping on the wings or do you like the Buffalo Sauce cooked onto the wings?
The answer to that question will determine if you are done cooking or not. If you like WET Buffalo Wings then sauce them & either serve them immediately. If you like DRY Buffalo Wings then you’ll put them back in the oven. In BOTH cases you’ll put cooked wings in sauce for this step…
It’s YOUR CHOICE:
If you like WET wings, sauce wings AFTER they are cooked & serve immediately.
If you like CRISPY wings, sauce wings AFTER initial cook to temp & then put them back in oven for 5 mins with sauce ON so wings will crisp up with sauce on them.
If you do like CRISPY Buffalo Wings like me, then here’s what they’ll look like if you cook the sauce onto them.
These Buffalo Wings are Crispy and Amazing!
Step 6: EAT & ENJOY
Congratulations, you’ve just made the best Buffalo Wing Recipe on the planet. Now grab a beer (if you don’t already have one) and enjoy eating your awesome Buffalo Wings.
I’m guessing when you’re done, it will look something like this…
What happened to the wings?
These wings are AWESOME. They are the Best Buffalo Wings you will ever have because they are easy to make and have the perfect combo of FLAVOR + HEAT AND the wings are CRISPY.
It’s time for YOU to try this recipe. Give it a shot and let me know what you like or what you might do different.
About the Products used:
Because of the Coronavirus pandemic, chicken wings are in short supply so I could only find I Costco Party wings – normally I’d cook the whole wing with all 3 sections (drumstick, wing, and tips).
Here are the other products I cooked with if you are interested…
Netflix Best Shows – want some ideas for what to watch on Netflix? I’ll give you 25+ series to watch on Netflix right now, including Money Heist, Ozark, Tiger King, Peaky Blinders, Narcos Mexico, Kingdom, Messiah, You, Dark, and many more. We’ll give you ideas on what to watch on Netflix by breaking down the shows into categories like Must Watch, New Popular Shows, Old Favs, etc. Ready? Let’s go!
Best Shows to Watch on Netflix – The Video
SKIP AHEAD in the vid with timestamps below…
Best Shows to Watch on Netflix – The Must Watch List
Start with these Netflix series if you haven’t seen them yet
00:25 Breaking Bad (Netflix Best All Time Show)
00:55 Ozark (starring Jason Bateman)
02:05 Stranger Things (80’s Pop Culture)
02:46 Narcos (Drug Lords)
03:22 Narcos Mexico
03:48 Better Call Saul (prequel to Breaking Bad)
Best Netflix Shows – Gaining Popularity
04:09 Money Heist (#1 Show in 2020 so far – more views than Tiger King!)
04:44 Peaky Blunders (Irish Mob)
05:08 The Crown (Queen Eliz)
05:38 Dark (One of my favs)
06:19 Mindhunter (Serial Killer Profilers)
Best Shows to Watch on Netflix – Loyal Fan Bases & New Discoveries
06:50 Black Mirror 07:07
13 Reasons Why (Teenage Angst)
07:48 Broadchurch
08:04 The Messiah (NEW Must Watch)
09:04 The Witcher
09:22 Elite (featuring stars from The Money Heist)
09:49 Love is Blind
10:10 Altered Carbon
10:33 The Order 10:47
You (Possessive Relationship 101)
Best Netflix Shows – Reality & Documentaries
11:30 Mind of Aaron Hernandez
12:08 Keepers
12:18 Wild Wild Country (Indian Cult invades Western US)
12:31 Making a Murderer
12:52 People vs OJ Simpson
13:35 TIGER KING (it’s all kinds of crazy!) – note: this review of trimmed by YouTube due to Netflix Claim
14:28 The Chef Show
15:30 Final Table
15:43 Ugly Delicious
16:04 Night on Earth (animals at night)
16:20 Our Planet (amazing 4k)
Best Shows to Watch on Netflix – Don’t Forget these old favorites
Are you a parent confused about whether a mobile monitoring app can help your keep your child safe? You must have read about how mobile phone use has increased among children and teenagers. You probably feel worried about dangers like cyberbullying, access to inappropriate content, or online scams that children are exposed to. Are you considering using a mobile monitoring app? Don’t worry; you have come to the right place! In this article, we will review one of the best child monitoring apps for 2020 called XNSPY. We’ll answer all your questions and also identify the most important features of the app.
About the Author
Alex Miller
ThatHelpfulDad.com is pleased to feature the work of Alex Miller in this guest post. Here’s a bit more about Alex…
“I am a tech enthusiast, programmer and a sci-fi fan. I enjoy reviewing and researching new, innovative software that adds value to human life. I love writing about latest technology and trends, and have made this a full-time job.”
What is XNSPY?
XNSPY mobile monitoring app is used by parents all over the world to keep track of their child’s digital activities. It offers important features that can prevent incidents of cyberbullying, scams, or other similar dangers.
Let’s review some of the reasons why we think XNSPY is the best child monitoring app…
Features that make XNSPY the Best Child Monitoring App
Telecommunications Tracking: XNSPY can monitor all calls made to and from the device. This information is detailed in a call log that lists all incoming, outgoing, and missed calls, along with their date, time, and duration. You can also record calls and listen at your convenience. However, there is no live-call intercept feature available with the app. Similarly, XNSPY can monitor all exchanged texts too.
GPS Tracking: You can use the GPS tracking feature to monitor your child’s location in real-time. The app also offers a geofencing feature. Just mark a specific location on the map to geofence it. XNSPY will alert you if the fence is violated. This is a useful feature if you want to prevent your child from accessing inappropriate locations such as bars or clubs. It can also give you peace of mind to know that your child is at a safe place such as at school.
IM, Text, and Social Media Monitoring: Most children and teenagers rely heavily on instant messaging, text, and social media apps for communication and socializing. Incidents of cyberbullying also occur on these platforms. You can use the IM, text, & social media monitoring feature to track apps such as Facebook Messenger, WhatsApp, Viber, Skype, Tinder, and others.
Online Activity Monitoring: XNSPY mobile monitoring app tracks all web-based activities such as bookmarked pages, complete web browsing history, and all exchanged emails. However, you would have to purchase a separate content filtering app as XNSPY does not offer such a system.
Control Your Child’s Phone Apps
Phone Remote Control: You can use the app to remotely control your child’s phone. Some features in this department are a bit on the intrusive side, such as microphone recording and screenshots. However, other features are quite useful. For example, you can remotely view all installed apps and block those you feel are unsuitable or inappropriately used. Similarly, you can view all saved contacts, lock the device, restart it, and delete all saved data in case of theft. The app management and screen-time management features are particularly handy if you are looking to prevent addictive behaviors.
Watch List Word Alerts: The watch list alert feature is among the most valuable features provided by the XNSPY mobile monitoring app. You can add any word, contact number, or a location to the app’s watch list and XNSPY will immediately notify of any relevant activities. For example, you can add words related to pornography to the list. The app will watch out for those terms and if they are mentioned in any text message or typed into a search engine, XNSPY will quickly send you an alert. Unlike with other monitoring apps, you do not need to track phone data at all times. XNSPY will provide the right information at the right time. This way, you can intervene in a timely fashion.
Use Watchlist Words for Monitoring
XNSPY Additional Functions: Other features available with the app include a keylogger that creates a record of all keystrokes, calendar access, and an analytics report that lists important information. This includes details such as top callers, most-visited websites, and other data.
Sounds good! How much does XNSPY cost?
There are two versions of the XNSPY app available for subscription. The basic version costs USD 4.99 per month but doesn’t offer all features. On the other hand, the premium version costs USD 7.49 a month but offers all available features. We suggest you opt for the premium version as the price difference between the two is marginal.
XNSPY Plan Options
Is it compatible with my phone?
XNSPY mobile monitoring app is compatible with all Android versions above 4.0 and supports all iOS versions above 6.0. Most mobile phones currently in use are running on one of the aforementioned versions, so compatibility should not be a problem.
While the installation process is different for both Android and iOS. Let’s go through this step by step on how to install XNSPY on both operating systems.
XNSPY For Android
Step 1: Head over to the XNSPY website and select a suitable subscription package. Make the payment and then check your email inbox.
Step 2: The email will contain a download URL, your XNSPY login credentials, and instructions on how to install the app.
Step 3: You only need physical access to the phone once, so you can install the app. You’ll download Xnspy using a download URL emailed to you. It should not take more than a couple of minutes. XNSPY is completely hidden after that point.
Step 4: Wait for 24–48 hours so the app can begin transferring data from the phone.
Step 5: Log in to your XNSPY account on the app’s website and select the relevant Android phone in the “My Devices” tab on the top left corner.
Step 6: You can access all the data and device control options via the menu bar on the left. All monitoring is remote. You can log in to your account from any web browser, anywhere in the world.
XNSPY For iPhone
Step 1: Visit the XNSPY website and make the payment on your chosen subscription package.
Step 2: Wait for an email that contains instructions on how to install the app, along with your unique log in details.
Step 3: You do not need to physically access the iPhone to install XNSPY. However, you need to have the Apple ID details of the phone you wish to monitor.
Step 4: Make sure that the iCloud backup feature is set to “on” for the device. You can do so in phone settings.
Step 5: Log in to your XNSPY account and select the relevant iPhone from the “My Devices” tab.
Step 6: Enter the Apple ID details and wait for verification.
Step 7: You can now access all data and use device control options through the tab on the left.
XNSPY Additional Considerations
Okay, I get it; but are there any pros & cons I need to consider?
Yes. Like all other services, XNSPY mobile monitoring app also has some advantages and disadvantages. Let’s take a quick look at some pros and cons.
Pros
XNSPY is among the most affordable monitoring apps currently available on the market.
The watch list alert feature is particularly unique and available with other services.
The app enjoys a solid reputation owing to its quality customer support.
Cons
Features such as microphone recording or screenshots are quite intrusive.
There is no content filtering service.
You may have to root or jailbreak the device if you want to use some specific features.
What’s the Verdict
XNSPY is a sophisticated monitoring app that offers a good combination of functions. The app has its drawbacks, such as a lack of content filtering systems. Considering that many such apps are free of cost, this limitation should not be a problem. At any rate, the app more than makes up for it with unique features such as watch list alerts, along with a very affordable price tag.